A simple step by step guide on how to install a new Hard Drive into a desktop Computer. So you just went out and bought a brand new hard drive and got home, so what now ? Many people find that working on a computer or even opening one up can be a daunting task, well today we will guide you through installing your brand new hard drive.
First lets look at the different hard drive types
Computing has come a long way over the last 25 years and so has hard drive technology. Today have a few different options when it comes to hard drive selection, speed and for factor. meaning, how they will be installed into a computer.
The SSD and Mechanical SATA Hard Drive
SATA or serial ATA refers to how the hard drive is connected to your computer. This is mostly likely the most common type of hard drive on the market today, The SATA Hard Drive or Serial-ATA drive came around in the late 2000’s and has since been the due facto standard of computing in Desktop and laptops you will most likely find one of these hard drives installed.
They are cheaper compared to SSD (Solid State Drives) and NVME hard drives and offer larger storage for less cost overall. SATA Hard drives comes in conventional mechanical hard drives as shown below first or as an SSD SATA hard drive that’s shown last.

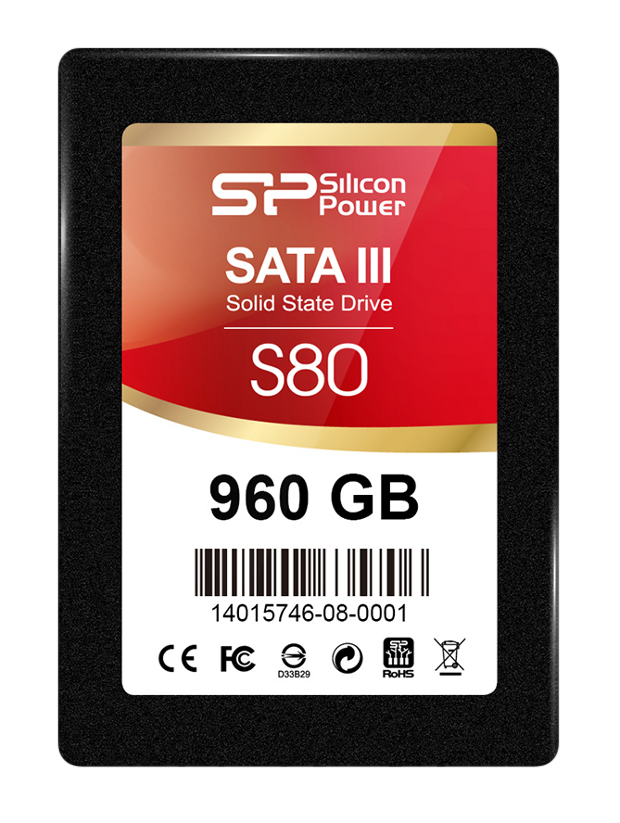
Both SSD and mechanical SATA Hard Drives are common today and their use cases will vary slightly. If you want speed then SSD is the way to go, if you want storage capacity then the conventional mechanical SATA Hard drive is recommended. They also have different sizes where a conventional mechanical SATA Hard drive is 3.5″ and a SSD SATA Hard Drive is 2.5″.
The key differences between HDD naming schemas.
We will look at two brands, Western Digital and Seagate. Both of these are industry leaders when it comes to Hard Drive storage and has been around for a very long time. Both offer different types of hard drives to suite a specific roll when choosing a hard drive. Some manufacturers also have different roles that mechanical hard drives are used for.
Western Digital Hard Drives
WD Blue – This hard drive offers a good overall value for money and is common on work stations and laptops in general.
WD Red – These hard drives are mostly used for NAS Servers or storage servers where you want the reliability and speed to matter.
WD Purple – Used mostly for surveillance and CCTV, they can run for long periods of time continuously.
WD Black – Performance focused, if gaming is your thing or content creation then this is the drive you need to look at.
WD Gold – These hard drives are meant for enterprise systems. Expensive so not used at home unless you want too.
Seagate Hard Drives
Seagate Barracuda – This is the main stain of Seagate, a good overall value for money hard drive. Perfect for work stations and home desktops computers.
Seagate IronWolf – These are used for storage and NAS Servers, much like the WD Red drives.
Seagate SkyHawk – This is the surveillance type hard drive for DVR and NVR systems.
Seagate Exos – Hard drives commonly used in enterprise systems. Not really recommended for desktop home use.
Understanding M.2 and NVMe
Now lets talk speed, M.2 and a lot of confusion.
M.2 refers to the form factor of an SSD. M.2 is the newer and smaller form factor than the previous SATA specification. M.2 is usually faster but more expensive.
M.2 sizes can vary, with possible widths of 12, 16, 22, or 30 millimeters, but they’re generally 22 millimeters wide. Lengths can also vary, coming in 16, 26, 30, 38, 42, 60, 80, or 110 millimeters. Newer Motherboards and laptops will accommodate a variety of lengths for an M.2 module to allow for flexibility, while the width is more fixed.
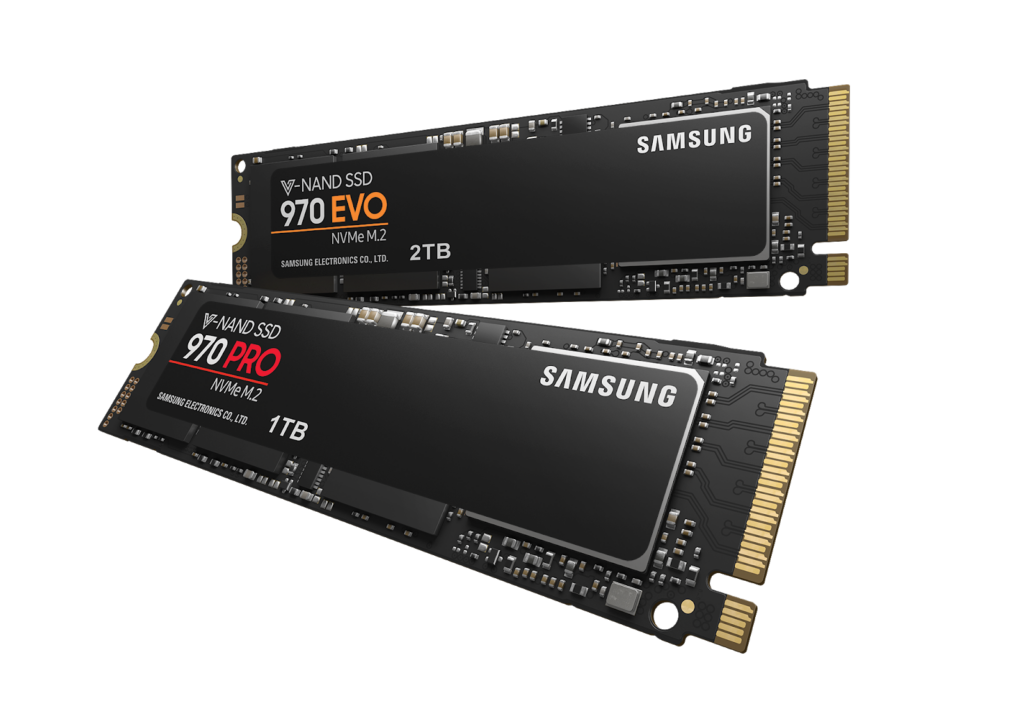
NVMe (NVM Express™, or Non-Volatile Memory Express) is a communication protocol designed specifically to work with flash memory using the PCIe interface on your computer and can move data muck quicker then SATA can.
If you want to have a computer boot in seconds or you just don’t want to wait for applications to load then your best bet is to install a NVMe Drive. However they can be quite expensive still as its the newest out on the market currently. They typically look like this.
You can read more about the differences here.
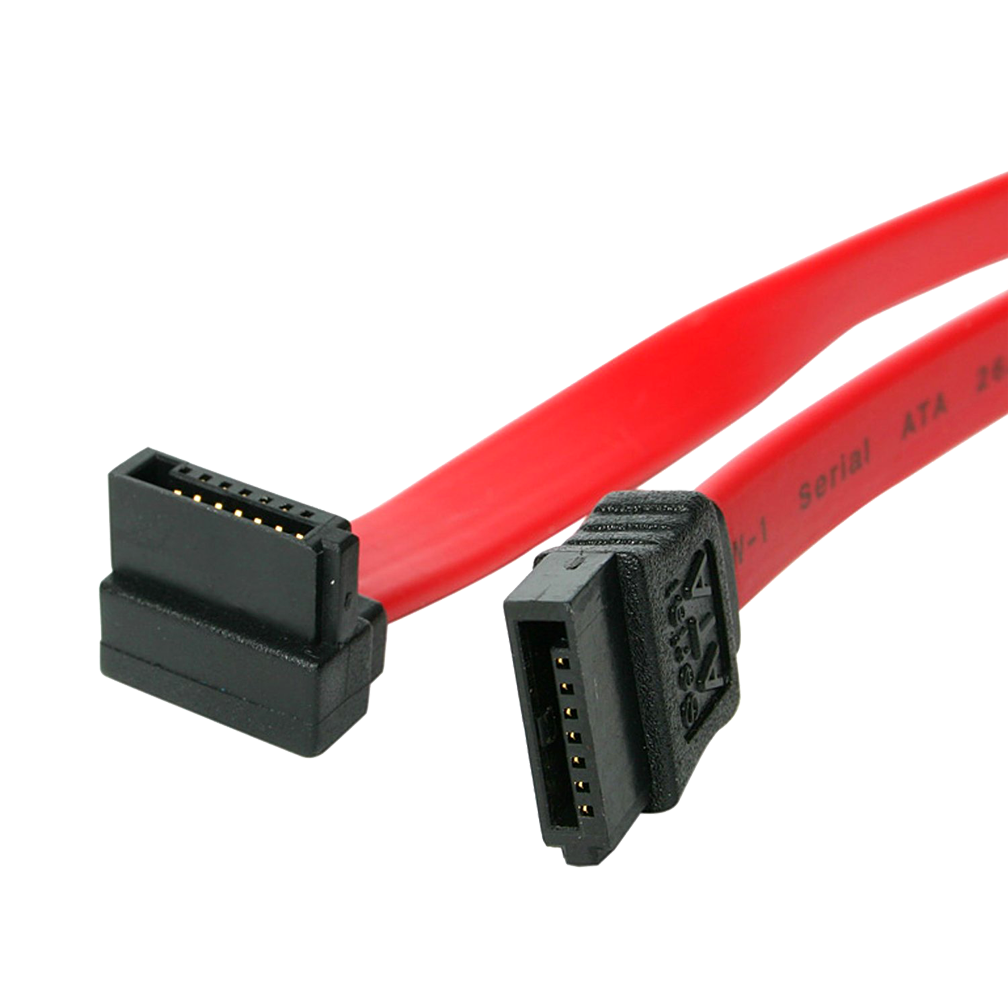
Don’t forget to purchase the SATA data cable
Most often when you purchase a hard drive it will not come with the required cables you will need. A SATA Hard Drive requires a SATA data cable and a power cable. The SATA cable is normally a red or blue or even black wire indicated below. Red is the most common and the color does not matter. its for aesthetics only.
The power will be provided from your power supply and usually a desktop PC will have at least one power plug available, but if you don’t have one available then you can always buy a Molex to SATA power adapter or you will need to get a newer power supply.
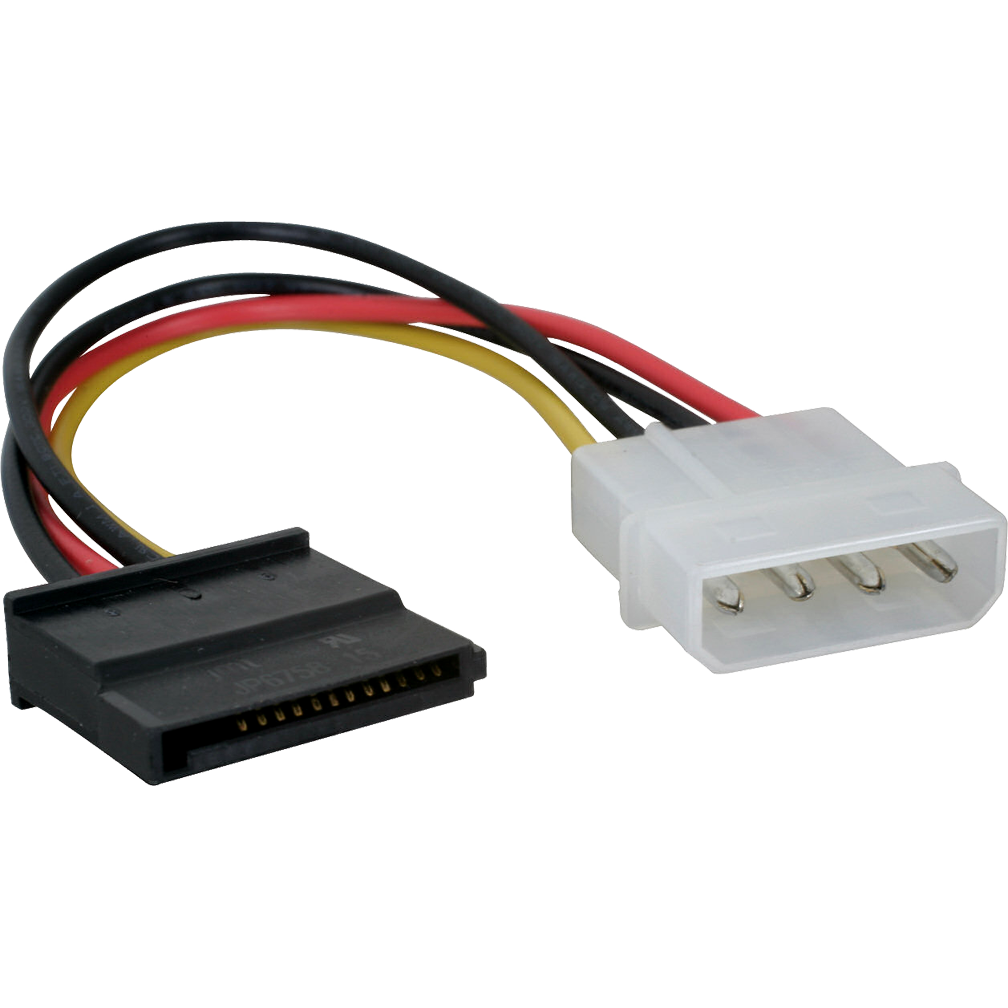
Note: The power and Data cable is the same for all SATA specification of Hard Drives, it doesn’t matter if you purchased a Seagate IronWolf or a WD Black. The SATA power and data cable will be the same. M.2 SSD and NVMe Hard Drives gets their power from the socket and do not require additional cables.
Installing the SATA Hard Drive into a desktop PC
Okay, you bough a new SATA hard drive and just got it, now what ?
Installing the SATA Hard Drive procedure
Step #1 – Power off your Computer and unplug it from the mains.
Step #2 – Unplug your PC and lie it on its side. the Mother board connections should face down when laying the PC Tower on its side.
Step #3 – Locate the two screws holding the PC towers side panel in place. Some cases will have clips, others will have hidden magnetic latches.
Step #4 – Gently remove the PC side panel, some clip off some slide off backwards, please check on the manufactures website to see how to open the PC tower if you are not sure.
Step #5 – Once the Panel is of you will see the motherboard and a bunch of wires, Look for the SATA connectors on the Motherboard. They are usually located near the edge on the right hand side, some might be located on the side of the motherboard. Again, if you are not sure check your motherboards manufacturer’s website for you make and model or if you have the manual, check that.
Step #6 – Connect the SATA Data cable to the motherboard’s available slot. The numbering does not matter however some motherboards share the last 2 or so SATA connections with the PCI lanes so they might not work if you also have a NVMe drive installed. For simplicity we will assume your PC has SATA port 3 open.
Step #7 – Locate any available SATA power connection from your power supply. On some computer systems they might be hidden or tied up somewhere out of sight. Once you locate one free it route it to safely reach the hard drive install bay.
Step #8 – Locate your cases Hard drive bay, some are sleds, some are mounted in front in the case and others Like SSD hard drives are mounted on the side or back panels.
Step #9 – Once located, gentry remove the hard drive from its packaging and place it into or onto the hard drive bay. use 6-32 UNC screws to fasten the hard drive.
Step #10 – Connect the SATA and power connections to the hard drive, the power plug is longer then the SATA data cable.
Step #11 – Double check all the connections and clearances. Make sure the SATA Hard drive’s data cable is connected to the motherboard and the power cable is connected to the hard drive. Sometimes you will hear or feel a click when you connect the SATA data cable.
Step #12 – Close up your case and plug in all the cables. Its now time to power on your system.
Installing an M.2 NVMe Hard Drive procedure
Follow Steps #1 to #5 above to get into the PC case then for a M.2 hard drive we need to locate the socket directly on the motherboard.
Step #6 continued – This is where things get interesting, Some newer motherboards will have one or two or more M.2 slots however… take note
A NVMe SSD Hard Drive is not the same as M.2 SSD Hard Drive, Some M.2 Sockets can take Both M.2 SSD and NVMe and others can’t.
Yes I know it can get stupid confusing with the naming schema of these Hard Drives but let me simplify things.
M.2 SSD hard drive will most often have 2 notches on the card with 6 pins one one side, they come in different sizes and you need to check your motherboard model which M.2 drives it supports.
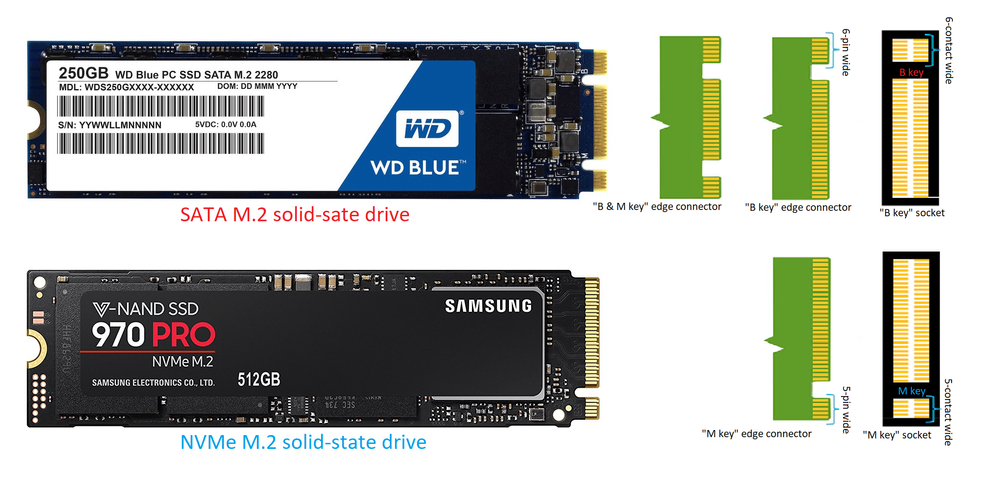
Like wise, NVMe Hard Drives have one notch on the card 5 pins. Like above.
Step #7 – Locate the M.2 Socket on the motherboard, some newer models have passive heat sinks that you need to remove to expose the M.2 socket. Position the M.2 hard drive pins up to the socket then gently slide the M.2 Hard Drive into the socket, next push down on the hard drive then secure it with a screw or motherboard latch. Again some motherboard manufacturers use a standard screw to hold the drive down and in place while others might use a plastic or metal pin or some form of latch.
Step #8 – re-install the heat sink of any and close up the case. M.2 Hard Drives get their power form the socket and do not require additional cables.
Configuring the Hard Drive for first use.
Step #1 Optional – When your PC boots up depending on its age it will either use a BIOS or a UEFI. This is firmware your PC uses to initialize hardware before control is handed over to the Operating system such as Microsoft Windows or Linux etc. Its recommended to enter the BIOS or UEFI to verify that your newly installed hard drive is installed correctly. Some PC’s will not allow you to enter the UEFI easily. Its recommended to consult your motherboards manufacturer on how to access the BIOS.
Step #2 – Boot into Windows. Please Note: Your new hard drive WILL NOT SHOW UP IN EXPLORER JUST YET.
Step #3 – We need to open up the Disk Management application, there’s a few ways to do this in Windows.
- If you have the This Computer Icon on your desktop right click on it and select Manage
- Or right click on the start icon, bottom left of the screen (Pre Windows 11) or near the center on windows 11 and select Computer Management
- Or open up search and type in Computer Management then open the app.
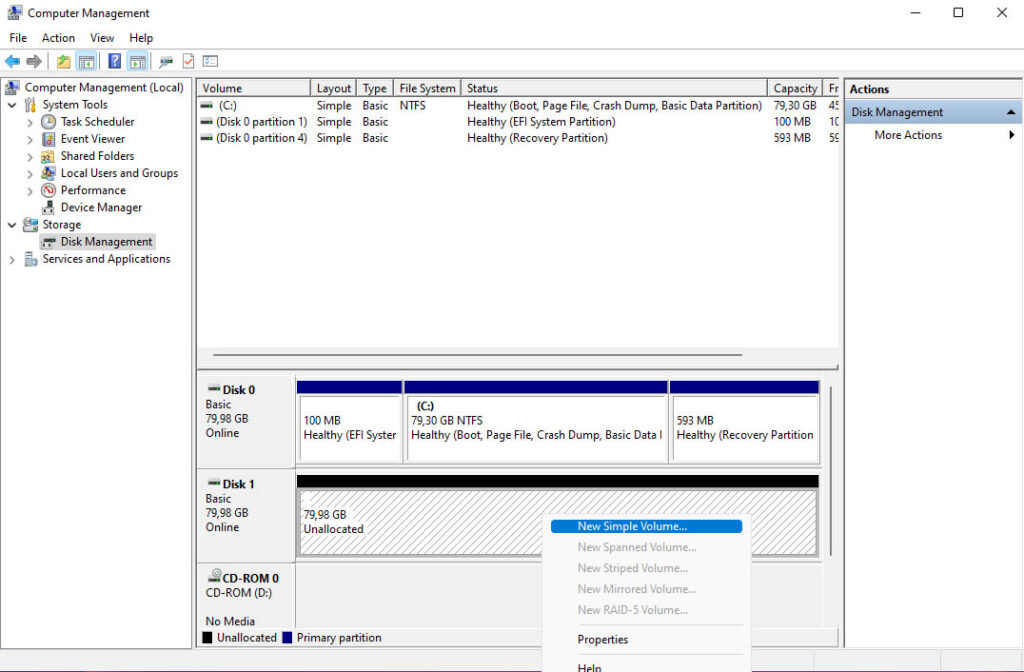
Once the Computer Management Application is open in the left side pane look for Disk Management and select it. As indicated below.
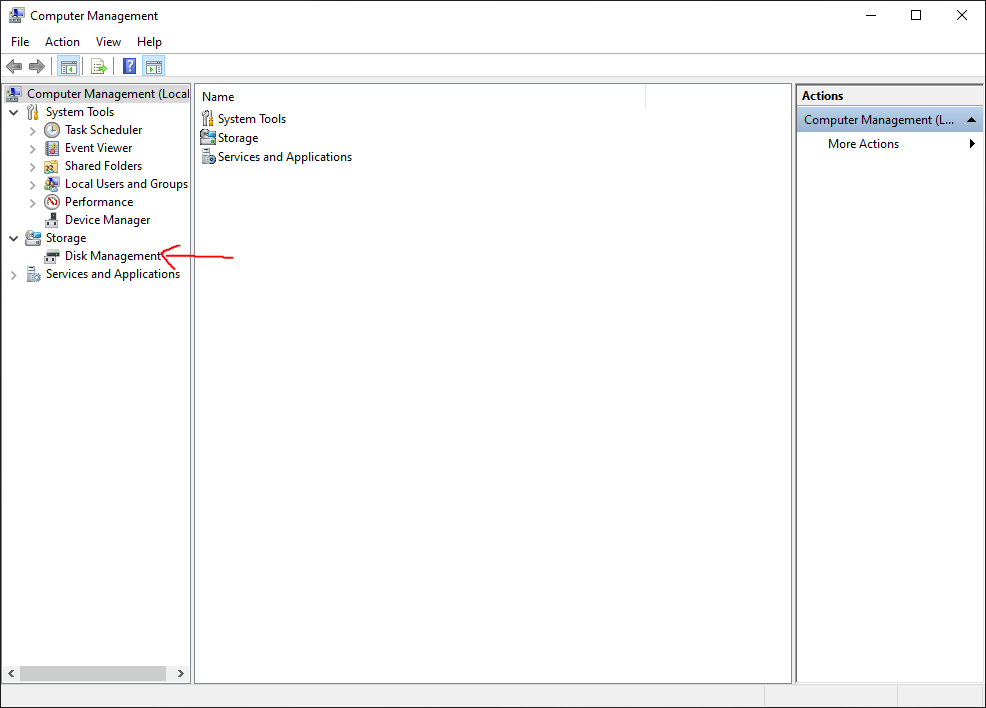
Here Windows will list all your Hard drives. What we are looking for is a Disk that’s black highlighted and marked as unallocated.
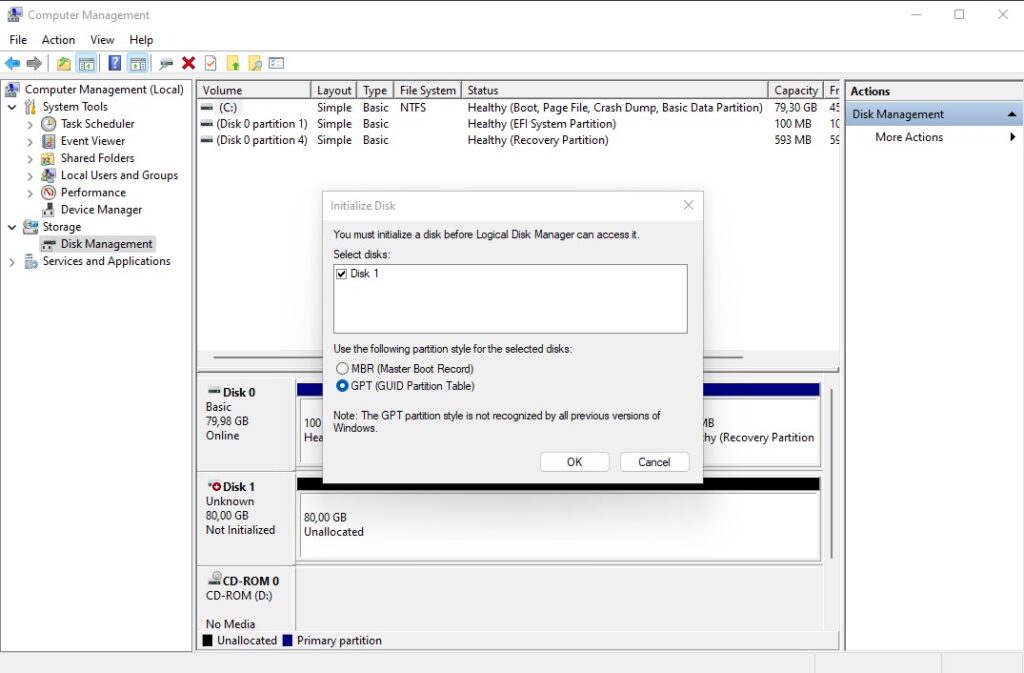
Its very likely that windows will detect that there is a new hard drive and you will get a prompt like shown above. Lets look at the two options here.
MBR or Master Boot Record (MBR) disks use the standard BIOS partition table. MBR has some limitations such as it can’t allocate sizes above 2 Terabyte and you cant have a lot of partitions on it if that’s your thing. These days its not needed to partition a hard drive anymore
So if your hard drive is a 4 Terabyte or bigger capacity or you have a computer that uses an UEFI Bios then you should select GPT instead of MBR.
GPT or (GUID Partition Table) disks use Unified Extensible Firmware Interface (UEFI) its also the newer standard that we use to get the most benefits, Older PC’s however should still use MBR but if your hard drive is larger then 2 Terabyte then you will need to setup partitions to be able to utilize all the space so 2 Partitions of 2 Terabyte each etc. To make it easy we will just use. GPT as default here. Assuming our PC was build in the last 10 years.
Next after you selected GPT or MBR windows will initialize the hard drive but you still need to format it with a file system before you can use it. To do this, right click on the black empty space and select New Simple Volume option as shown below.
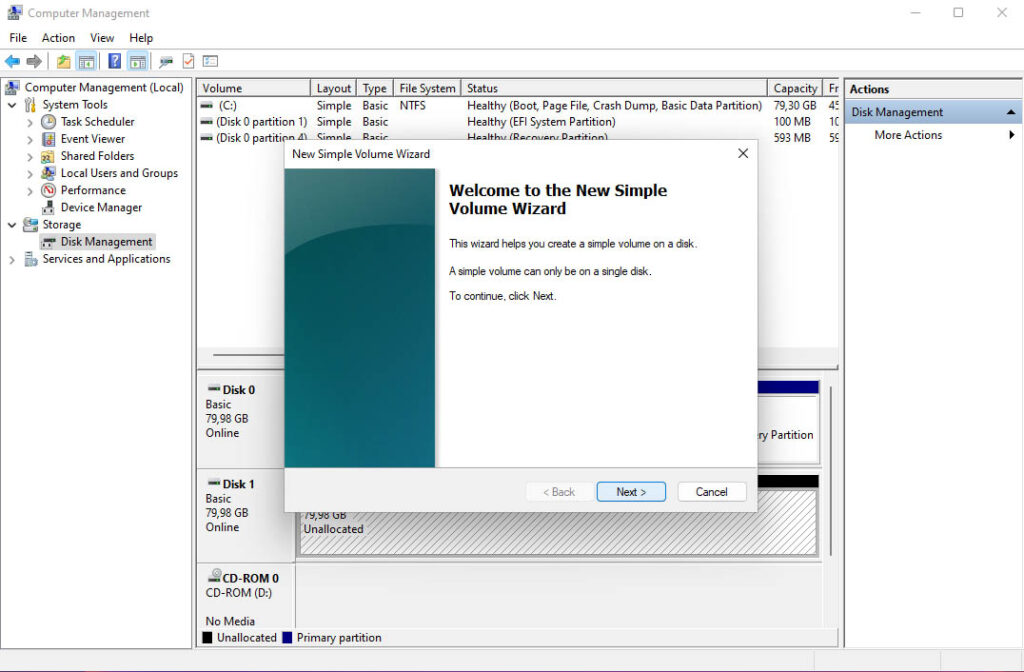
This will launch a new Simple Volume Wizard, we will now give the new Hard drive a file system. Typically Windows uses the NTFS filesystem so we will stick with that.
Follow the onscreen prompts as indicated below.

Windows will ask you what side the new hard drive disk size is, it will automatically assign the maximum space that can be assigned so leave this as default. Select Next
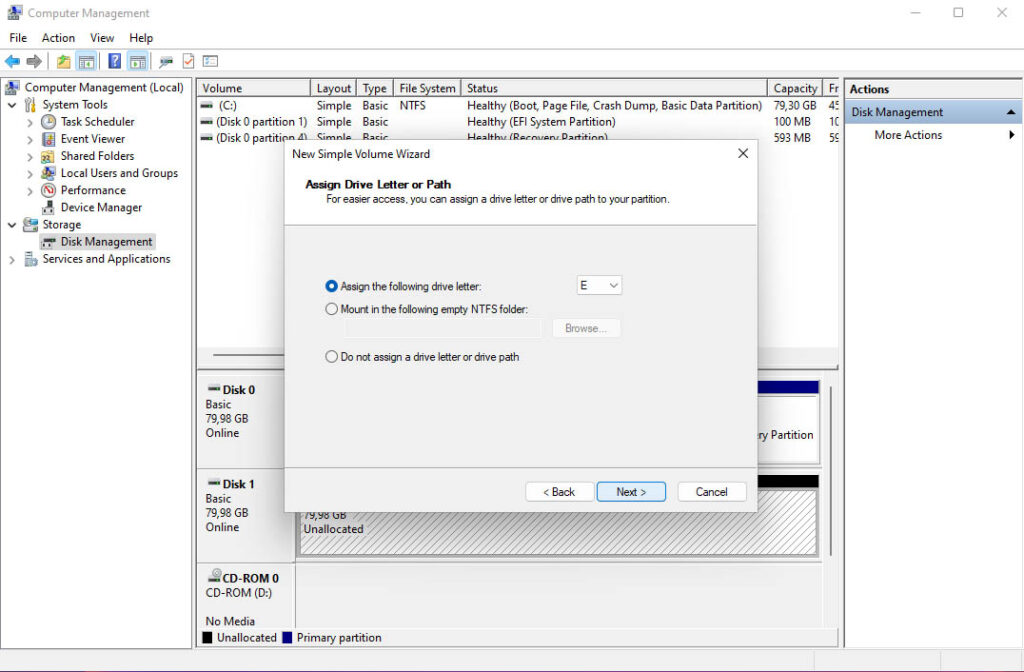
Next we need to assign a Drive letter for the newly installed Hard Drive before you can use it, typically Windows will automatically recommend the next available drive letter in this case Drive E: You can leave this as default or assign your own one, however just note that you can not assign drive letters that’s already in use by the operating system. Select Next
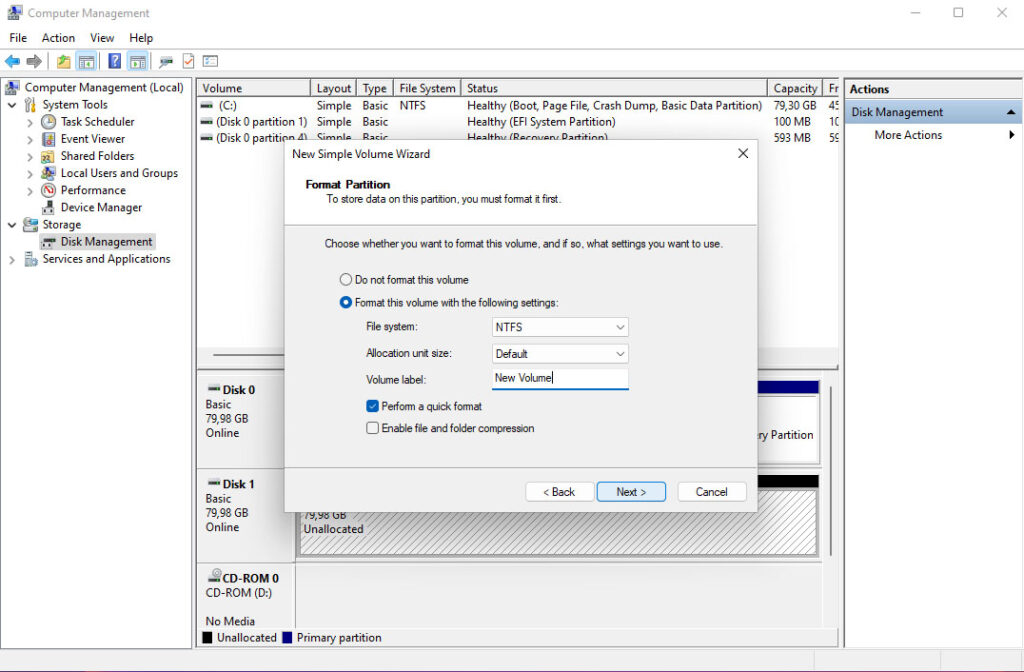
Now we will assign the filesystem for the new hard drive. Select to format the volume option then set the file system to NTFS, next leave the Allocation size as default. then as optional you can set the Volume label of the hard drive. I like to name my hard drives that I install like WD Red 80 Gig if its a Western Digital Red thats 80 Gig.

Just to keep track of which hard drive is what. But again this is completely optional. Next make sure the Quick format option is selected. then hit Next
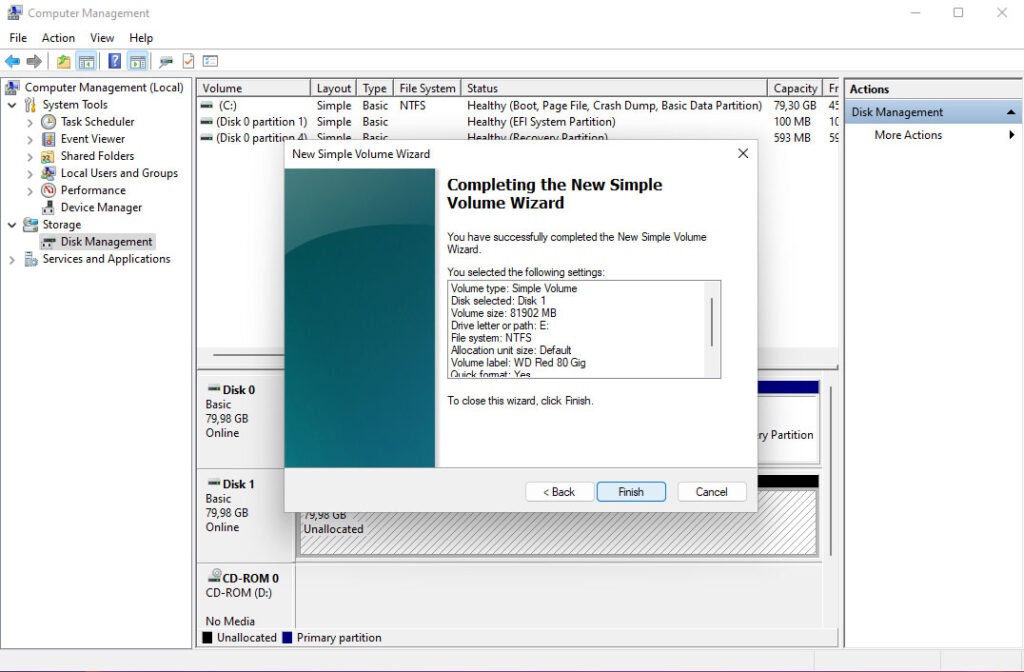
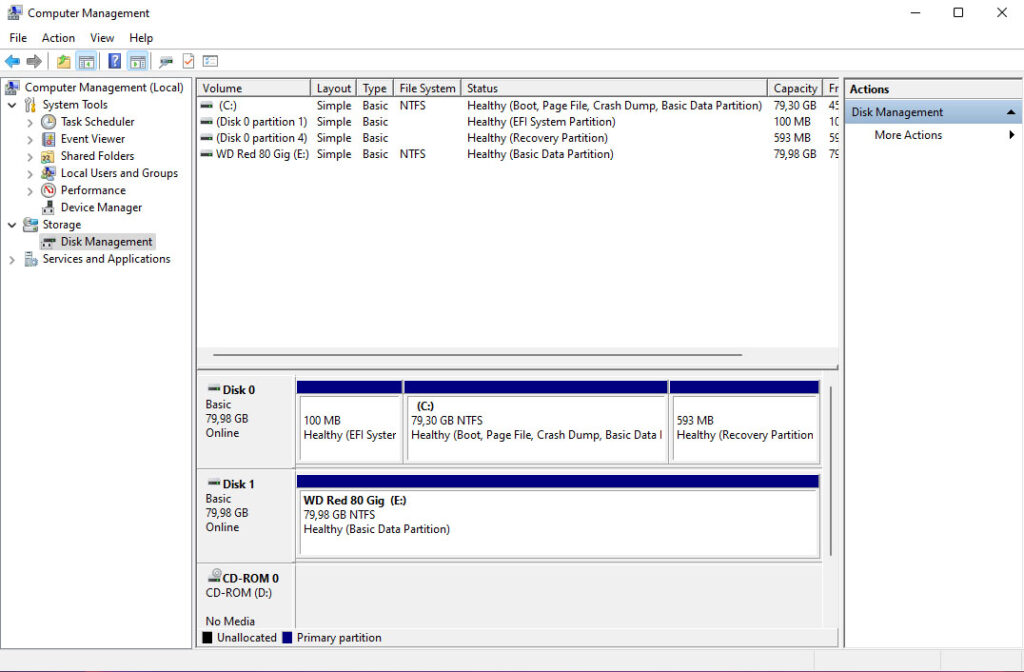
Lastly select finish, and that’s it. The new SATA Hard drive should now be ready for use. You will notice in Windows Disk manager that the new SATA Hard Drive is no longer listed as unallocated. It should now appear as something like this.
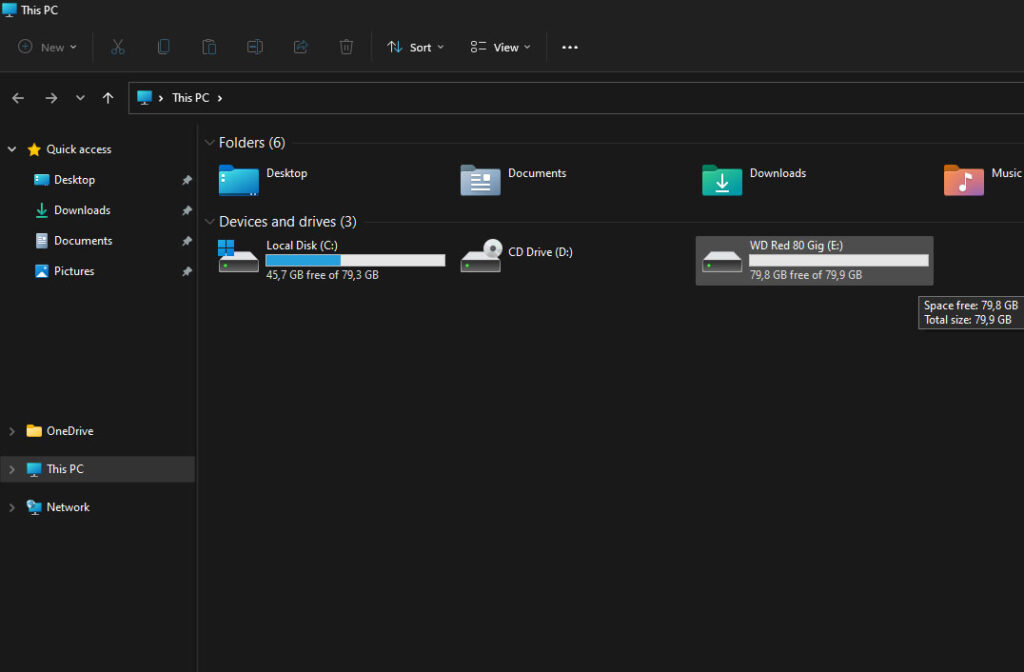
Lets go check out the new SATA hard drive in Windows Explorer, close the Disk Management application and open up Windows Explorer. What you should see is your newly installed hard drive under the This PC option. Like illustrated below.
The Conclusion
It’s not really all that hard to install a hard drive yourself, it takes a little time and as long as you follow the manufacturer guide lines you should be fine. I hope this tutorial was of any help to all the new comers in the PC space.


Pingback: Setting up a simple NAS server on Linux Ubuntu - Micro Fusion Insight