What is a NAS server and what is it used for ?
Simply put, a NAS or (Network Attached Storage) Server is a computer that sits on the network that stores, manages and contains a collection of files and information, usually multimedia content such as pictures, movies and music, documents or any other file type that you want other users on the network to share and have access too at the same time. The most cost effective NAS to setup and deploy is using Linux such as Ubuntu or Mint but a Windows computer can also be used at additional licensing that can make it more expensive in comparison to Linux.
- Easily setup a Linux NAS server on Ubuntu
- Firstly you will need a few things to setup a Linux Ubuntu NAS server
- Step #1 – Getting the software needed for setting up Ubuntu NAS
- Step #2 – Preparing Linux Ubuntu installation medium via flash drive
- Step #3 – Installing the Linux Ubuntu operating system from the flash drive on our NAS server
- Step #4 – Getting the Linux Ubuntu operating system ready to be a NAS Server
- Step #5 – Setting up a static IP address on Ubuntu 22.04 LTS NAS
- Step #6 – Setting up a hard drives for NAS storage
- Step #7 – Setting up File Sharing via Samba for the NAS server
- Step #8 – Connecting to the NAS Server from Windows
- The Conclusion
- What did you think of setting up a Linux Ubuntu NAS server ?
Easily setup a Linux NAS server on Ubuntu
Setting up a NAS server for your home or business can seem like a daunting task – and let’s face it, there are plenty of expensive NAS solutions out there. But what if you could do it yourself, on the cheap? That’s where Ubuntu comes in. With just a few simple steps, you can have your own NAS server up and running in no time. So grab your laptop, fire up Ubuntu and follow along as we show you how to set up a simple NAS server for your home or business.
Simply follow these easy steps and you should have a NAS server setup on Linux in now time. It will take around 30 minutes, so lets get started!
Firstly you will need a few things to setup a Linux Ubuntu NAS server
- An Old PC, or Raspberry Pi will do. I’d advise not using an old laptop here BUT if that’s all you have then go for it.
- Any small sized Hard drive,
- Usually an old PC will have at least one hard drive installed already. An SSD drive is perfect for this.
- It will only be used to install the Linux Ubuntu Operating system so anything around 40 gig or more is fine. 120Gig SSD’s are cheap and perfect for a NAS
- Some larger hard drives for the actual content you want to host on the server.
- Such as the Western Digital Red or Seagate IronWolf series will be perfect.
- Network capable LAN port and either CAT5e or CAT6 LAN cable for connecting your NAS to the local network.
- A downloaded copy of Ubuntu LTS. It’s free and legal so go ahead and Download the ISO file for Ubuntu here
- Linux Ubuntu LTS Server – Is a lightweight version of Ubuntu that DOES NOT INCLUDE A GRAPHICAL USER INTERFACE.
- Linux Ubuntu LTS Desktop – Is the complete OS with all software and does include a Graphical User interface. Use this one for this tutorial
- A USB Flash Drive which we will use to install Ubuntu onto the PC with. 16 Gigabyte or more is fine.
- Rufus, a small Windows program that will help us to create a bootable flash drive that we will use to then install Ubuntu onto the NAS Server PC
Step #1 – Getting the software needed for setting up Ubuntu NAS
Download Linux Ubuntu 22.04 LTS Desktop iso from Canonical here
Download Rufus – used to create the installation flash drive
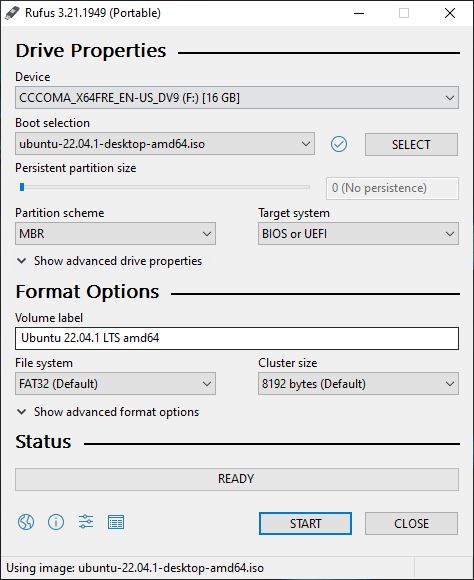
Step #2 – Preparing Linux Ubuntu installation medium via flash drive
First we need to prepare Ubuntu for installation using flash drive. Plug in the flash drive on a windows PC not on the NAS server PC then using Rufus select the USB flash drive and the Ubuntu ISO image you downloaded as shown below. Then press start to copy the ISO files to the flash drive and make it bootable.
Step #3 – Installing the Linux Ubuntu operating system from the flash drive on our NAS server
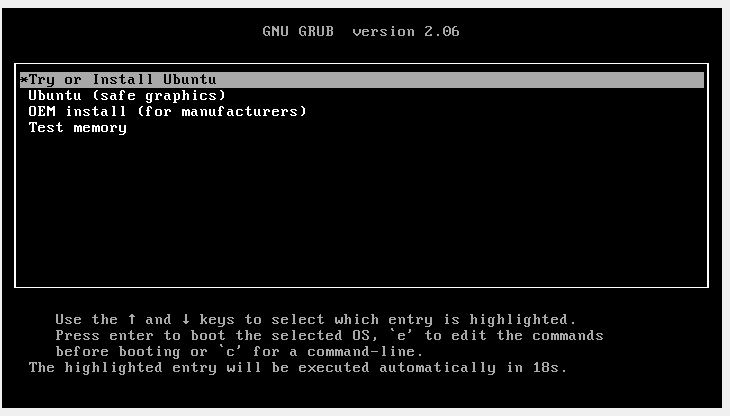
Once Rufus is done we can move over to the NAS server an install it’s operating system. Plug the flash drive into the USB port and power on the NAS server PC.
We will need to boot from the flash drive and to do so I’d highly advise consulting your motherboard manufacturer documentation. Most PC’s will have a shortcut key such as F2, F9, F10 or F12 to bring up a boot menu. Else you will need to configure the BIOS or UEFI to boot from flash drive. If you are using a UEFI bios then disable secure boot first to be able to boot from a flash drive…
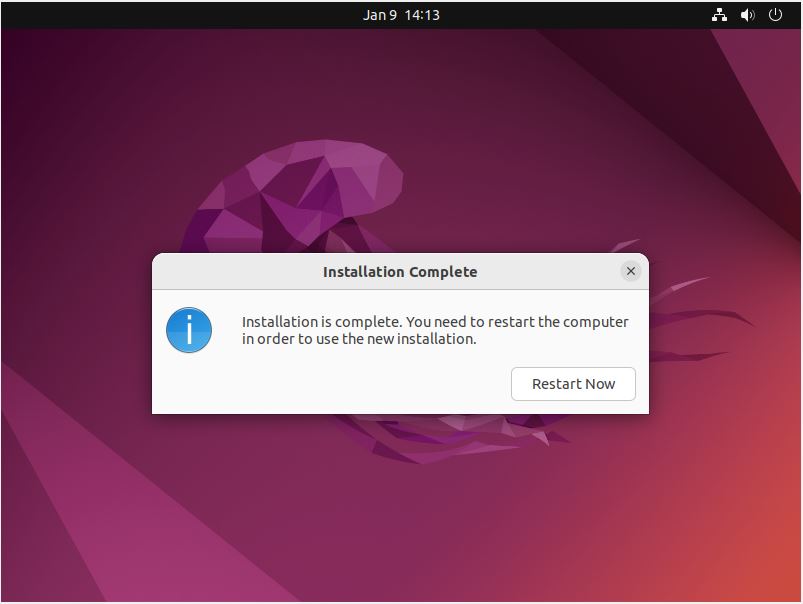
You will know you have successfully booted when you reach the Ubuntu Installer screen
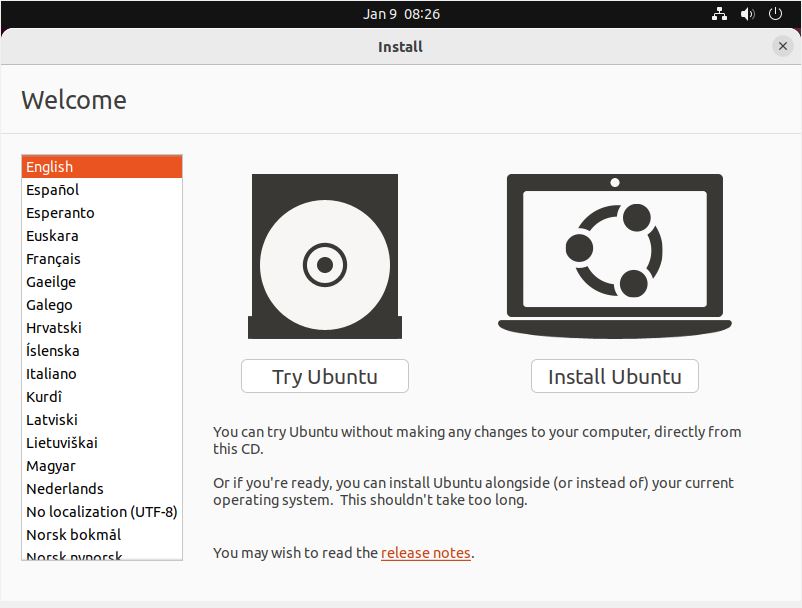
From there follow the Ubuntu installer to install the Ubuntu OS on the NAS server PC. Its pretty straight forward and will only take about 20~30 minutes depending on your internet connection and NAS server hardware. When you reach the end of the installation you will be greeted with this screen as shown below. Restart the system and remove the USB flash drive.
Step #4 – Getting the Linux Ubuntu operating system ready to be a NAS Server
The very first thing we want to do after installing Ubuntu is update the system. This will ensure that any software we install is the latest versions and will help with security and stability of the overall NAS server. To update Ubuntu and its software packages open Terminal and type in the following command or copy and paste it then hit enter.
sudo apt update && sudo apt upgrade -yNow that we have everything up to date its time to install some additional software that the NAS server will need to work as a NAS. In Linux these are called packages.
sudo apt install build-essential ssh samba samba-common samba-common-bin ntfs-3g fuse2fsStep #5 – Setting up a static IP address on Ubuntu 22.04 LTS NAS
Next we need to configure a static IP address for the server, By default the ip will be most likely come from your internet router and this will change which will cause issues down the line. By assigning a static IP address to the NAS server we tell the router not to hand out an IP address and instead that the NAS server will provide its own IP address that will not change automatically. Lets setup a static IP now. In the Terminal run the following commands
nmcli connection show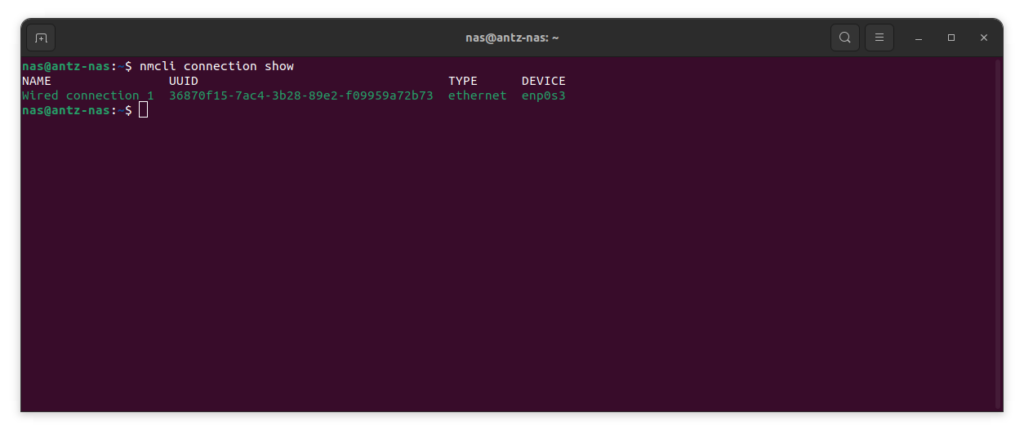
Take note of the DEVICE name that gets listed. next we will need to edit the following file. This is applicable to Ubuntu 22.04 LTS as of this writing, older versions of Ubuntu and future version might implement different ways of assigning static IP addresses.
sudo nano /etc/netplan/01-network-manager-all.yamlMake the following changes to the file as shown below.
If you are Using Ubuntu 22.04 LTS Desktop Version
network:
  renderer: NetworkManager
  ethernets:
    enp0s3:
      addresses:
        - 192.168.10.201/24
      nameservers:
        addresses: [192.168.10.1, 8.8.8.8]
      routes:
        - to: default
          via: 192.168.10.1
  version: 2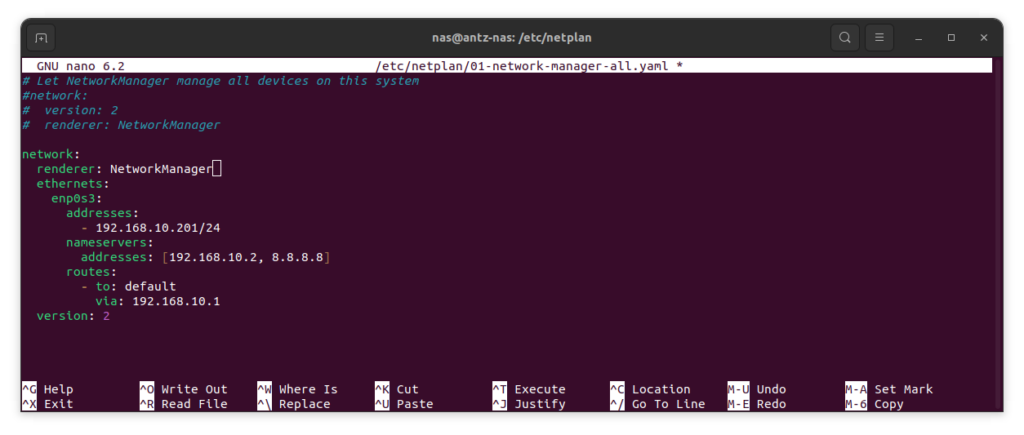
If you are using Ubuntu 22.04 LTS Server version
network:
  renderer: networkd
  ethernets:
    enp0s3:
      addresses:
        - 192.168.10.201/24
      nameservers:
        addresses: [192.168.10.1, 8.8.8.8]
      routes:
        - to: default
          via: 192.168.10.1
  version: 2
The only difference is the renderer option. for Ubuntu Desktop we set it to NetworkManager and on Ubuntu Server we set it to networkd.
In the above file we have used following configurations
- enp0s3 is the interface name (yours might differ so check with nmcli connection show command )
- addresses are used to set the static ipv4 and the /24 is the netmask.
- nameservers used to specify the DNS server ip address’s
- routes used to specify the default gateway (this is your router’s IP most of the time)
Note: Please change the IP addresses and interface name as per your environment For this Example I am using the following values that you need to change
- 192.168.10.201 as my Static IPv4
- /24 as my netmask, this one most likely will be the same for you as well.
- Name Server addresses DNS 192.168.10.1 (My routers DNS) and 8.8.8.8 (Google DNS) as a fallback
- Route needs to be set as your routers IP. in my case its 192.168.10.1
Save the file by pressing CTRL+X then y and finally press enter
Apply the changes by running the following command.
sudo netplan apply
Verify that you have internet and that everything is working. you can ping google using the following command in terminal.
ping -c 4 www.google.comPING www.google.com (172.217.170.36) 56(84) bytes of data.
64 bytes from jnb02s03-in-f4.1e100.net (172.217.170.36): icmp_seq=1 ttl=119 time=7.19 ms
64 bytes from jnb02s03-in-f4.1e100.net (172.217.170.36): icmp_seq=2 ttl=119 time=5.88 ms
64 bytes from jnb02s03-in-f4.1e100.net (172.217.170.36): icmp_seq=3 ttl=119 time=16.6 ms
64 bytes from jnb02s03-in-f4.1e100.net (172.217.170.36): icmp_seq=4 ttl=119 time=5.34 ms
--- www.google.com ping statistics ---
4 packets transmitted, 4 received, 0% packet loss, time 3030ms
rtt min/avg/max/mdev = 5.337/8.741/16.558/4.562 ms
Look for the number of packets that was received which should be and 0% loss which is good. At this point networking should be done.
Step #6 – Setting up a hard drives for NAS storage
Its time it setup the additional hard drives for the NAS server, make sure that your hard drives are installed in the NAS server before we continue.
You can follow our guide here on how to install hard drives into a PC.
Now if you are using Linux Ubuntu 22.04 LTS Desktop open up the applications menu and type in disks then open up the app disks.
On the left hand side panel you will find a list of all the hard drives that is detected by the Ubuntu Operating system. Find your large NAS hard drive in that list and select it in the left hand side as shown below.
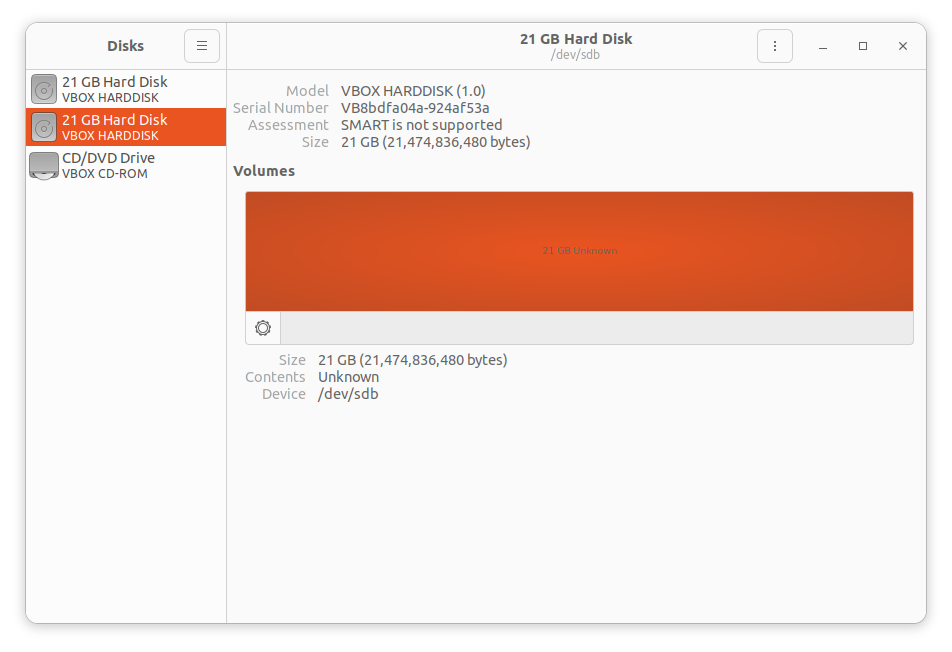
What we are looking for is hard drive(s) that are unknown and completely empty. No partitions on it. As shown above. Mine is a single 21 Gigabyte Virtual hard drive.
NOTE: If you have more then one Hard Drive you will need to repeat the following steps for each hard drive you want to use on this server.
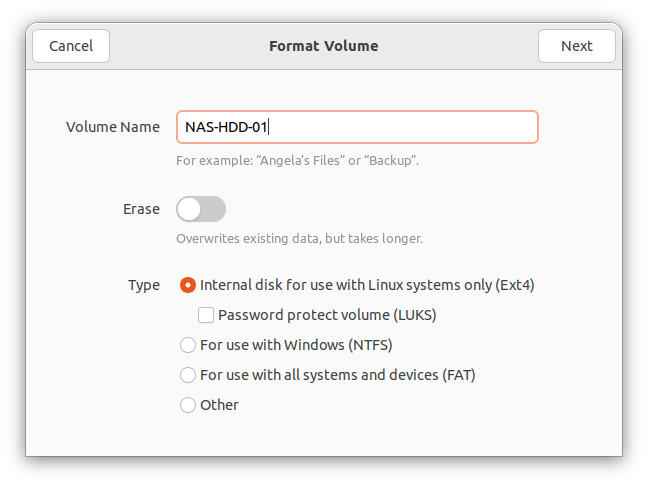
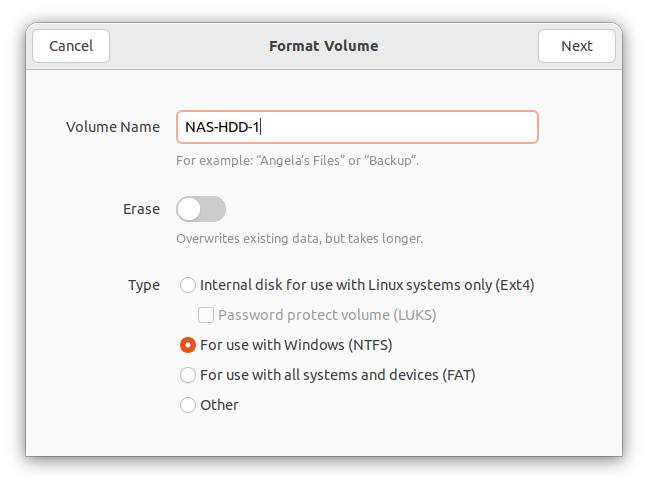
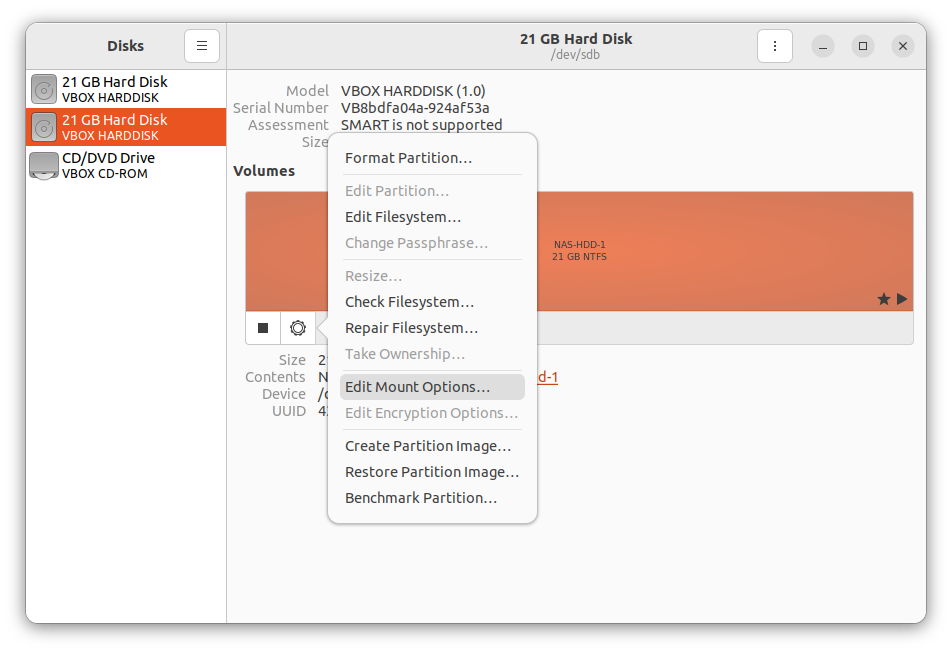
With the new empty hard drive selected on the left side click on the little gear icon and select the Format Partition option. By default Linux Ubuntu uses the EXT4 file system, which is great for a NAS however if you plan to ever use this hard drive in a windows computer or you would like to access the files on a windows PC directly by plugging it directly into a windows computer, Windows wont be able to read the EXT4 file system so now you have a choice.
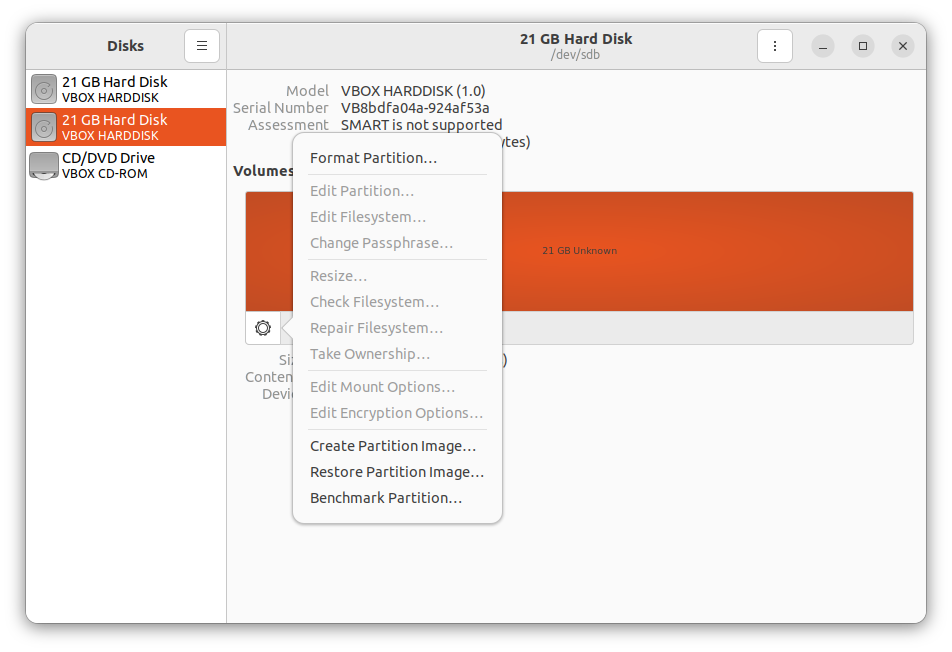
If you only intend to use this hard drive in the NAS server then leave it as EXT4 else I recommend selecting the NTFS option before formatting, as shown below. Both of these will work fine while in the NAS server the only upside is what NTFS is the default Windows filesystem schema and EXT4 is native to Linux. Linux can read both NTFS and EXT4 where as Windows can only read NTFS drives.
After formatting the drive or drives we need to make sure that when the NAS starts up the hard drives are automatically mounted. In Windows when the system boots all hard drives are automatically available and mounted by default however in Linux you need to do this manually. So in the application Disks which should still be open click on the little gear icon again and this time select the Edit Mount Options
If you are using Ubuntu 22.04 LTS Server version
Note: For Ubuntu Server you will need to edit and add each hard drive in the /etc/fstab file. You can get the Hard drive UUID using the command
sudo blkidFrom here locate the hard drive or hard drives you wish to auto mount and record each ones UUID. Next edit /etc/fstab and add the following lines at the bottom.
sudo nano /etc/fstab# syntax
# UUID="YOUR-UID-HERE" /mnt/ntfs/ ntfs nls-utf8,umask-0222,uid-1000,gid-1000,ro 0 0
UUID="438A7D041A7D234C" /mnt/nas-hdd-1/ ntfs nls-utf8,umask-0222,uid-1000,gid-1000,ro 0 0Add the following lines of code to the bottom if the fstab file making sure to change the UUID to match your hard drive and make changes to the file system type.
If you formatted the hard drive in EXT4 then change ntfs to ext4 else if you formatted the drive in NTFS make sure its set as ntfs. The mount point needs to set too.
Once done close and safe the fstab file by pressing. CTRL+X then y then enter.
If you are using Ubuntu 22.04 LTS Desktop version
Disable User session Defaults option, then check both options Mount at system startup and Show in user interface.
Next, rename the Mount Point Name, by default it will use the UUID which is a bunch of numbers and letters, we will give it a friendly name here. but leave the “Identify As” field alone. See below.
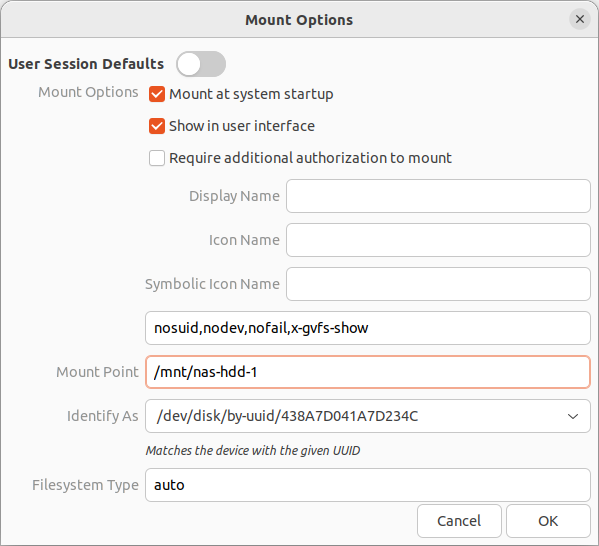
Note: If you have multiple Hard drives you will need to do this for each one making sure the Mount Point Name is unique for each hard drive. When done click OK to close out and return to the Disks main menu. If you are done with each hard drive you can exit the Disks application. If in future you want to add additional hard drives you will need to come back to the Disk application and follow the above steps again.
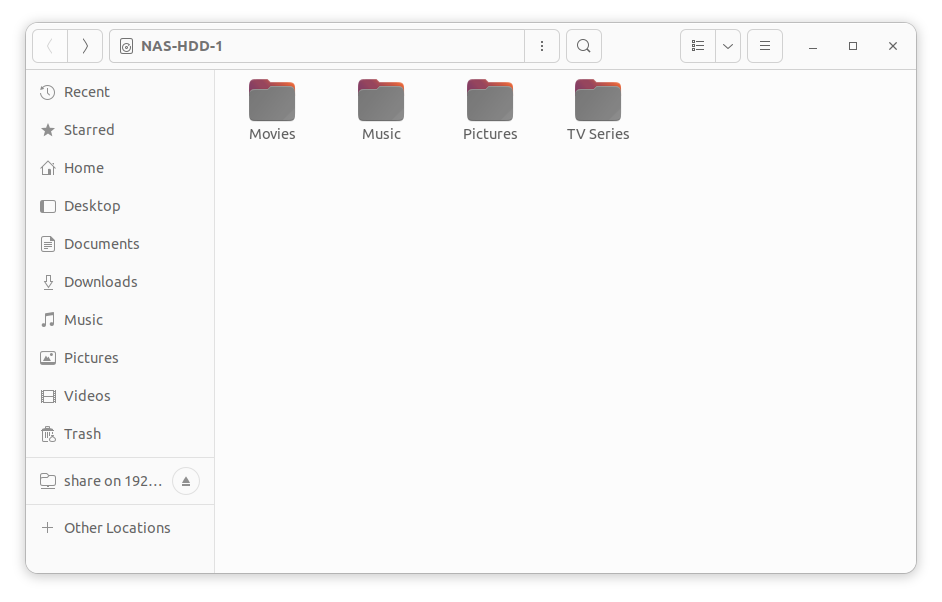
Now lets setup some NAS folders that we want to share file with. For this example i will add folders that a typical home multimedia NAS server will use.
Open up the file explorer app in Ubuntu then select the NAS hard drive we mounted earlier.
Next, right click on the white space and select Create New Folder and create some folders, these will be used to store your files you wish to share on the NAS server.
Step #7 – Setting up File Sharing via Samba for the NAS server
Linux by default doesn’t allow windows computers to connect over the network, we need to setup Samba. A Windows compatible network translation layer application.
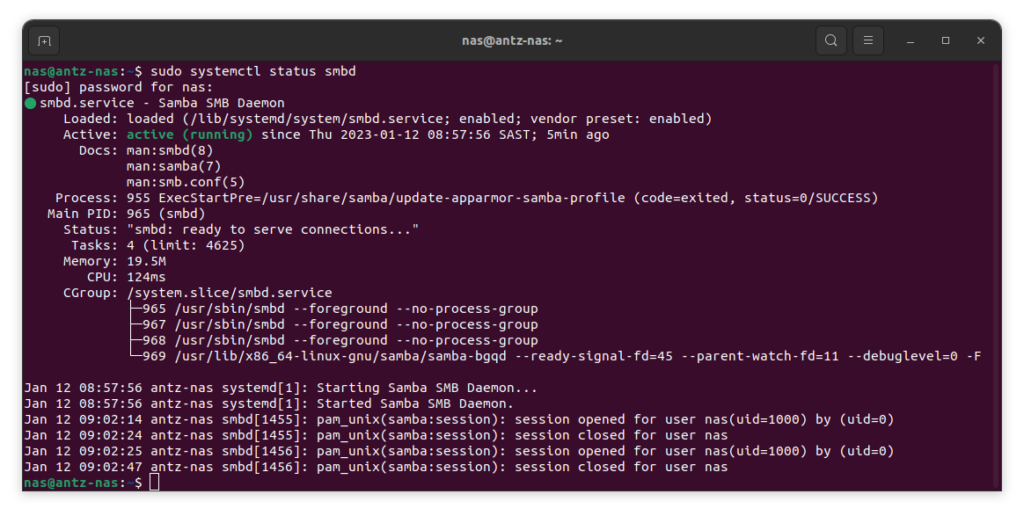
First lets see if Samba is installed and running by executing the following command in Terminal.
sudo systemctl status smbdWhat we are looking for is the following output. make sure its active.
Lets configure the samba shares for the NAS server, open terminal and run the following commands.
The first one will make a backup copy of the original configuration file and then second command will open up the samba config file that we need to alter.
sudo cp /etc/samba/smb.conf /etc/samba/smb.conf.backup

sudo nano /etc/samba/smb.conf
Scroll ot the very bottom of the file and add the following configuration, alter as needed to match your environment and file names
[nas-hd-1]
   comment = Nas Share
   # Below is the path to the share. In this case its the whole NAS Hard drive
   path = /mnt/nas-hdd-1
   guest ok = no
   browseable = yes
   create mask = 0777
   directory mask = 0777
   writable = yes
   read only = no
If you have more hard drives you need to repeat this step for each one.
Take Note: The above shared the entire hard drive. Including all folders on it. If you don’t want to do that you need to setup shares for each folder instead for example
[Movies]
   comment = Movies Only Share
   # alter the path below to point to the folder you want to share
   path = /mnt/nas-hdd-1/Movies
   guest ok = no
   browseable = yes
   create mask = 0777
   directory mask = 0777
   writable = yes
   read only = no

[TV Series]
   comment = Movies Only Share
   # use (") double quotes if there are any spaces in the path, As indicated Below
   path = "/mnt/nas-hdd-1/TV Series"
   guest ok = no
   browseable = yes
   create mask = 0777
   directory mask = 0777
   writable = yes
   read only = no
When you are done, save and exit the file by pressing CTRL+X then y then Enter.
The last steps are to add your current user to the samba group, set a samba password and allow it through the firewall. Lets do that now. Run the following in Terminal.
sudo usermod -aG sambashare $USER

sudo smbpasswd -a $USER

sudo ufw allow samba

sudo systemctl restart smbd
#1 command adds you (the current user) to the sambashare group.
#2 command assigns a password for the user to samba. Its recommended to just use the same password here that you use for your user however they can be different.
#3 command writes allow rules for the firewall to allow connection to samba.
#4 command restarts samba service to apply all the changes.
Step #8 – Connecting to the NAS Server from Windows
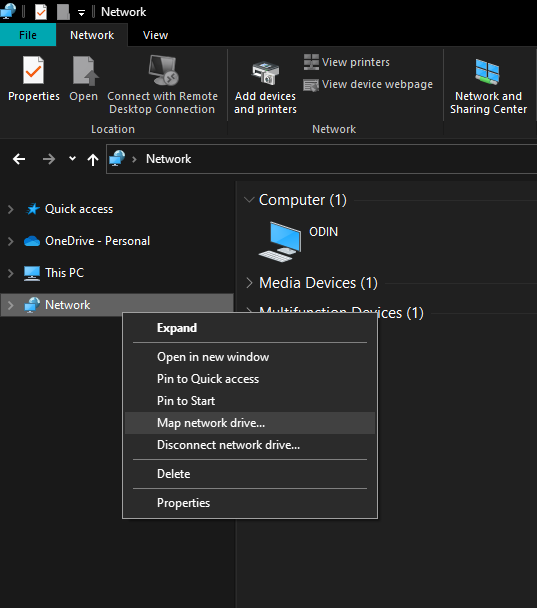
Its time to connect to the our NAS server. On a Windows PC open up the file explorer app. From the left panel locate the network category and right click on it, then select Map Network Drive as shown below
Next select a drive letter and set the network path to your NAS share folder. What I like to do is assign a drive letter that is near the end at the alphabet and that closely match the content of the share, like for movies i selected M as the drive letter but this is completely optional. See below.
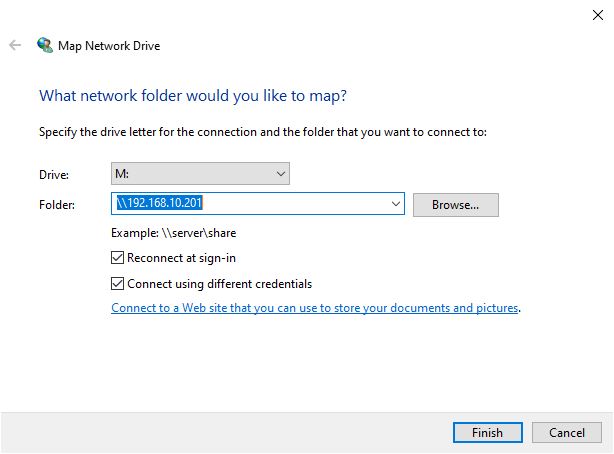
Once you have the IP entered for the NAS server click on Browse… to select which folders you want to map.
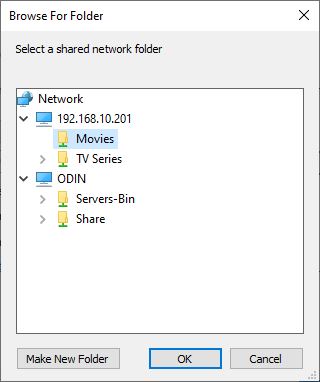
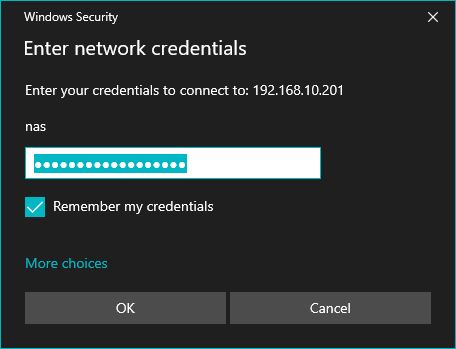
Click OK then Finish, Windows will ask you for the username and password next. Enter your NAS server username and then the samba password you have set.
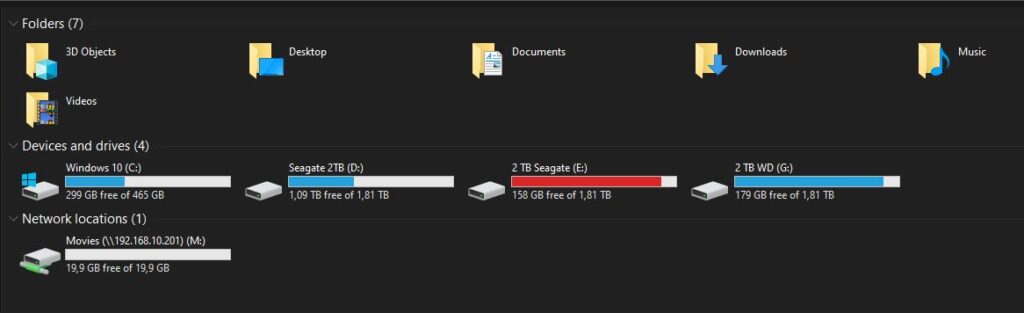
If all went to plan you should have access to the NAS servers mapped drive in Windows. It will now show up as a hard drive in Windows Explorer where you can now store, add, use and access files as long as the NAS server is online. As you can see below I have mapped out Movies as drive letter M: and its its now listed.
The Conclusion
NAS servers are very useful, in a more advanced manner one would setup multiple user accounts with each user only allowed access to some folders and resources on the NAS and RAID would also come into play as redundancy for the server. This tutorial serves as a very basic setup mostly for home use.
Have a look at Kodi next to set that up to work with you multimedia NAS server as a home entertainment system. Alternatively you there are other Linux distributions out there that;s sole purpose is to be a NAS. Some paid for and others free. Consider them maybe as well. Such as OpenMediaVault and TrueNAS
Furthermore those that wish to use Windows instead can have a look here: Setting up a simple NAS server on Windows 10


Pingback: How to install a new Hard Drive - Micro Fusion Insight
Pingback: How to Download YouTube Videos - Micro Fusion Insight
Very useful guide, thank you! I did have to change one thing in the smb.conf file though, as I had named the partition in uppercase (NAS-SSD vs nas-ssd) the “path” location had to be uppercase too (mnt/NAS-SSD) even though the mount point set earlier in Disks was lowercase (mnt/nas-ssd).
Pingback: How to fix Linux NTFS read only access issue when dual-booting with Windows 10 - Micro Fusion Insight
Pingback: Top 10 things to know before switching to Linux - Micro Fusion Insight
This is a long stretch but maybe I’ll find some help here. I’ve followed your guide thoroughly and I cant acces the share. when entering \\serwer-ip\ in windows, I can see the nas-hdd-1 folder but I cant access it with error “The network name cannot be found” I have no clue what to do next.
Hi, Double check your network path to your NAS server on windows, you mentioned that you typed it as “\\serwer-ip\” try using the actual IP address. Also note that Linux is case sensitive so make sure the share you are trying to access is spelled correctly. Check if you can Ping the NAS server from Windows as well. If not check your network settings, if you can then double check your hard drives are mounted AND double check your samba settings on the NAS server. Process of elimination.
I had same problem until I moved the comment in the path= statement in the .conf to the next line.
instead of:
path = /mnt/nas-hdd-1/Movies # alter the path here to point to the
use this:
path = /mnt/nas-hdd-1/Movies
# alter the path here to point to the
Pingback: Setting up a simple Apache web server on Linux Ubuntu - Micro Fusion Insight
Pingback: How to setup Windows Bitlocker Encryption - Micro Fusion Insight
Hey this guide was very helpful, thank you
Thank you, I’ll keep em coming
Pingback: Setting up a simple NAS server on Windows 10 - Micro Fusion Insight