Terminal Commands and the terminal, also known as the command line interface (CLI), allows you to interact with your Linux system using text-based commands. As a system administrator or a Linux enthusiast, understanding and utilizing terminal commands is crucial for efficient system management. In this comprehensive guide, we will explore 60 essential Linux terminal commands that will empower you to navigate, manage, and troubleshoot your system effectively.
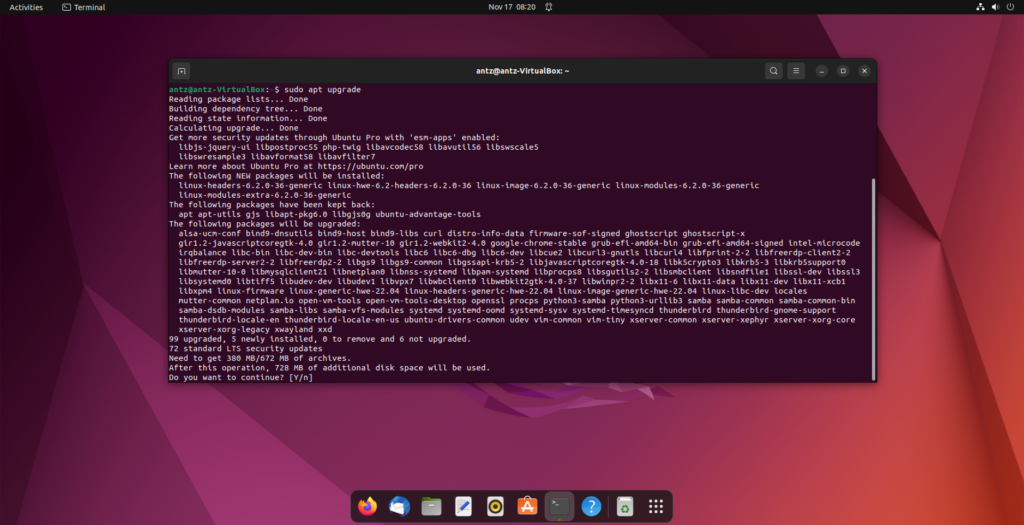
Table of Contents
- Why are Linux Terminal Commands So Essential ?
- Getting Started with popular Terminal Commands
- File and Directory Management Using Terminal Commands
- User and Permission Management Using Terminal Commands
- System Information and Management Terminal Commands
- Network Management and Troubleshooting Terminal Commands
- Package Management and Updating with Terminal Commands
- Overall Linux System Terminal Commands
- Conclusion
Why are Linux Terminal Commands So Essential ?
The Linux terminal, often shrouded in mystery for new users, is a powerful tool that shouldn’t be ignored. While graphical interfaces (GUIs) offer a user-friendly experience, the terminal unlocks a hidden layer of efficiency and control over your system.
Linux servers often do not have a GUI so learning some of the basic Linux Terminal Commands are essential if you want to effectively navigate and manage a Linux system such as a Linux server.
Why embrace the command line? Here are just a few reasons:
Precision and Speed:
The terminal eliminates the need to navigate menus and click icons. You can execute tasks with specific commands, often much faster than using a GUI. Imagine copying a file with a single keystroke instead of navigating through folders.
Direct Access With Little Overhead:
The terminal grants you direct access to the core of your system. This allows for fine-grained control over processes, file management, and system configuration, offering a level of detail not readily available through a GUI.
Automation Powerhouse:
Repetitive tasks become a breeze with the terminal. You can write scripts to automate complex processes, saving you time and effort in the long run.
Lightweight and Resource-Friendly:
The terminal is a text-based interface, requiring minimal resources compared to a GUI. This makes it ideal for older machines or situations where system resources are limited.
Universal Language:
Learning the Linux terminal equips you with valuable skills that transcend specific distributions or even operating systems. The core concepts and terminal commands are often transferable, making you a more versatile user across different platforms.
Beyond the technical advantages, the terminal fosters a deeper understanding of how your computer operates. It empowers you to troubleshoot issues, diagnose problems, and delve into the inner workings of your system.
The learning curve can feel steep at first, but numerous online resources, tutorials, and communities are available to guide you. Embrace the challenge, and you’ll unlock a powerful tool that will enhance your Linux experience and make you a more efficient and knowledgeable user.
Remember, the terminal is not a replacement for the GUI, but rather a complementary tool. By mastering both, you’ll equip yourself with the best of both worlds, empowering you to navigate the digital landscape with confidence and control.
Getting Started with popular Terminal Commands
To begin our journey, let’s familiarize ourselves with the terminal interface and some fundamental commands.
1. ls command
The ls command is used to list the contents of a directory. By default, it displays the files and directories in the current working directory. For example:
lsYou can modify the output of the ls command by using various options. For instance:
-l: Displays files in a long format, including permissions, ownership, size, and modification date.-a: Shows hidden files and directories.-h: Provides human-readable file sizes.
2. pwd command
The pwd command stands for “print working directory.” It displays the current directory’s absolute path. To use it, simply type:
pwd3. cd command
The cd command is used to change the current working directory. It allows you to navigate through the file system. For example, to move to the parent directory, use:
cdTo move to a specific directory, provide the path as an argument:
cd /path/to/directory4. mkdir command
The mkdir command is used to create a new directory. To create a directory named “my_directory,” use the following syntax:
mkdir my_directoryYou can also create nested directories by specifying the full path.
5. rm command
The rm command is used to remove files and directories. Be cautious when using this command, as it permanently deletes the specified files and directories. To remove a file, use:
rm file.txtTo remove a directory and its contents, use the -r (recursive) option:
rm -r directory6. cp command
The cp command allows you to copy files and directories. To copy a file, use the following syntax:
cp source_file destination_fileTo copy a directory and its contents, use the -r (recursive) option:
cp -r source_directory destination_directory7. mv command
The mv command is used to move or rename files and directories. To move a file, specify the source and destination:
mv source_file destinationTo rename a file, simply provide the new name as the destination.
8. touch command
The touch command is used to create a new empty file. If the file already exists, it updates its access and modification timestamps. To create a file named “file.txt,” use:
touch file.txt9. file command
The file command is used to determine the type of a file. It provides information about whether a file is a text, image, or binary file. To check the type of a file, use the following syntax:
file file.txt10. zip and unzip commands
The zip command allows you to create compressed zip archives, while the unzip command is used to extract files from zip archives. To create a zip archive, use the following syntax:
zip archive.zip file1 file2To extract files from a zip archive, use:
unzip archive.zipThese are just a few of the essential commands you can use to navigate, manage files, and perform basic operations within the terminal. Let’s now dive deeper into text processing and searching.
File and Directory Management Using Terminal Commands
In this section, we will explore Linux terminal commands that will empower you to effectively manage files and directories.
11. nano, vi, and jed commands
Text editors such as nano, vi, and jed allow you to create and modify files directly from the terminal. For example, to open a file named “file.txt” using nano, use:
nano file.txtYou can edit the file, save it, and exit the editor.
12. cat command
The cat command is used to display the contents of a file. It can also be used to combine multiple files and create new ones. To display the contents of a file, use:
cat file.txtTo combine two files and create a new one, use the following syntax:
cat file1.txt file2.txt > new_file.txt13. grep command
The grep command allows you to search for specific patterns within files. It is a powerful tool for text processing and filtering. To search for a specific pattern within a file, use:
grep pattern file.txtThe grep command will display all lines containing the specified pattern.
14. sed command
The sed command is used for text manipulation and transformation. It allows you to find, replace, and delete patterns within a file. To replace a specific pattern with another, use the following syntax:
sed 's/pattern/replacement/g' file.txtThe sed command will modify the file accordingly.
15. head command
The head command displays the first few lines of a file. By default, it shows the first 10 lines. To display a different number of lines, use the -n option followed by the desired number. For example:
head -n 5 file.txtThis command will display the first 5 lines of the file.
16. tail command
The tail command is similar to the head command but displays the last few lines of a file. By default, it shows the last 10 lines. To display a different number of lines, use the -n option followed by the desired number. For example:
tail -n 5 file.txtThis command will display the last 5 lines of the file.
17. awk command
The awk command is a versatile tool for text processing and data extraction. It allows you to search for patterns and perform various operations on the data. For example, to extract specific fields from a file, use the following syntax:
awk '{print $1, $2}' file.txtThis command will print the first and second fields of each line in the file.
18. sort command
The sort command is used to sort the lines of a file in a specific order. By default, it sorts the lines alphabetically. To sort the lines numerically, use the -n option. For example:
sort -n file.txtThis command will sort the lines of the file in ascending numerical order.
19. cut command
The cut command allows you to extract specific parts of a line or a file. It is useful for splitting data into columns. To extract a specific field from a file, use the following syntax:
cut -f 2 file.txtThis command will extract the second field from each line of the file.
20. diff command
The diff command is used to compare two files and display the differences between them. It is commonly used for file comparison and version control purposes. To compare two files, use the following syntax:
diff file1.txt file2.txtThe diff command will highlight the lines that differ between the two files.
These commands will empower you to effectively manage files and directories within the Linux terminal. Now, let’s explore user and permission management.
User and Permission Management Using Terminal Commands
As a system administrator, managing users and permissions is an essential part of system administration. In this section, we will explore Linux terminal commands for user and permission management.
21. sudo command
The sudo command allows you to execute commands with administrative privileges. It enables ordinary users to perform administrative tasks without logging in as the root user. To run a command with sudo, use the following syntax:
sudo commandYou will be prompted to enter your password before the command is executed.
22. su command
The su command allows you to switch to another user account. It is often used to run commands as the root user. To switch to the root user, use:
su -You will be prompted to enter the root user’s password. Once authenticated, you will have access to root privileges.
23. chmod command
The chmod command is used to change the permissions of a file or directory. It allows you to control who can read, write, and execute files. To change the permissions of a file, use the following syntax:
chmod permissions file.txtThe permissions parameter can be represented using symbolic or numeric notation.
24. chown command
The chown command allows you to change the ownership of a file or directory. It is commonly used to transfer ownership between users. To change the ownership of a file, use the following syntax:
chown new_owner file.txtThe new_owner parameter specifies the user or group that will become the new owner of the file.
25. useradd and userdel commands
The useradd command is used to create a new user account, while the userdel command is used to delete a user account. To create a new user, use the following syntax:
useradd usernameTo delete a user, use:
userdel usernameThese commands must be executed with administrative privileges.
26. passwd command
The passwd command is used to change a user’s password. To change your own password, simply type:
passwdYou will be prompted to enter your current password and then set a new one.
27. groups command
The groups command displays the groups that a user belongs to. To view the groups that you are a member of, use:
groupsThis command will list all the groups that you are associated with.
User and permission management is crucial for maintaining the security and integrity of your Linux system. With these commands, you can effectively manage user accounts and control access to files and directories. Now, let’s delve into system information and management.
System Information and Management Terminal Commands
Understanding and monitoring system information is essential for system administrators. In this section, we will explore Linux terminal commands for obtaining system information and managing system services.
28. df command
The df command provides information about the disk space usage on your system. It displays the amount of disk space used and available on each mounted file system. To display disk usage information, use the following syntax:
df -hThe -h option displays sizes in a human-readable format.
29. du command
The du command is used to estimate file and directory space usage. It allows you to determine the size of individual files and directories. To display the disk usage of a directory, use the following syntax:
du -sh directoryThe -s option displays only the total size, and the -h option provides human-readable sizes.
30. top command
The top command displays real-time information about system processes and resource utilization. It provides an interactive interface that allows you to monitor CPU usage, memory usage, and other system statistics. To launch the top command, simply type:
topPress q to exit the top command.
31. ps command
The ps command displays information about running processes on your system. It provides details such as process ID (PID), CPU usage, memory usage, and command name. To display a list of running processes, use the following syntax:
ps auxThe aux options provide a comprehensive list of processes.
32. systemctl command
The systemctl command is used to manage system services in Linux. It allows you to start, stop, and restart services, as well as enable or disable them at startup. For example, to start a service, use the following syntax:
sudo systemctl start service_nameTo stop a service, replace start with stop. To restart a service, use restart.
33. journalctl command
The journalctl command is used to view and analyze system logs. It allows you to retrieve logs from the systemd journal and filter them based on various criteria. To display all system logs, use the following syntax:
journalctlYou can also use options to filter logs based on date, service, or log level.
34. uname command
The uname command displays information about the system’s kernel and operating system. It provides details such as the system’s hostname, kernel version, and machine architecture. To display system information, use the following syntax:
uname -aThe -a option displays all available information.
35. hostname command
The hostname command displays the system’s hostname. To display the hostname, use:
hostnameYou can also use options to display the fully qualified domain name (FQDN) or the system’s IP address.
36. uptime command
The uptime command displays the system’s current uptime and load average. It provides information about how long the system has been running and the average number of processes in the run queue. To display system uptime, use the following syntax:
uptimeThese commands will empower you to gather valuable system information and effectively manage system services. In the next section, let’s explore network management and troubleshooting commands.
Network Management and Troubleshooting Terminal Commands
In this section, we will explore Linux terminal commands for managing and troubleshooting network connections.
37. ifconfig command
The ifconfig command displays information about network interfaces on your system. It provides details such as IP addresses, netmasks, and MAC addresses. To display network interface information, use the following syntax:
ifconfigThis command will display information for all network interfaces.
38. ping command
The ping command is used to test network connectivity between two hosts. It sends ICMP echo request packets to a specified host and measures the response time. To ping a host, use the following syntax: Replace Host with the IP address or DNS name of the remote device or PC.
ping hostThe ping command will continuously send ICMP echo request packets until interrupted. To stop press CTRL + c to break out of the loop.
39. traceroute command
The traceroute command is used to trace the route that packets take from your computer to a specified host. It displays the IP addresses of intermediate routers and measures the round-trip time for each hop. To trace the route to a host, use the following syntax:
traceroute hostThe traceroute command will display the route and round-trip times for each hop.
40. netstat command
The netstat command displays network statistics and active network connections. It provides information about open ports, listening sockets, and established connections. To display network statistics, use the following syntax:
netstat -aThe -a option displays all available information.
41. ssh command
The ssh command allows you to securely connect to a remote host over an encrypted network connection. It is commonly used for remote administration and secure file transfers. To connect to a remote host, use the following syntax:
ssh username@hostReplace username with your username and host with the remote host’s IP address or hostname.
Note that on some Linux distributions SSH is not installed by default. Thus ssh needs to first be installed before you can make use of it.
42. scp command
The scp command is used to securely copy files between hosts over a network. It uses the SSH protocol for secure file transfers. To copy a file from a remote host to your local machine, use the following syntax:
scp username@host:source_file destinationReplace username and host with the remote host’s credentials, source_file with the file you want to copy, and destination with the local directory where you want to save the file.
43. nc command
The nc command, also known as netcat, is a versatile networking tool. It can be used for port scanning, transferring files, and creating network connections. To connect to a specific port on a remote host, use the following syntax:
nc host portReplace host with the remote host’s IP address or hostname, and port with the port number you want to connect to.
44. wget command
The wget command is used to download files from the internet. It supports HTTP, HTTPS, and FTP protocols. To download a file, use the following syntax:
wget URLReplace URL with the URL of the file you want to download.
45. curl command
The curl command is another versatile tool for transferring data over various protocols. It supports HTTP, HTTPS, FTP, and many other protocols. To retrieve data from a URL, use the following syntax:
curl URLReplace URL with the URL of the resource you want to retrieve.
These network management and troubleshooting commands will empower you to effectively monitor and troubleshoot network connections within your Linux system.
Package Management and Updating with Terminal Commands
A great part of Linux is making sure your system and its packages or programs are up to date. Using the Linux terminal you can easily achieve this
46. apt Command
apt is the most commonly used package manager for Debian-based distributions such as Ubuntu, Mint, and Elementary OS. It is a user-friendly and high-level tool that simplifies the process of installing, updating, and removing packages.
To check for packages that need to be updated simply run
sudo apt updateTo get all the packages that need to be updated run the following terminal command
sudo apt upgradeYou can also chain both of these terminal commands into a single line that will first check for updates and then if there are any, it will then proceed to download and install them: the syntax is as follows.
sudo apt update && sudo apt upgrade -yNotice the -y at the end, this is a conformation flag to automatically accept the upgrades if any.
If you want to review the action before accepting the upgrade action omit -y from the command
Note when using non-debian based Linux distributions you will will need to use their respectable package mangers such as yum, pacman, dnf an so on…
47. dpkg command
The dpkg command is a lower-level package management tool that is also available on Debian-based systems. It provides more granular control over packages and is often used for troubleshooting purposes. However, for most users, apt is the preferred option.
dpkg is useful in the event that problems arise with packages, you can use dpkg to essentially reconfigure or even continue an interrupted upgrade session.
To use dpkg to reconfigure all un-configured packages use the following command:
sudo dpkg --configure -a Overall Linux System Terminal Commands
The following commands with allow you to manage the Linux system operation
48. poweroff command
As the command implies, the poweroff command will shut down your PC. On some systems you will need root privileges to run it.
sudo poweroff49. reboot command
Furthermore as with the poweroff command the reboot command will restart your PC when executed.
sudo rebootBoth poweroff and reboot commands have additional parameters that can be used to change the behaviour of the command, have a look here
50. man command
Probably the most useful command in the Linux system the man command will offer you help or the documentation of any command available in the system. When in doubt or you need additional information about a specific command or argument you can use the man command to call up the documentation. Like so:
man <Your_command>Replace <Your_command> with any actual Linux command to call up help for that command. You can scroll the documentation and when done press q to quite and return to the terminal
Conclusion
In this comprehensive guide, we explored 60 essential Linux terminal commands for efficient system management. We covered various aspects, including file and directory management, text processing and searching, user and permission management, system information and management, and network management and troubleshooting. By mastering these commands, you will become a more proficient Linux user and system administrator.
Remember, practice is key to becoming comfortable with the Linux terminal. Experiment with these commands, explore their options, and gradually build your knowledge and expertise. Happy terminal-ing!