Setting up a simple virtual machine to run Windows 11 provides a convenient and flexible way to explore the latest features and functionalities of Microsoft’s newest operating system.
Virtual machines or VM’s for short simulate a complete computer system within your existing setup, allowing you to test software, perform development tasks, or simply experience a different OS without affecting your primary system.
In this guide, we will walk through the essential steps and considerations involved in setting up a Windows 11 virtual machine, from understanding the system requirements to optimizing performance and troubleshooting common issues along the way but first lets look at what is a virtual machine.
Brief introduction to Virtual Machines
Virtual machines are like having a computer within a computer – it’s like Inception, but for technology. They allow you to run multiple operating systems on a single physical machine. This comes in handy if you need to run some legacy software that is not longer able to work with newer hardware or if you want to test software quickly on different systems.
What is a Virtual Machine?
A virtual machine (VM) is a software-based emulation of a physical computer that operates within your existing operating system. In other words, it allows you to install and run one or multiple operating systems within a single computer. like an app.
Furthermore for instance servers can reduce the cost of having multiple physical computers for each roll assigned and instead you can setup one physical computer that can host multiple different isolated rolls. This also help manage power efficiency a lot better
Delving deep into virtual machines
Lets say you’re hesitant to commit your entire system to the unknown…
Enter the realm of virtual machines (VMs), a powerful technology that allows you to create a self-contained environment to run Windows 11 or pretty much any other Operating System from windows 95 or DOS right up to Windows 11, all within the comfort of your existing operating system in the form of an app like any other…
Provided you have a strong enough physical Computer since Virtual Machines can be very demanding on system resources.
The Virtualization Advantage: Why virtual machines are so popular
Isolation:
Virtual Machines create a sand-boxed environment, meaning the virtualized Windows 11 instance operates independently of your main system. This isolation provides significant benefits:
Safety First:
Experimenting with new software or tinkering with system settings in the VM won’t affect your primary operating system. Any potential crashes or conflicts remain confined within the virtual environment, safeguarding your critical data and applications.
Unleashing Legacy Software:
Running older software that might not be compatible with your current operating system becomes a breeze. The VM acts as a time machine, allowing you to seamlessly integrate past and present software needs.
Enhanced Security:
If you’re venturing into untrusted websites or testing potentially risky applications, the VM acts as a shield, preventing malware or viruses from infiltrating your main system.
Resource Efficiency:
Unlike a dedicated machine, VMs allocate resources dynamically. This translates to efficient resource utilization. You can tailor RAM, storage, and processing power allocation based on the specific needs of your virtual Windows 11, ensuring smooth operation without overloading your physical machine.
Versatility Unbound:
VMs aren’t limited to just Windows 11. You can create virtual machines for various operating systems, like Linux distributions or older versions of Windows, all within a single physical machine. This versatility fosters exploration and experimentation, allowing you to test software compatibility across different platforms.
Easy Migration and Backups:
Migrating a VM is a breeze compared to transferring data and settings between physical machines. You can simply copy the virtual machine files, making it easy to move your virtual Windows 11 environment to another computer. Additionally, backing up VMs is straightforward as you’re essentially backing up a single file containing the entire virtual environment.
Charting Your Course: Popular VM Software Options
With the advantages of Virtual Machines firmly established, let’s explore the battleground of VM software.
Here are some of the most popular contenders, each catering to specific needs:
- VirtualBox:
Open-source, user-friendly, and boasting wide platform compatibility (Windows, macOS, Linux), VirtualBox is a popular choice for beginners and veterans alike. Its intuitive interface and extensive documentation make it easy to learn and use. - VMware Workstation Player:
While offering a free version with essential features, VMware Workstation Player comes into its own with the paid version, unlocking functionalities like bridged networking and nested virtualization. This paid version caters to power users and professionals who require advanced features. - Hyper-V:
Built-in on Windows 10 Pro and above editions, Hyper-V offers seamless integration with the Windows ecosystem. Its tight coupling with Windows makes it a natural choice for those already invested in the Microsoft environment. However, Hyper-V lacks the platform compatibility of VirtualBox. - QEMU:
An open-source powerhouse, QEMU offers unmatched flexibility and customization options. It can emulate a vast array of hardware architectures, making it ideal for advanced users and developers who require granular control over their virtual environments. However, QEMU’s learning curve is steeper compared to user-friendly options like VirtualBox. Very Common for Running virtual Machines on Linux Host Systems
The TPM Conundrum: A Hurdle for Some, Not All
Windows 11 throws a new requirement into the mix: Trusted Platform Module (TPM) 2.0. This security chip enhances data encryption and helps safeguard your system. While TPM 2.0 is present in most modern machines, some older systems might lack it.
Here’s where things get interesting. Technically, some workarounds exist to bypass the TPM requirement for Windows 11 installation within a VM. However, these methods are not officially supported by Microsoft and can introduce security vulnerabilities.
We strongly advise against bypassing TPM checks, as the potential security risks outweigh any.
Recently, Microsoft has introduces countermeasures to Windows 11 that will not longer allow for some of the mentioned bypasses to work.
System Requirements for Running Windows 11 VM
Before you dive into the Windows 11 virtual machine world, make sure your hardware can handle the heat.
Minimum Hardware Requirements
To run Windows 11 in a VM, you’ll need a decent amount of RAM, a speedy processor, and enough storage space.
Processor:
- Minimum:
While Microsoft doesn’t officially list a minimum processor requirement for running Windows 11 within a VM, a dual-core (2 CPU cores) processor is generally considered the bare minimum for acceptable performance. Recently Windows 11 pushed updates that render older CPU’s Incompatible and thus you will need at least an 8th Generation Intel Processor or Second Generation AMD Ryzen Processor to install Windows 11. - Recommended:
For a smoother experience, a quad-core (4 CPU cores) or higher processor is recommended. This will allow Windows 11 to utilize multiple cores for improved multitasking and application responsiveness.
Memory (RAM):
- Minimum:
Microsoft specifies a minimum of 4 GB RAM for Windows 11. However, allocating only 4 GB to your virtual machine might result in sluggish performance, especially when running multiple applications simultaneously. - Recommended:
Aim for at least 8 GB of RAM allocated to your virtual Windows 11 machine. This will provide a more balanced experience for basic tasks. If you plan on running resource-intensive applications or multitasking heavily, consider allocating 12 GB or more for optimal performance.
Storage Space:
Furthermore lets look at Hard drive space, Typically a Virtual Guest will require you to allocate a decent size of your physical hard drive space. Some might install a large separate hard drive drive dedicated to hosting Virtual Machines from.
- Minimum:
Microsoft requires a minimum of 64 GB of storage space for a Windows 11 installation. However, this only accounts for the initial installation. As you install applications and store data, additional space will be needed. - Recommended:
Allocate at least 100 GB of storage space for your virtual Windows 11 machine. This provides sufficient space for the operating system, applications, and some user data. Consider allocating more space if you anticipate storing large files or installing demanding software.
Security Features:
- Trusted Platform Module (TPM) 2.0: This is a new minimum requirement for running Windows 11, both on physical and virtual machines. TPM is a hardware security chip that enhances data encryption and system integrity.
- Important Note:
While some workarounds exist to bypass the TPM check during virtual machine installation, these methods are not officially supported by Microsoft and can introduce security vulnerabilities. We strongly advise against bypassing TPM checks for a secure and stable virtual Windows 11 environment.
Additional Considerations:
- VirtualBox Version:
Ensure you’re using a compatible version of VirtualBox. While older versions might work, the latest versions offer better performance, security, and compatibility features for running Windows 11. - Host Operating System:
While VirtualBox is compatible with various operating systems, ensure your host machine (the physical machine running VirtualBox) meets the recommended system requirements for your specific host operating system (e.g., Windows 10, macOS). - Graphics Card:
While not strictly essential, a dedicated graphics card with sufficient video memory (VRAM) can improve the performance of graphically demanding applications within your virtual Windows 11 machine.
Setting Up a Virtual Machine with VirtualBox for Windows 11
Downloading and Installing Windows 11 ISO
Now the fun part lets star by getting the Windows 11 iso or image file.
Firstly, You can download the Windows 11 ISO from Microsoft’s official website or other trusted sources. It’s like ordering pizza – make sure it’s from a legit place and not some sketchy back alley.
Configuring VirtualBox Virtual Machine Settings
When setting up a virtual machine to run Windows 11, it’s crucial to configure the virtual machine settings correctly. This step ensures that the VM runs smoothly and efficiently.
VirtualBox offers a user-friendly interface for creating and managing virtual machines. Here’s a detailed breakdown of the process:
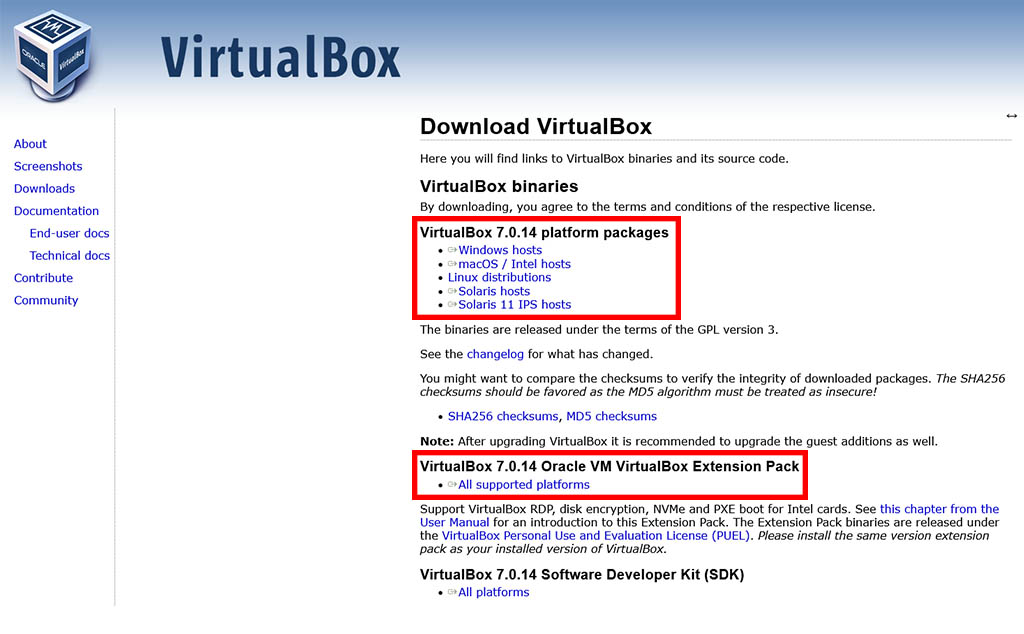
1. Download and Install VirtualBox:
- Head over to the official VirtualBox website: https://www.virtualbox.org/wiki/Downloads.
- Download the appropriate installer for your operating system (Windows, macOS, Linux).
- Make sure to also download the Extension Pack
- Double-click the downloaded installer and follow the on-screen instructions.
- During installation, you might be prompted to install additional Oracle components. These are typically recommended for full functionality, so feel free to select them for installation. if not you can install the Extensions Pack After installing VirtualBox
2. Create a New Virtual Machine:
- Launch VirtualBox.
- Click the “New” button in the main toolbar.
- In the “Create Virtual Machine” window:
- Name and operating system type: Enter a recognizable name for your virtual machine (e.g., “Windows 11 VM”).
- Version: Select the appropriate version of Windows 11 you plan to install (e.g., Windows 11 64-bit).
- Memory: Allocate memory (RAM) for your virtual machine. A good starting point is 4 GB, but you can adjust this based on your available system resources and the desired performance of your virtual Windows 11. Keep in mind, allocating more RAM will provide a smoother experience but will also consume more resources from your physical machine.
3. Configure Hard Disk:
- On the “Hard Disk” selection screen, choose “Create virtual hard disk now.”
- Select the type of virtual hard disk (VDI is the default and recommended option unless you plan on migrating the VM to another platform).
- Choose the storage on a physical hard drive. Allocate enough storage space for your virtual Windows 11 installation and future use. A good starting point is 50 GB, but adjust this based on your needs. Consider using the “dynamically allocated” option, as it will only consume physical storage space as the virtual disk fills up instead of allocating the space immidiatly.
4. Fine-Tuning Settings (Optional):
- Click “Create” to finish creating the virtual machine.
- You can now access the virtual machine settings by right-clicking on it and selecting “Settings.” This allows you to configure various aspects like:
- Network: Specify how the virtual machine will connect to your network (bridged networking is a common choice, allowing the virtual machine to access the internet like a separate physical machine).
- Storage: Add additional virtual hard disks or optical drives for your virtual machine’s needs.
- Shared Folders: Set up shared folders between your host machine and the virtual machine for easy file transfer.
- Display: Adjust display settings for your virtual machine.
5. Installing Windows 11:
- Using the downloaded Windows 11 ISO file (ensure you have a valid license for Windows 11).
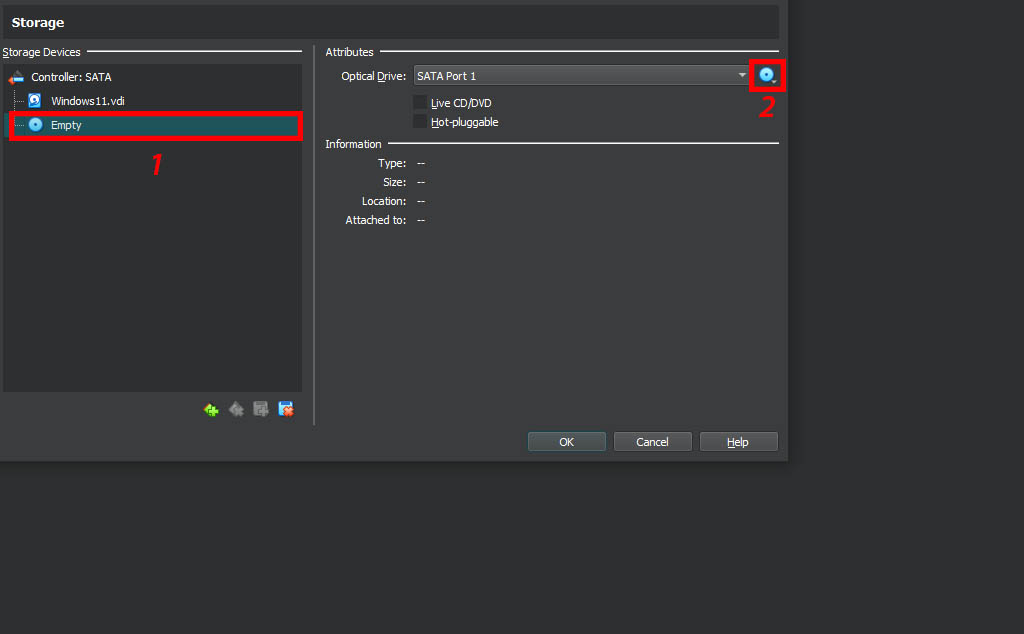
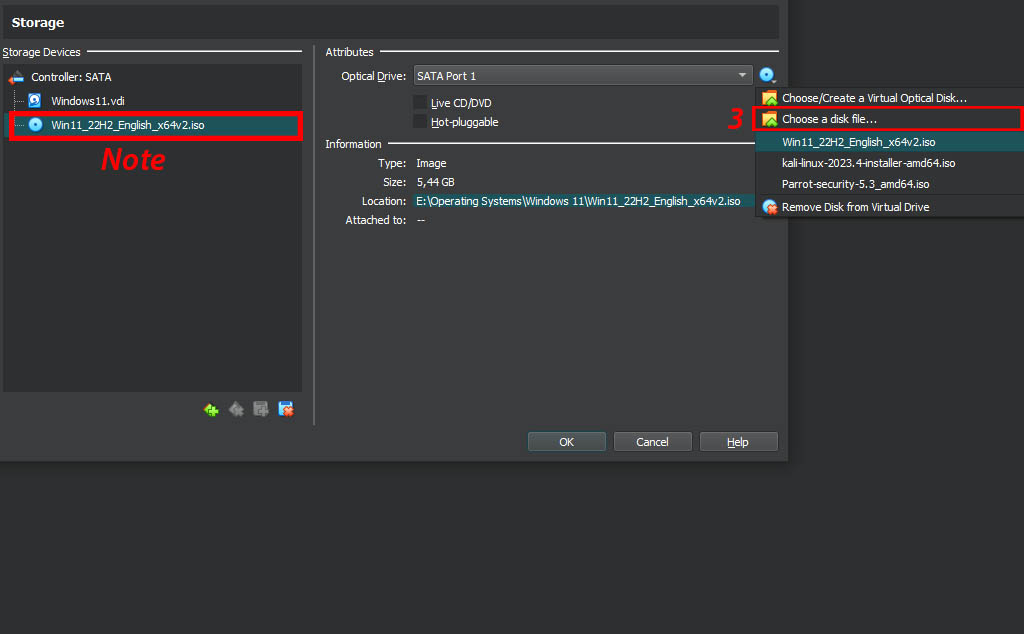
- In VirtualBox, right-click on your virtual machine and select “Settings.”
- Navigate to the “Storage” section and click the empty CD/DVD drive icon.
- Choose “Choose virtual optical disk file” and select the downloaded Windows 11 ISO file.
- Now, start your virtual machine by clicking the “Start” button in the VirtualBox toolbar.
- The virtual machine will boot from the ISO file, initiating the Windows 11 installation process.
- Follow the on-screen instructions to complete the Windows 11 installation within your virtual machine.
6. Guest Additions (Optional, Highly Recommended):
- Once Windows 11 is installed, install the VirtualBox Guest Additions within the virtual machine. This software enhances the performance and user experience by offering functionalities like shared folders, seamless mouse movement, and improved display resolution.
- To install Guest Additions, navigate to the “Devices” menu in VirtualBox while your virtual machine is running. Select “Insert Guest Additions CD image.” This will mount a virtual CD drive containing the Guest Additions installer.
- Inside the virtual machine, open the virtual CD drive and run the installer for Guest Additions. Follow the on-screen prompts to complete the installation.
- Reboot your virtual machine for the changes to take effect.
Conclusion
With Windows 11 now installed in a Virtual Machine you can run your Windows 11 instance inside of your primary (Host) operating system as you would any other app.
Take note that while this method offers you many advantages, gaming will not be one of them. Emulating hardware such as graphics will require GPU pass-through and as the time of writing this article Virtualbox does not offer such a feature. If gaming is your primary focus you will need to look at QEMU or HyperV instead.
A host system can have any number of Virtual Guests stored on and running on it, limited only to the amount of system resources you have available. Every time you start up a VM a dedicated amount of your Host Systems resources will be allocated to the Guest OS.