Dual Boot is where you want to make use of two or more operating systems but on the same computer choosing which one to use at startup.

Why Dual Boot multiple operating systems ?
Often times users that want to experiment and try out a new operating system without loosing their daily driver will opt in to setup dual booting.
In most cases, it is done between a Linux and Windows operating system.
Benefits of Dual Booting
With dual booting, you get the best of both worlds – the stability and security of Ubuntu Linux and the compatibility of Windows for those times when you need that one specific program that just won’t run on Linux.
Particularity useful if you want to try Linux, have software that require Linux or if you are a developer that needs to write software for Linux.
Cybersecurity specialists also make use of dual booting sometimes since Linux offers a better array of tools to conduct security audits.
Preparing Your Computer for Dual Boot Setup
Before you dive into the world of dual booting, it’s important to make sure your computer is ready for the challenge.
Checking System Requirements for Dual Booting
Make sure your computer meets the minimum requirements for running both Ubuntu Linux and Windows. You don’t want your computer to feel like it’s running a marathon while wearing flip-flops.
While the overall hardware requirement is lower than let’s say running Virtual Environments make sure you meet both Linux and Windows’ requirements.
Linux operating systems like Ubuntu can be set up to “share” a hard drive with Windows by partitioning it in two and it will work fine…
It is ideally better, to use two hard drives. One for Linux and one for Windows. This will limit complications should you no longer wish to dual boot between the two.
Backing Up Data
Before you start the dual boot setup, back up all your important files and data.
Trust me, you don’t want to lose that half-finished novel or your collection of cat memes in case something goes wrong.
We have a guide here: How To Backup My Windows Computer
Creating a Bootable USB Drive for Ubuntu
Step #1 – Getting Linux Ubuntu
To install Ubuntu Linux, you’ll need a bootable USB drive. You can Download the .ISO from Canonical Directly Here
Once you have the Ubuntu.iso file you need to flash it to a flash drive.
Step #2 – Preparing Linux Ubuntu installation medium via flash drive
First we need to prepare Ubuntu for installation using flash drive.
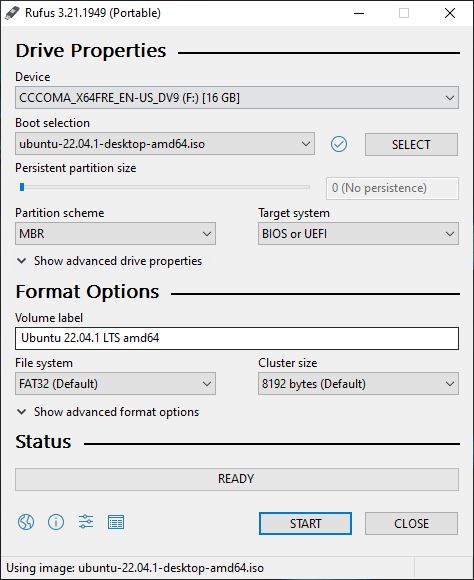
Plug the flash drive into your Windows PC than using Rufus select the USB flash drive and the Ubuntu ISO image you downloaded as shown below.
Next press “Start” to copy the Linux .iso files to the flash drive and make it bootable.
Installing the Linux Ubuntu operating system from the flash drive
Once Rufus is done we can now boot the computer from the flash drive to install Linux Ubuntu
We will need to boot from the flash drive and to do so I’d highly advise consulting your motherboard manufacturer documentation.
You will also need to configure how the BIOS or UEFI boot from flash drive.
If you are using a UEFI bios (which pretty much all new PC’s use today) then You have a choice:
A quick word on Secure Boot and the UEFI
Secure boot is a feature in UEFI/BIOS which restricts what code can run when the computer boots.
This helps prevent malware from loading before the operating system, thus improving security of the computer overall.
Traditionally, disabling Secure Boot was recommended for dual booting because most Linux distributions weren’t signed with keys recognized by UEFI/BIOS.
However, most major Linux Distributions now has some implementation that supports dual booting with secure boot turned on making it much easier and safer.
It’s important to note that Windows 11 specifically requires Secure Boot to be enabled.
Two Options To Consider:
- Disable Secure Boot (if comfortable BUT LEAVE IT Enabled If you have Windows 11):
- This is the simpler option, but offers less security.
- Consult your motherboard manual for instructions on how to disable it in UEFI settings.
- However leave Secure Boot Enabled if you are using Windows 11.
- Enable Secure Boot (recommended for better security):
- Requires adding a key for your Linux distribution during installation.
- This process varies slightly depending on the distro you choose. Some may require enrolling a MOK key.
- Refer to your distro’s documentation for specific instructions. On Ubuntu a new MOK is automatically generated without further user interaction.
More on how Ubuntu manages and handles Secure boot Here
Assuming you already have Windows installed
It is time to boot from the flash drive and Install Ubuntu Linux.
Most computers will have a shortcut key such as F2, F9, F10 or F12 to bring up a boot menu.
We will need to tell your Computer to boot the flash drive and launch the Ubuntu Installer so we can install it.
Sometimes Windows being windows makes it very difficult to get into a boot menu. Luckily you can tell Windows to boot a flash drive on the next system boot.
While in Windows open start and hold down the Shift key while you select Restart.
Windows will restart and provide you with advanced options like this.
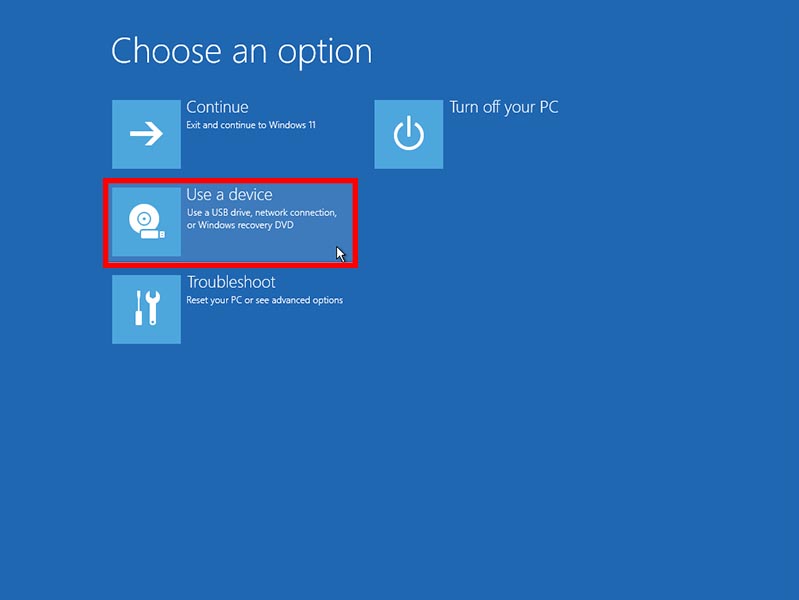
Select the Use a device option from the list then on the next screen choose your Linux flash drive that was created with Rufus.
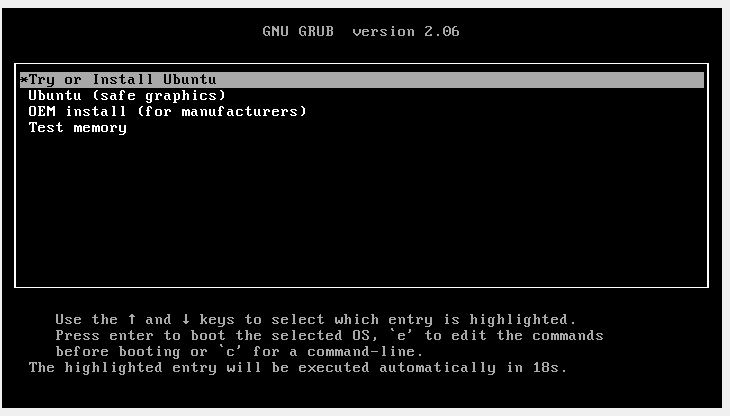
You will know you have successfully booted when you reach the Ubuntu GRUB Installer Screen shown below.
Choosing to Install Linux along side Windows on the same hard drive or another drive.
Now comes the fun part – actually installing Ubuntu Linux alongside Windows or choosing to install Linux to a new hard drive
If you choose to install Windows to another hard drive make sure you select the correct drive in the Ubuntu Installer.
To make room for Ubuntu, you’ll need to partition your hard drive.
To simplify things you can have the Ubuntu installer manage all that for you however if you want to get your hands dirty you can also setup the partitions manually.
This is risky for inexperienced users so be warned.
Installing Ubuntu Alongside Windows – Not really recommended
During the installation process, you’ll be given the option to install Ubuntu alongside Windows… While I am not particularly a fan of this practice it is the default option.
What happens next, should you choose this method is that the Ubuntu installer will resize your Windows Partition and allocate or take space from Windows and give it to Ubuntu.
The Pro’s of Installing Ubuntu Alongside Windows (Sharing the Same Hard Drive)
- Easy to setup, the Ubuntu Installer will do it all for you.
- Convenient when you only have 1 hard drive in your PC.
- Might be the only option for PC Laptop Users
The Drawbacks of sharing the same hard drive.
- Sacrificing Windows Hard Drive space to Linux that cant be used by windows.
- The Boot loader will override native Windows boot and this can cause issues later.
- If you choose to not dual boot anymore its a pain to remove Linux and restore everything back to windows.
- Can lead to breaking your Windows install or Linux install, when Microsoft Update’s Windows
- Will Require advanced Windows repair skills if ever you wish to remove Linux and revert back to windows only
Windows will not be able to access anything on the Linux Partition as Windows does not support the Linux File system called EXT4.
However, booting into Linux you can access your files inside the Windows partition. Linux can read from a Windows drive if its not encrypted using Bitlocker.
A better way, Use a separate hard drive for dual booting
This method is my preferred one, Leave the Windows Installation alone and install Linux onto it’s own Hard Drive.
We have a guide on How to install a new Hard Drive if you need more information.
If you choose to go with this option then Linux will install to its own hard drive. the GRUB boot loader will also install to that hard drive esencially giving you two boot loaders that work independently.
The up side of giving Linux its own Hard Drive
- Leaves Windows completely alone. So if you ever choose to not dual boot anymore you can revert quickly.
- Linux is flexible and you can easily move the hard drive to another computer
- Does not effect Windows and its Boot loader in any way.
- You can still access files on your Windows hard drive via Linux.
The down side of giving Linux its own Hard Drive
- It is a little more costly as you will need another hard drive for this
- Setting it all up is a little more involved and you need some understanding on how the UEFI/BIOS works
The choice is yours on which method you choose. Both has its pros and cons and you need to wieght the odds.
On Laptops you might not be able to go with option two as most laptops do not offer any way to install an additional hard drive.
Check out Laptops vs Desktops: Which one should you consider and why?
Pro Tip: If you are scared to mess things up. Unplug your Windows Hard Drive from your Computer BEFORE installing Linux to the secondary drive.
This way you cannot by accident mess up windows.
Installing Linux Ubuntu for Dual Booting with Windows
Select Install Ubuntu on the first screen of the installer.
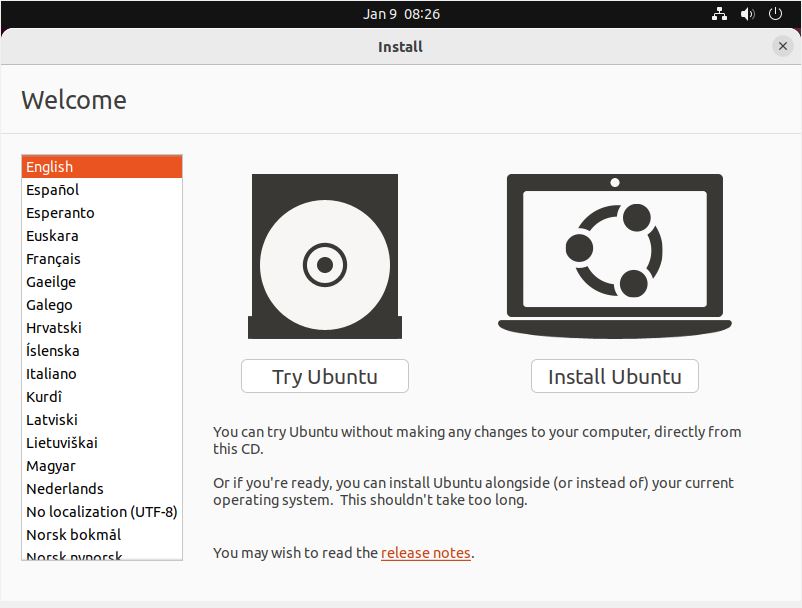
Choose to install Ubuntu then on the next screen select your Keyboard and language.
When you are ready, continue on to the next section Where you will be selecting what type of install you want. For most users its the Normal Installation (default).
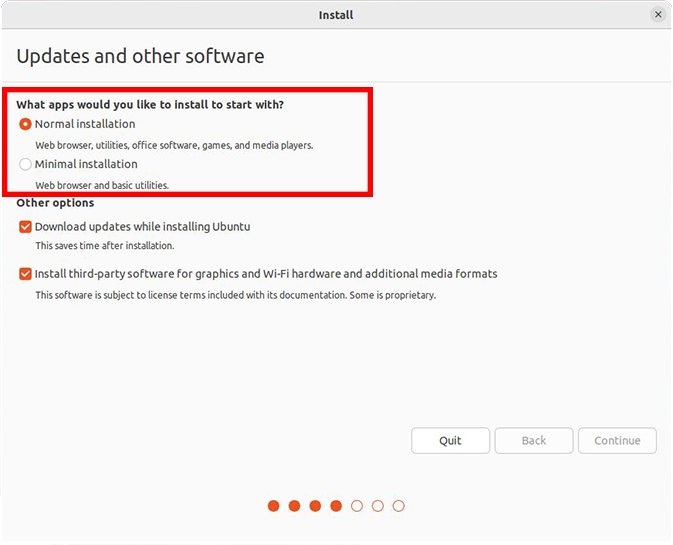
Now you need to Pay Attention
The next step is where we will decide on how Ubuntu is installed.
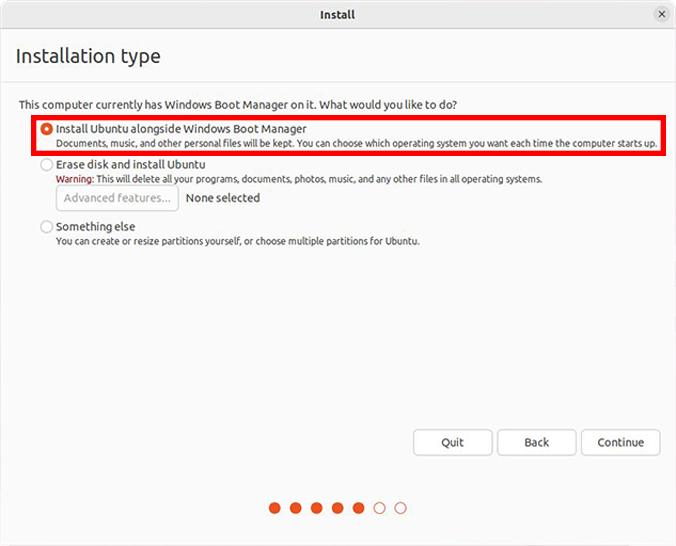
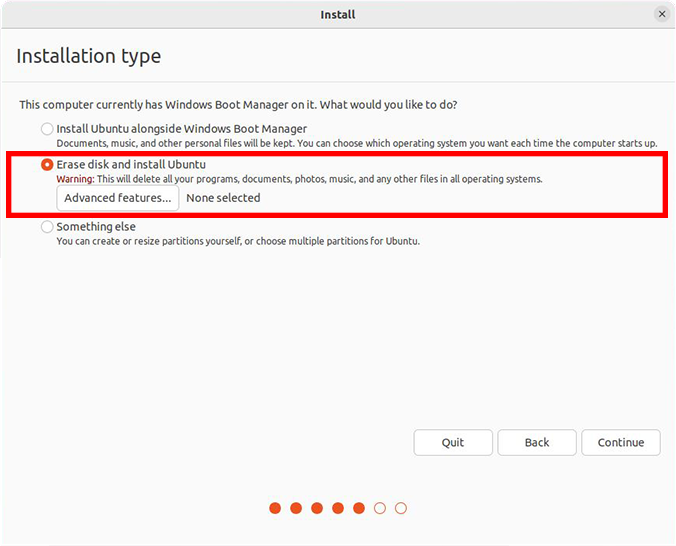
The installer here is a little misleading, if you want to install Ubuntu alongside windows then the option is clear, pick the First Option
Installing Linux Ubuntu Alongside Windows (Same Hard Drive)
By default your Hard Drive containing Windows will be selected, all you need to do now is allocate space for Linux Ubuntu.
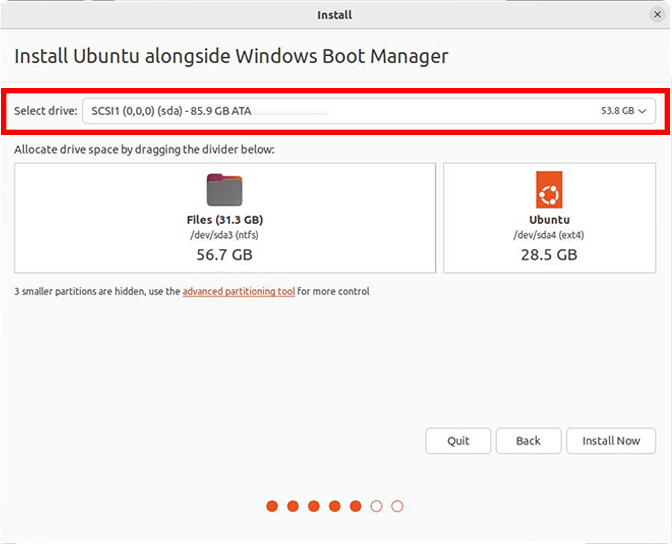
Use the dividing slider and drag it left or right to to allocate space for Linux Ubuntu. Remember that space allocated to Linux will not be usable to Windows.
Install Linux Ubuntu to a separate secondary drive for Dual Booting
However if you want to install Ubuntu to a different secondary hard drive:
Select the Second Option – Erase Disk and Install Ubuntu in the list.
Next up you will be asked to specify the hard drive you wish to erase and install Ubuntu onto.
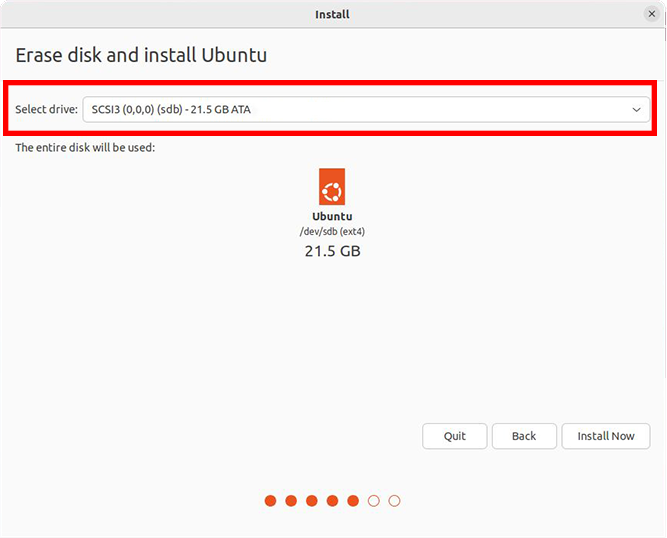
Make very sure you select the correct drive here. It will be erased and used for Linux exclusively.
Experienced users can opt for the 3rd option called “Something Else” but in doing so you will need to manually create all partitions on the desired hard drive such as:
A UEFI boot partition of at least 500mb, the root (/) partition, home (optional) and swap partition.
We will not be covering this method in this article. Moving along to the next phase…
After this continue with the setup by filling in your name creating and account and so on, when done you can reboot the PC.
Now depending on which installation option you went with different scenarios will play out after a reboot.
Managing Boot Options and Boot loader Configuration
Once you have both Ubuntu Linux and Windows installed, you’ll need to manage how your computer boots up and handles the two operating systems.
Overall, Windows does not play nice with booting other systems and in recent years its become much more complicated to have the Windows Boot loader recodnise and allow booting into Linux so we will flip the script a bit.
We will be assigning the Linux Boot loader GRUB to boot both systems.
When you power on your PC, the UEFI BIOS will boot to GRUB and from there you can choose which Operating system to boot into.
Grub can detect Windows and will create an entry on its boot menu for you even if Windows is installed on a separate hard drive.
Differences depending on your needs
However, if you decided to opt for “Option 1” and installed Linux along side windows then you will need to repair Windows to be able to boot it if you ever removed Linux and GRUB.
As I pointed out previously, if you go with “Option 2” and wish to remove Linux you can simply point your UEFI/BIOS to boot from the windows drive again.
Thus if you installed Linux Ubuntu along side Windows upon restart you will notice that by default your system will boot up in grub. Windows should be on the list but by default your system will boot to Linux Ubuntu by default.
If you opted to install Linux to a different hard drive then you will realise upon system restart that nothing changed. your PC will still just boot to Windows with no option to select Linux.
To fix this you will need to enter your UEFI/BIOS and change the default boot drive to poit to the Linux drive. Once done, your PC will boot to GRUB and then you can select which OS to go into.
Understanding GRUB Bootloader
GRUB (Grand Unified Bootloader) lets you choose which operating system to boot into.
Depending on your chosen method, you will most likely either see grub booting up the next time you start your PC up or you it will boot straight into windows.
If you installed Linux Ubuntu along side Windows then Grub would replace the windows boot manager.
If you installed Linux Ubuntu on a separate hard drive then you will need to configure your PC to boot to the Linux drive.
Setting Default Boot OS
You can set the default operating system to boot into if you don’t make a choice.
To do this using grub, Boot into Linux Ubuntu then from the terminal edit the grub config file by running the following command:
sudo gedit /etc/default/grubNow look for and change the value of GRUB_DEFAULT to the name of the Windows system you want to always boot.
Lets say I wanted to have Window 11 always set as default at boot, I would set GRUB_DEFAULT to "Windows 11 (loader) (on /dev/sda1)"
For Example:
GRUB_DEFAULT="Windows 11 (loader) (on /dev/sda1)"Note: Some versions of Ubuntu require single quote (‘) vice double quote (“).
Alternatively, you could also set GRUB_DEFAULT to the line number in the menu entry list (with 0 being the first), but when the kernel in Ubuntu is updated grub adds the new kernel to the top of the list, you would have to change the number, since Windows is the last one in the menu entry list.
When done save the grub config file then update the grub boot loader to apply the changes.
Updating Bootloader Configurations
If you ever need to update or change your bootloader configurations
In Linux Ubuntu you can open a terminal and run
sudo update-grubWhich will force grub (linux boot loader) to look for and fix missing entries.
In windows you will need to use BDCEdit, a tool provided by Microsoft with Windows.
While it is technically possible to force an entry into Windows to boot to Linux, its not straightforward to setup and it can break when windows updates. So its better to use grub instead
Configuring System Settings for Dual Boot Stability
A note on Time and Date Sync
When dual booting between Linux and Windows you will notice that there is a time discrepancy between the two.
That is because Linux and Windows handles time differently and both will update your computers time in the UEFI/BIOS when they boot up.
Windows Uses Local Time where as Linux uses UTC time.
To fix this, you can set Windows to auto sync the time or you will need to adjust Linux and the way it handles time to be more inline with Windows.
To make Linux use local time run in Terminal:
sudo timedatectl set-local-rtc 1 --adjust-system-clockMore on that Here
Troubleshooting Common Issues with Dual Boot Setup
Resolving Bootloader Issues
Windows offer tools like BCD Edit to troubleshoot and repair Windows boot sequence
Where Linux offer you a live environment and tools such as Boot-Repair and grub
Dealing with Grub Rescue Mode
Enter Grub Rescue Mode, the mysterious realm where lost bootloaders wander aimlessly. If you find yourself in this predicament, fear not.
With a bit of patience and know-how, you can navigate through Grub Rescue Mode and guide your system back to the light of dual-booting harmony.
Sometimes in Ubuntu running:
sudo update-grubCan resolve issues where Windows was not detected and you cant boot certain operating systems.
Alternatively holding down “Shift” while booting will bring up advance grub options as well for more troubleshooting tools.
Closing Thoughts
Dual booting Ubuntu Linux and Windows opens up a world of possibilities for users who want to harness the strengths of both operating systems.
However caution should be taken when setting all this up. if you are not sure rather seek the help of a qualified support center such as Micro Fusion Computers to do it for you.
By following the steps outlined in this guide, you can seamlessly switch between Ubuntu and Windows, maximizing productivity and customization on your computer.
But remember to backup your data, stay informed about system updates, and troubleshoot any issues that may arise along the way.
Embrace the dual boot experience and enjoy the best of both worlds in your computing journey.