In this article we will show you how to setup and make a computer backup of your entire system or just your important data the easy way.
Why do a computer backup ?
Making a backup of your computer is essential to keep your data safe in today’s digital life and prevent data loss against hardware failure, theft viruses and even in most cases safeguard you against ransomware attacks.
When it comes to computer backups there are a few ways we can store the backups, this is ideal for a NAS Server which we have a nice step by step tutorial that you can follow about creating your own home NAS Server. The other way might be to use an additional hard drive on your Computer to store the files. But this might not be the safest way as it wont protect you from theft or ransomware. Then there is the external hard drive way that most home users will be able to manage.
Then there is always 3rd party software you can use to make life easier.
Choosing the right method
There are a few ways to make a computer backup. Windows 7,8 and 10 comes with a simple backup tool build right in provided you are using the Pro versions of Windows. However there are many other software out there that will do better computer backups for you on any Windows system you are using. Let’s look at some now.
#1 AOMEI Backupper
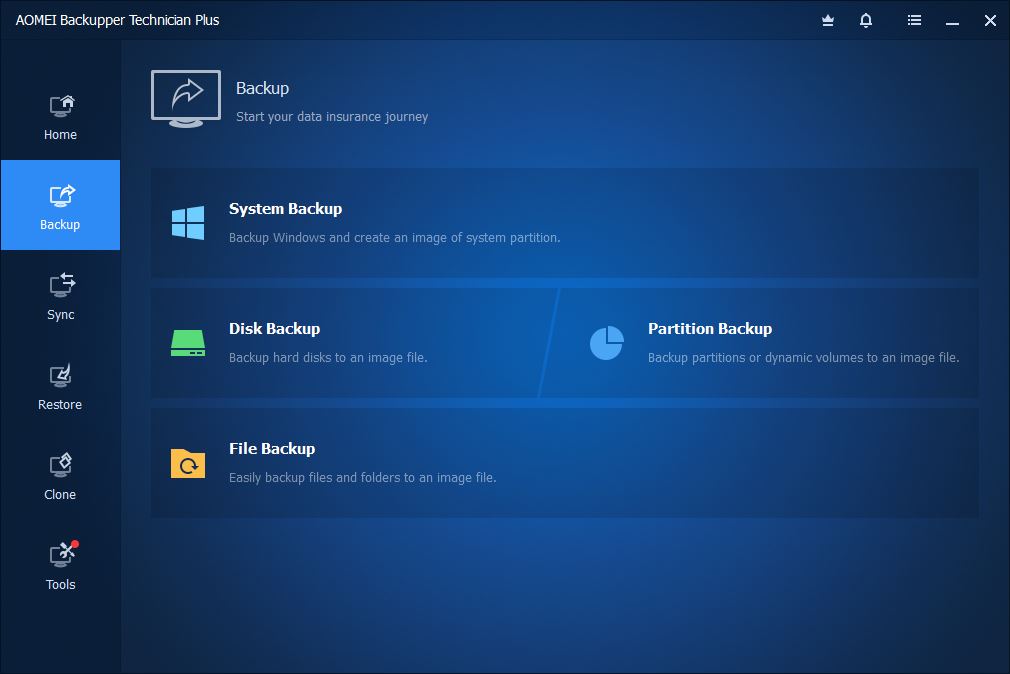
AOMEI Backupper is a complete PC backup software suite that is amongst the leading 3rd party computer backup software on our list. It’s easy to setup, reliable and offers a great selection on features that’s easy to understand and use. Micro Fusion highly recommends getting a copy of AOMEI Backupper to make backing up your Windows PC a breeze irrelevant of that version of windows you are using…
System Backup vs File Backup vs Synced Backup whats the difference ?
A system backup is a complete backup including the entire Hard Drive and all of its content. This will most likely include the entire Windows operating system as well as the apps installed and user’s data and settings. In the event of a hard drive failure you will be able to restore the computer completely to its original working state.
A File backup is a backup done where only your data is backed up to another location. In the event of a hard drive failure you will not be able to restore the computer completely but you will have access to your backed up data at all times. This type of backup will make sure you have multiple copies of your data and in the event of accidental deletion or hard drive failure you will still be able to view and restore your backed up data.
A synced backup is basically the same as a file backup however instead of the backup being scheduled to run periodically a sync backup will make sure both locations are exactly the same at all times. This backup will not protect you from accidental deleting files or virus attacks because the files will get synced between two or more locations.
Pro Tip: Its a Good idea to make use of all 3 backup methods to maximize your safety of your data.
You can easily use AOMEI Backupper to backup the entire computer or just selected files and folders to a NAS Server or another hard drive, USB drive or an extra one that is installed. There is also the option to sync your data. This use useful for keeping both locations up to date with the same data.
Restoring a System Backup in the event of system failure using AOMEI Backupper
After setting up a backup plan and making at least one System backup, we will now look at restoring a system to its original state in the event of system failure or hard drive failure.
You will need to create a AOMEI Backupper Boot Media. This is a CD or DVD image or a flash drive that we will be able to boot from in the event of a system failure that when can then use to restore the backup image to the hard drive.
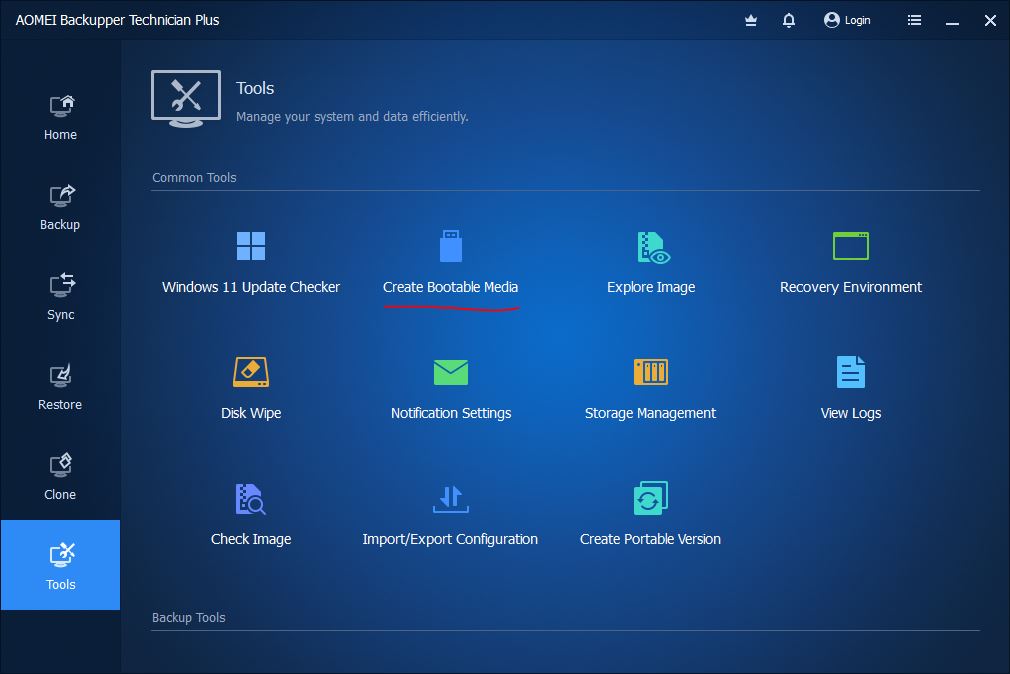
In AOMEI Backupper go to the tools section and click on the Create Bootable Media option.
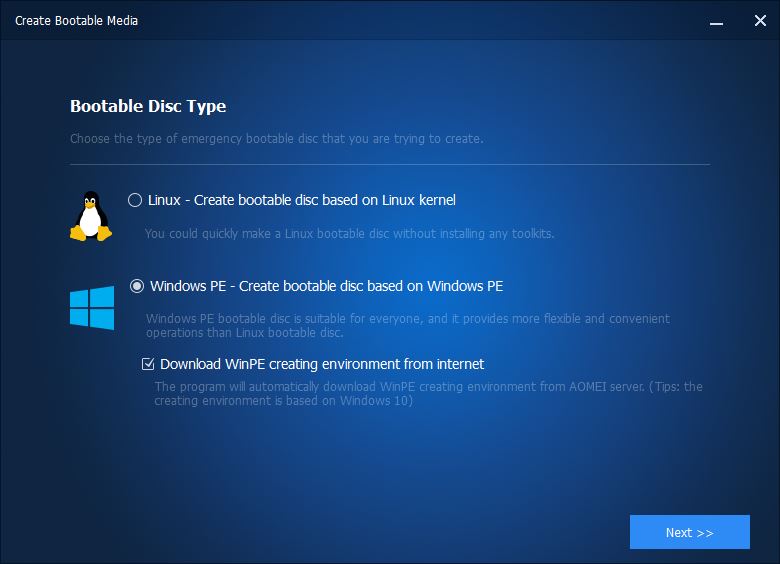
Next you will be asked which environment you would like to use, Linux or WinPE. For this to keep it simple we will select WinPE. Make sure to check the option to download WinPE from the internet option.
Next, we can choose what type of bootable media we wish to create. Modern Computers can boot from USB Flash drives but for older computers you might wish to select ISO or CD drive. Basically an ISO is a disk image that AOMEI Backupper will create that can later be either written to a flash drive or a CD/DVD.
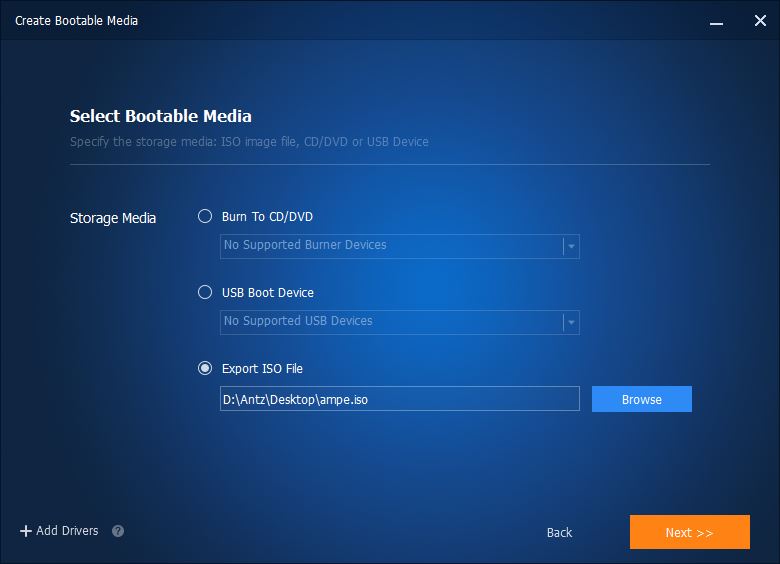
AS you can see, I selected the ISO option here as i want to have backwards compatibility with both newer and older computers.
AOMEI Backupper will now download WinPE and prepare the boot medium for you. This will take a little time depending on your internet speed.
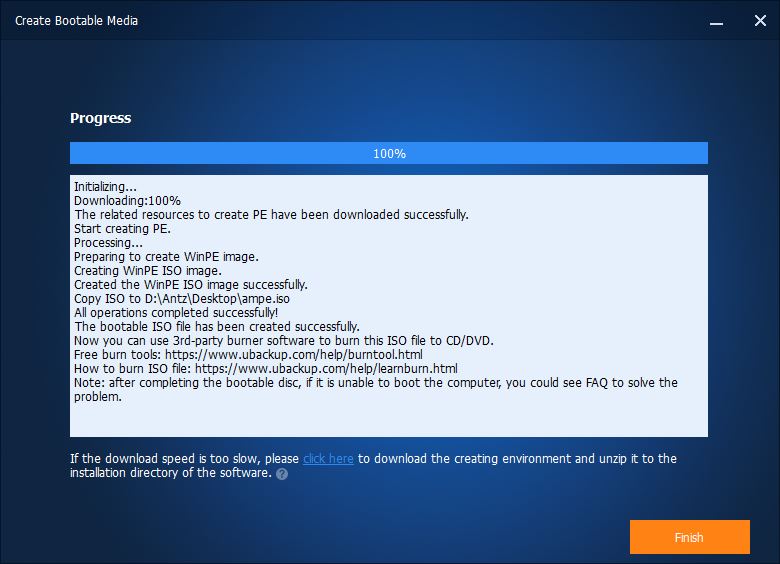
After the bootable medium is created its recommended to store it with your backups or if its a flash drive keep it in a safe place. You can then use this bootable CD/DVD or flash drive to restore the System Image backup in the case of system failure.
Restoring a system from AOMEI Backupper system image backup
In the event that you need to restore your computer where it can no longer boot Windows due to hard drive failure or virus attack or Windows corruption take the following steps.
If the hard drive failed then you will need to replace it first. Follow the guide we have here on how to install a hard drive into a desktop computer
Get your Boot medium ready. if its a flash drive plug the USB drive into the usb port on your computer and turn it on.
If its a CD/DVD power on the computer then open the CD drive and insert the bootable CD/DVD disk you created.
We need to make sure the computer boot from the bootable media. You need to access either the boot menu, BIOS or UEFI and make sure you set that to boot from the USB, or CD/DVD drive.
If you are using a newer PC that has a UEFI then you need to disable secure boot in the UEFI BIOS first. Look for the setting under the boot options or check your motherboard manual or the manufacturer website on how to do this.
Once AOMEI Backupper as booted you will be greeted by a light weight version of AOMEI Backupper, from there select the Restore Option.
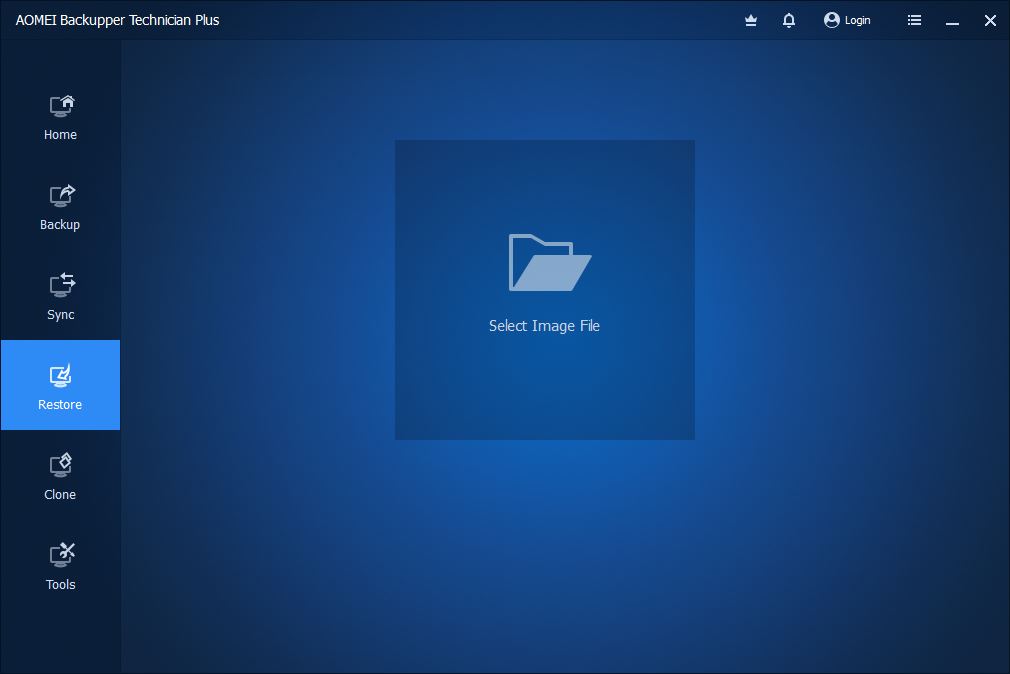
Next you will be asked to point to the System Backup Image that you have created. This can be on a NAS Server, External or Internal Hard Drive.
Once that is done you can choose the destination drive to restore the backup too and AOMEI Backupper will then restore your system backup.
When completed, you should be able to reboot into Windows again and the system should be exactly as when the backup image was made.
#2 Windows 10 Backup
Lets look at using the build-in Windows 10 backup tool. It will be very basic and limited compared to AOMEI Backupper but we can still make use of it.
You will need to have either Windows 10, Windows 8 Pro or Windows 7 Professional to be able to use the back up features. Windows 11 has chosen to do away with the build in backup tool as of this article but this may or might not change. So again we recommend getting a 3rd party app to manage backups for you.
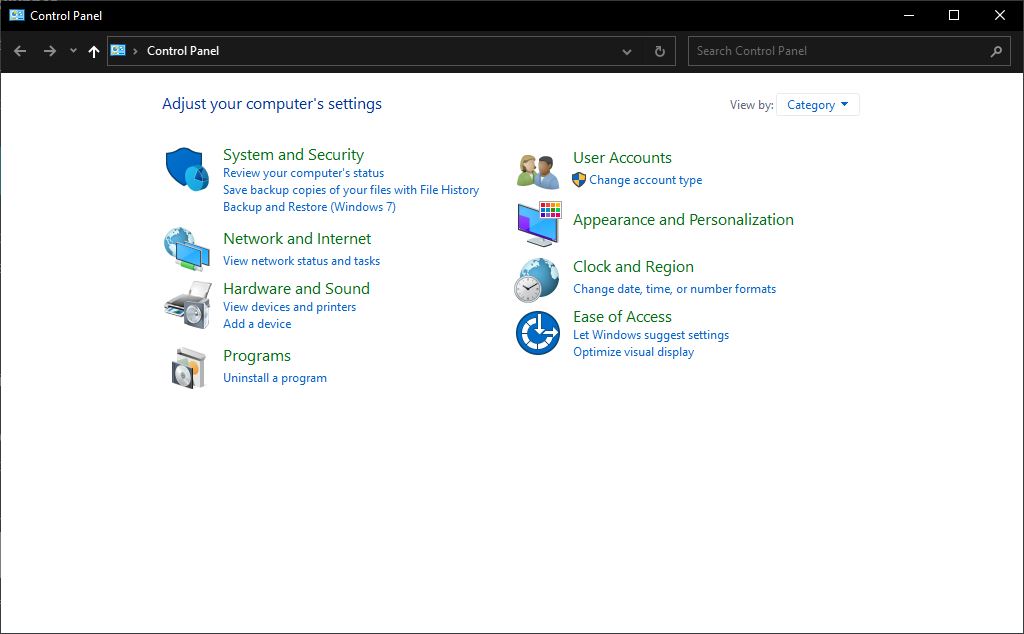
We will be using Windows 10 for this demonstration, On your desktop in the bottom left hand corner left click on the start menu icon then type in Control Panel. You can also do a search for the Control Panel application from the search field.
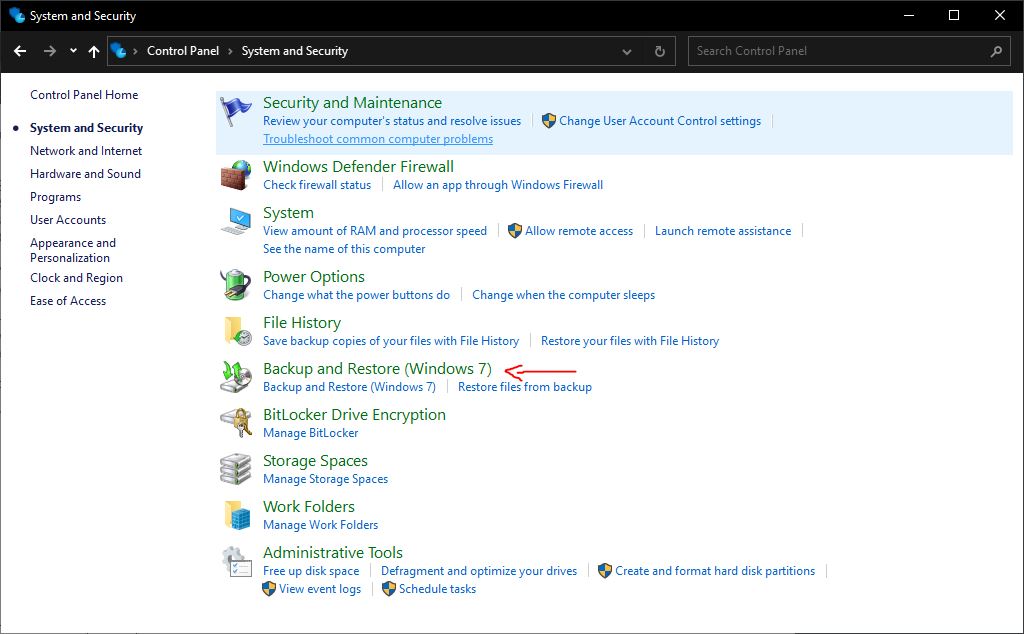
Open Control Panel. Then look for the System and Security option
Next, Look for the Backup and Restore option as indicated below and open it. On Windows 10 it will say Windows 7 that is fine. Its basically compatible with Windows 7 backups so you can always access your Windows 7 backup using windows 10 as well.
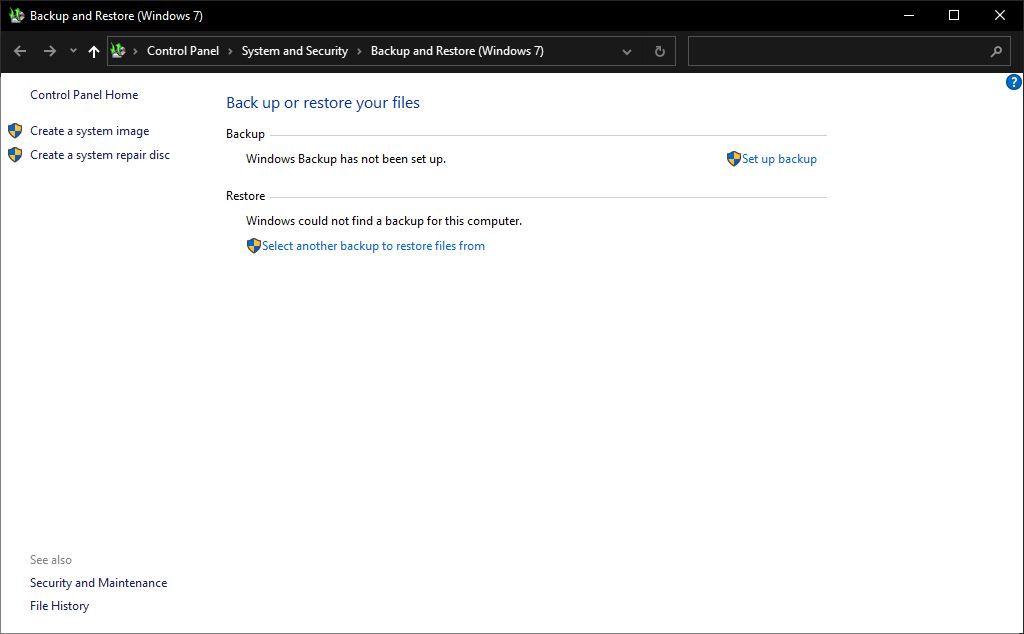
Once open, you will have some choices on what type of backup you wish to make. You can, make an entire system backup or you can setup a backup schedule for files and folders. Both of there options can be used with a NAS server, USB external hard drive or an extra internal hard drive.
Setting up a backup Schedule on Windows 10
We will be setting up a backup schedule for folders and files, this will make sure that your important data is backed up at a second location that’s not stored on this computer. This is by far a better practice then having the backups stored on the same computer. Look for the option Set up Backup and click on it.
Next we will be selecting where the backup’s will be stored. If you have a NAS Server select the Save on a network option else wise you can select your external USB drive or extra internal hard drive from the list. For this tutorial we will be selecting a a NAS server as the target location for our backups.
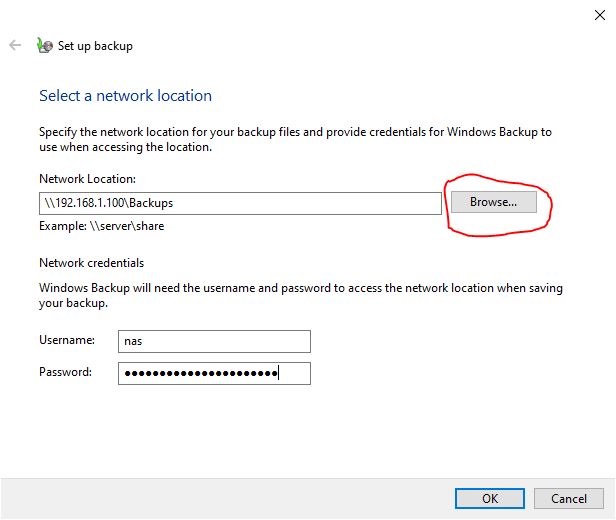
Fill in the IP address of the NAS server or its hostname, I find that an Static IP is usually more reliable then using the host name. for out example the NAS server we are using has the following address. 192.168.1.100 Where Backup is the folder that’s shared on that server that we want to send and store the backups too. If you are not sure what the address is, use the Browse… option to locate the Server and its shares on your network.
Don’t forget to also fill in the username of the server as well as the password you use to access the share folders. Once all that is done we can continue to the next step.
Which backup option to choose ?
A new entry will be created in the backup destination list. Locate and highlight the network share we just created in the list then select Next.
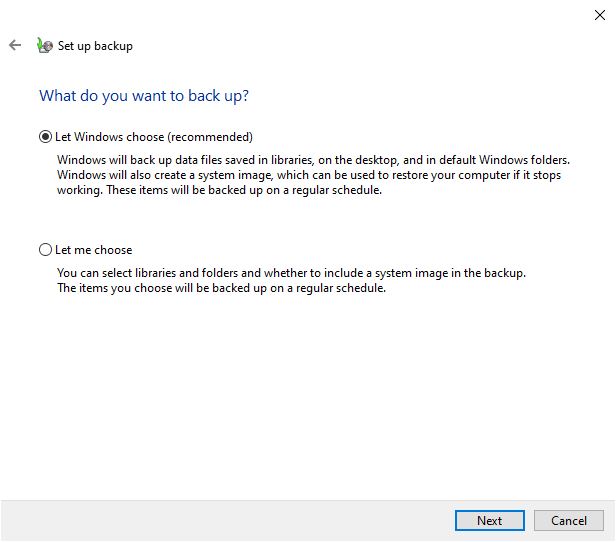
You can let Windows decide what to backup for you or you can choose. I always like to specify my work folders for backups. The choice is yours here.
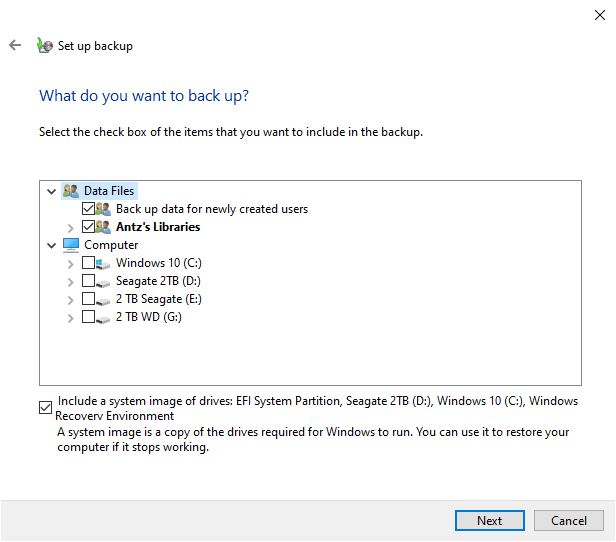
Tick any folder you wish to include in the backup schedule. Windows will also ask you if you want to make a System image. This is useful if you ever have a complete hard drive failure then you can use this image to restore your computer. So we will leave the option checked. Its completely up to you to decide what you want to include in the backup. Just take note that you will need enough free hard drive space on the backup destination to store the system image and other backups.
You may also now set the desired schedule for then windows will run the backup. Its recommended to schedule the backup for when you are not going to use the computer. Maybe in the early hours of the morning or late afternoons. Its recommended to do backups at least once a week.
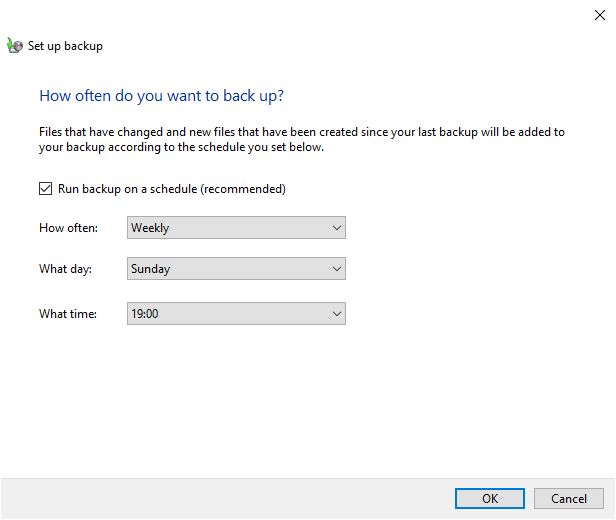
When all is done, you can hit OK and then Save Settings and Run Backup. windows will then start to do the first backup. thereafter it will keep to the schedule you have set. You can always come back here to make adjustments to the backup, schedule or folders that needs to be excluded or included.
Doing a Complete Windows 10 system backup
Select the Create System Image option from the main backup app screen.
Next we will need to select where we want to store the system image backup, again we will use a NAS server to store the backup on a remote computer that’s on out network. You can always choose an external hard drive here. But we will use a NAS
Next we need to choose which hard drives you wish to backup. if your computer has multiple hard drives you can choose only the Windows Drive or all of them.
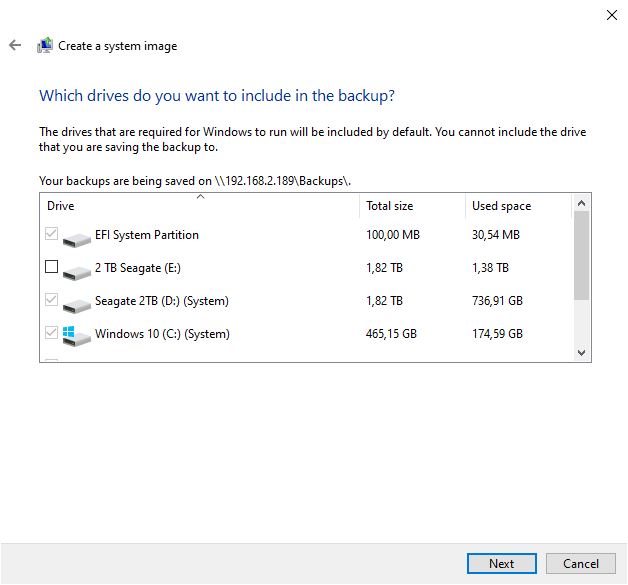
Just keep in mind that the destination where you are going to store the backup will need to have enough hard drive space available to accommodate the backup.
Windows will automatically select the system hard drive and partitions that is required to make the current computer work.
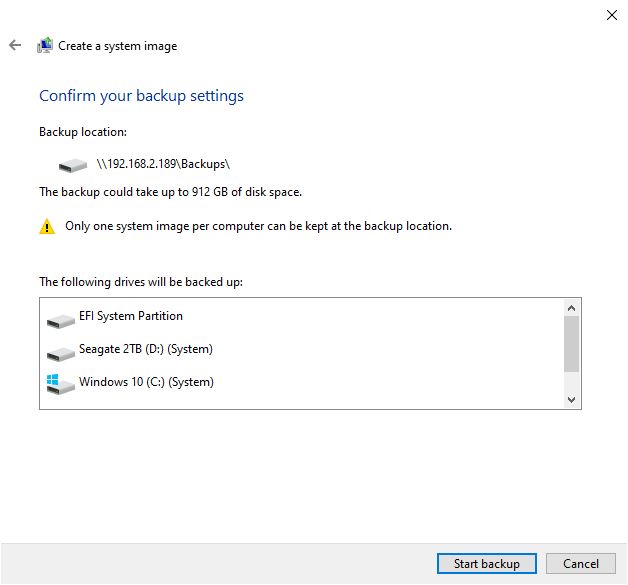
Next we will proceed to verify the backup settings and then we will start the backup. Windows will only store one system image per computer. If another one exists it will be overwritten and updated with the latest one.
The difference between schedule backups and a system image
Each of the two backup types have their pro’s and cons and when you should use the, Lets look at when to use which type of backup solution.
Scheduled Backups
These backups as the suggested are frequently done and can cover exactly what the user needs to be kept safe in the event of system or hardware failure.
What are scheduled backups good for:
- Smaller space required overall
- Highly customizable
- Faster to make and restore overall
- More up to date usually as they run on a schedule
What scheduled backups falls short on is:
- Can’t recover the system in event of a hardware failure. Windows will still need to be reloaded.
- Users might forget to include important files
- Runs weekly or more often and can impact system performance.
- Needs to be updated periodically to make sure important folders and files are covered in the backup plan.
System Image Backups
System Image backups are the absolute backup. It will contain a snapshot of your entire system. A user cannot normally choose what to include or exclude as a system image usually include everything.
What is a System Image Backup good for:
- Contains the entire structure of the system.
- Can be used to restore the computer in the event of a hardware failure.
- Users don’t have to worry about forgetting anything as the backup will have everything in
The downside of System Image backups:
- Can take up a lot of space on the backup server
- Slow to create and can take a long time depending on how many hard drives needs to be backed up
- Usually done once in awhile so might be less up to date then a scheduled backup schema
- Normally can’t be scheduled, the backup is meant to be ran manually every now and then.
Restoring a Windows System Image backup
In order to restore a Windows System backup image you will need a Windows installation medium. Either a CD/DVD or USB flash drive
Boot with the Windows installation media, then specify the system language and region.
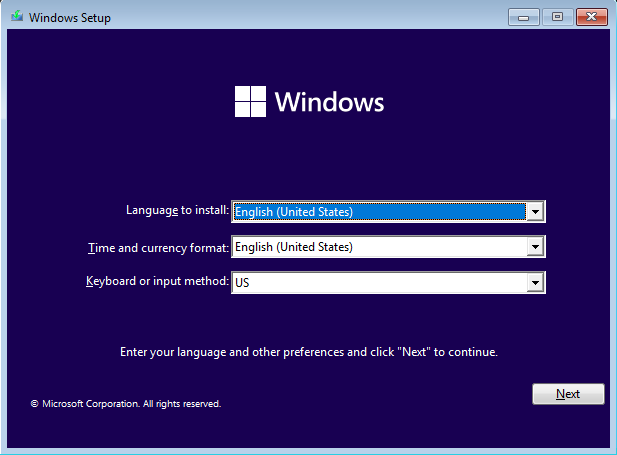
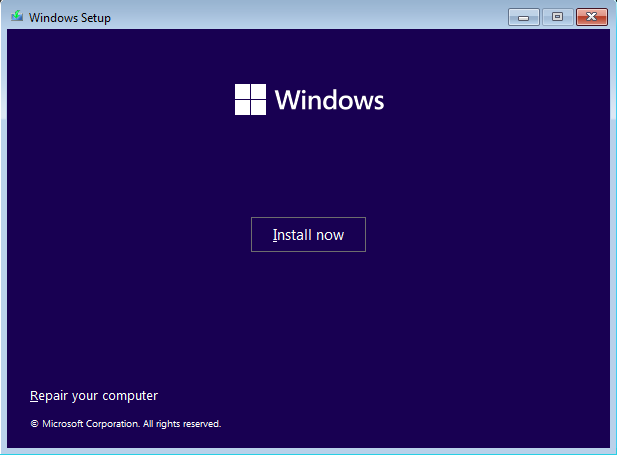
Select next, then in the bottom left corner select the option Repair your computer.
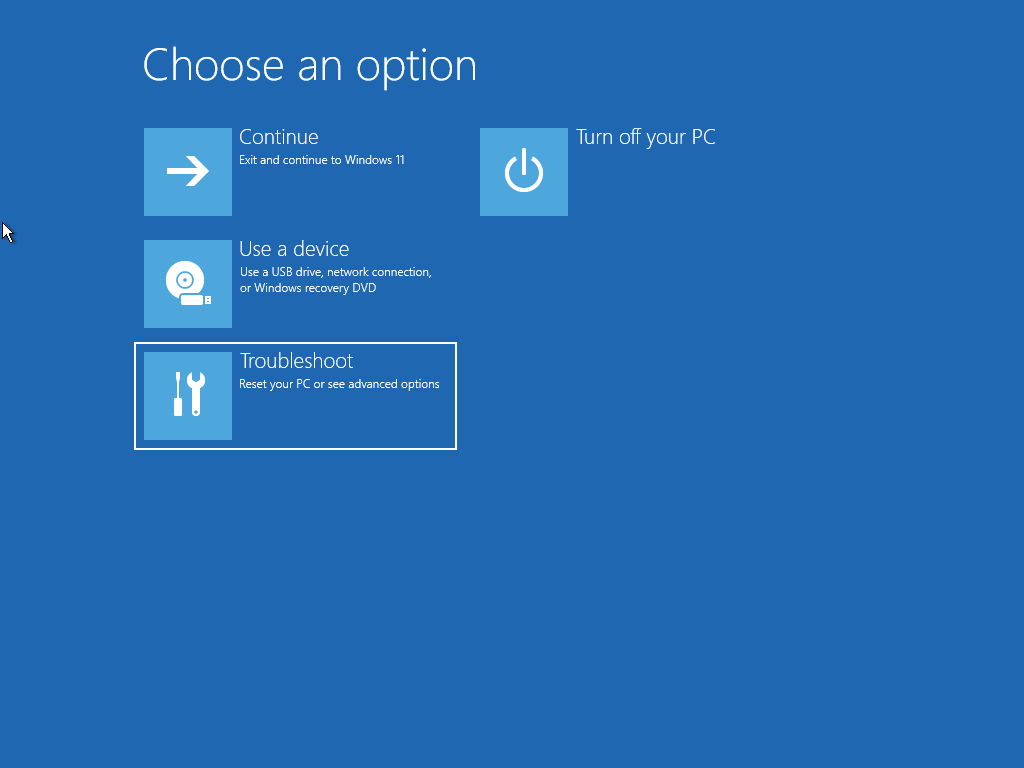
On the next screen select the troubleshooter option
Then select the System Image Recovery option
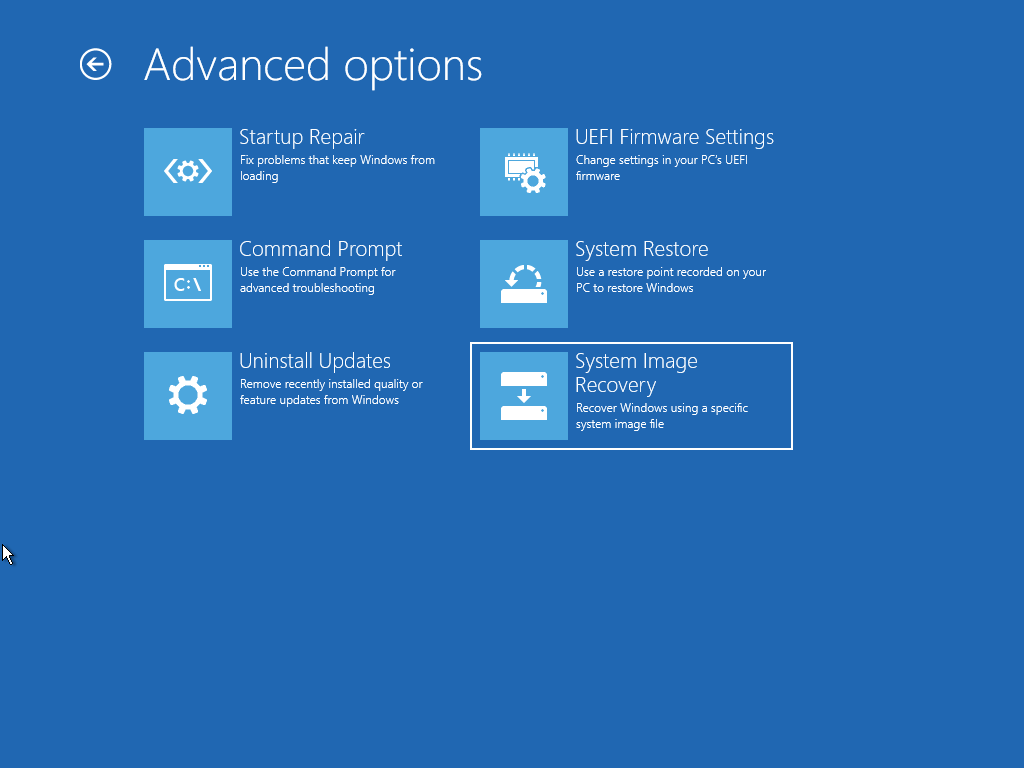
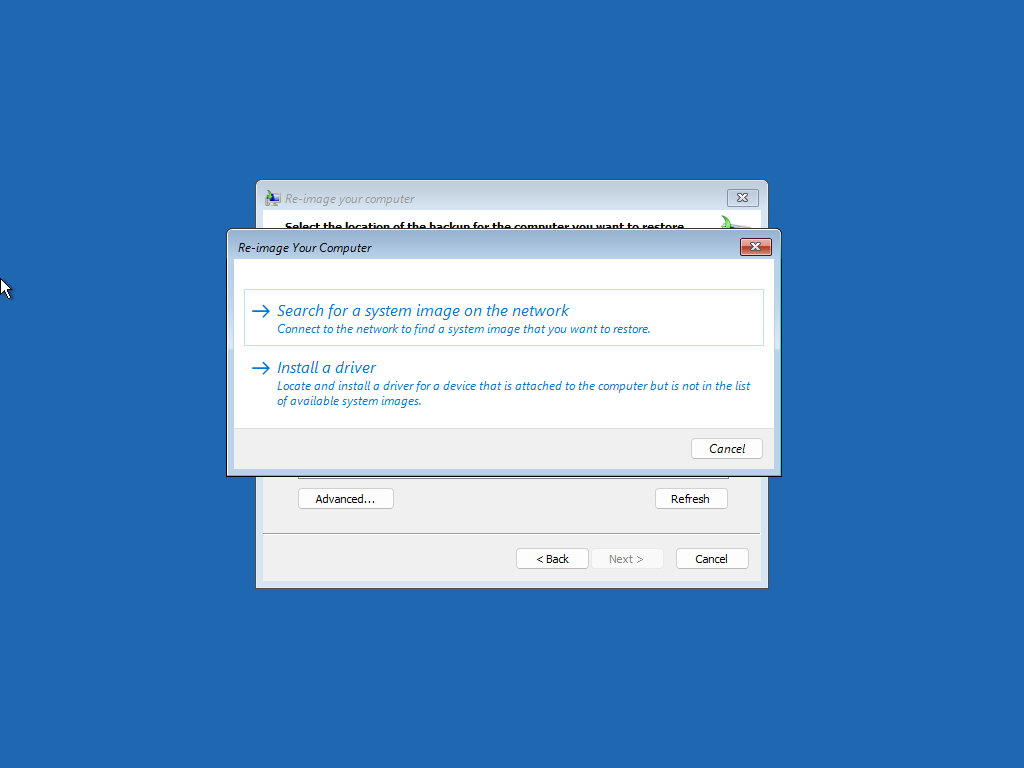
Next we will need to specify the location of the System Image backup file before we can restore the backup.

If you have the external hard drive or internal hard drive attached to the computer where the System Backup image is located then Windows will or should auto detect the drive, form there you need to select your backup image. There is also the option to locate it on the network, in the case of a NAS Server.
Once you have located the backup image and selected it, the Windows installer will now be able to restore the System backup image, This can take some time.
Conclusion
Though Windows comes with a good over all build in application to setup and do backups its still held back by pit falls of Microsoft. As stated some editions of Windows does not include this feature and can leave some users out in the cold. We still highly recommend using a 3rd party application such as AOMEI Backupper to manage computer and data backups on your behalf regardless of what version of Windows you are using.


Pingback: How to setup Windows Bitlocker Encryption - Micro Fusion Insight