In the fast-paced world of technology, having the ability to access your Linux Mint PC’s desktop remotely can be a game-changer. Whether you’re troubleshooting an issue, collaborating with a colleague, or simply managing your system from a distance, setting up a remote desktop server is a valuable skill. In this step-by-step guide, we’ll walk you through the process of configuring x11vnc Remote Desktop on your Linux Mint system for seamless remote desktop access.
The problem with Remote Desktop and Linux Systems
I recently ran into a situation where a client needed to be able to access a PC running Linux Mint remotely from a Windows PC but unlike Windows, this turned out to be quite challenging to achieve.
Firstly, Linux Mint does not come pre-configured with a remote desktop capabilities and so we will need to manually setup reliable Remote Desktop (RDP) for this system.
Secondly, most VNC applications on offer are either payed for or simply does not work very well with Linux Mint Cinnamon over Remote desktop connections.
Thirdly, if you do not have a monitor attached this can become even more of a headache to get working. As Linux does not boot into a graphical user interface (by design) when no physical monitor is present and plugged in, unlike windows.
Thus, to rectify all of this I will be covering and going over some steps to setup a Remote Desktop servers using x11vnc on Linux Mint.
Step 1: Bid Farewell to the Default Vino Server
Ubuntu 22.04 LTS has a bug that will prevent the Vino RDP service from working correctly, not loading the key-ring where its password is stores and thus resetting the RDP password and making it impossible to reconnect after a reboot. Vino also breaks when you lock the screen making it again impossible to reconnect unless someone physically goes and unlocks the session. There is a gnome extension available to help fix this but for simplicity we will be using x11vnc instead.
Our journey begins with bidding farewell to the default Vino server (if installed, Ubuntu uses this for its RDP and VNC build in protocols but it is broken as of the writing of this article).
Open Terminal and execute the following command:
sudo apt-get -y remove vinoRemoving Vino will make sure there is no conflicts when we install another Remote desktop application.
This clears the way for the installation of x11vnc, a powerful alternative that offers enhanced functionality.
Step 2: Embrace x11vnc for Superior Remote Access
Now, let’s install x11vnc using the following command in Terminal
sudo apt-get -y install x11vncThis step equips your system with the necessary tools for efficient remote desktop management software
Step 3: Establish a Secure Password Directory
Security is paramount when it comes to remote access. Create a dedicated directory for the password file with this command:
sudo mkdir /etc/x11vncWe will use this directory to host the configuration file for the password
Step 4: Generate an Encrypted Password File
Enhance security further by creating an encrypted password file. Execute the following command and follow the prompts to set and confirm your password:
sudo x11vnc --storepasswd /etc/x11vnc/vncpwdStep 5: Configure the x11vnc Systemd Service
Create a systemd service file for x11vnc to ensure it starts at boot. Open the file with your preferred text editor: We will use xed here, the default Linux Mint text editor.
For Ubuntu use nano or gedit so enter:
sudo gedit /lib/systemd/system/x11vnc.serviceFor Linux Mint use nano or xed so enter:
sudo xed /lib/systemd/system/x11vnc.servicesystemd is used to start services automatically on most Linux systems today. We will now create a new systemd service for x11vnc
Copy and paste the following code into the empty file:
[Unit]
Description=Start x11vnc at startup.
After=multi-user.target

[Service]
Type=simple
ExecStart=/usr/bin/x11vnc -auth guess -forever -noxdamage -repeat -rfbauth /etc/x11vnc/vncpwd -rfbport 5900 -shared

[Install]
WantedBy=multi-user.target
Tip: To Manually set the Resolution of the Remote session you can add the following argument to the execute line. For my case i set it to 1600×900
ExecStart=/usr/bin/x11vnc -geometry 1600x900 -auth guess -forever -noxdamage -repeat -rfbauth /etc/x11vnc/vncpwd -rfbport 5900 -sharedSave and close the file when done.
Step 6: Reload the Services
Ensure the changes take effect by reloading the services:
sudo systemctl daemon-reloadThe above command will reload systemd, making sure all new entries are taken into consideration and can be used.
Step 7: Enable Autostart for Remote Desktop (x11VNC ) at System Boot
Make x11vnc an integral part of your system by enabling it to start at boot:
sudo systemctl enable x11vnc.serviceStep 8: Initiate the Remote Desktop Service
Finally, start the x11vnc service either by rebooting your system or using the following command:
sudo systemctl start x11vnc.service
At this point you should be able to connect to the Linux PC using a VNC viewer however. This is great and all if you have a physical monitor attached to the Linux PC. If you remove that monitor and try to run the PC headless then you will soon find that Linux in general doesnt play well here. So we have a few solutions to overcome this annoying limitation…
Addressing the headless (no monitor attached) issue, have Linux boot into a desktop
There are 3 known ways to go about forcing Linux to boot a GUI (Graphical User Interface) desktop environment. Normally if you boot a Linux PC and there is no monitor attached it will boot to a Command line interface (by design) and not a desktop environment, so to resolve this we will take a look at three methods.
Your first option (With Monitor):
Have a monitor connected to the PC. Simple as that. Most often computers will have a monitor connected and thus, Linux will start up with a graphics user interface if one is attached. In this case Linux Mint will start up Cinnamon or MATE. You will be able to remotely access your PC from another computers using a VNC viewer app.
Your second option (No Monitor Using Software):
This method will not work for Linux Mint. It breaks Cinnamon from starting normally when a screen is attached.
Works for Ubuntu 22.04 LTS though, I have not found a Software only solution for Linux Mint yet.
Using a Linux PC without a monitor connected is challenging, unlike Windows where RDP just works Linux does not boot a GUI by default when there is no monitor present making remote desktop connection nearly useless. Luckily all is not lost. We can use a dummy driver to trick Linux into thinking a monitor is attached and will therefore boot into a desktop environment without a physical monitor connected.
We need to install a dummy vga driver for Ubuntu only
Open terminal and enter the following command:
sudo apt-get install xserver-xorg-video-dummyThe command will install a dummy x11 driver that we will be using to create a fake monitor that will be used for remote desktop connections.
Don’t panic, this will NOT effect your physical monitor or system and will only be used when there is no physical monitor attached to your PC to simulate a screen for the remote session. Although Linux Mint with Cinnamon Desktop will break. remote desktop connections will work BUT then if you connect a physical monitor again that will no longer work. so go with the hardware dummy plug idea instead.
Setting up the dummy driver and creating a fake monitor
For Ubuntu only next, we need to do some configurations to get the fake monitor working. The easiest way I manage to find for this is to edit a x11 config file and add a new section for the dummy display.
In terminal enter the following command to open up the x11 file:
sudo gedit /usr/share/X11/xorg.conf.d/10-quirks.confOnce the 10-quirks.conf file is open scroll to the bottom and insert the following configuration below the current configuration. Do not modify any of the existing fields above this custom code. Just insert the following below existing values.
# Dummy Adapter To allow RDP without Monitor

Section "Device"
    Identifier  "Configured Video Device"
    Driver      "dummy"
    # Default is 16MiB, this sets it to 64MiB
    #VideoRam    16384
    VideoRam 64000
EndSection

Section "Monitor"
    Identifier  "Configured Monitor"
    HorizSync 28.0-80.0
    VertRefresh 48.0-75.0
EndSection

Section "Screen"
    Identifier  "Default Screen"
    Monitor     "Configured Monitor"
    Device      "Configured Video Device"
    DefaultDepth 24
    SubSection "Display"
    Depth 24
    Modes "1920x1080_60.00"
    EndSubSection
EndSection
Some key Points, you can set a desired resolution by editing the “modes” argument. In this example mine is set to 1920 x1080 at 60hz refresh rate.
I recommend you set it to a lower resolution to start with. something like: 1280x720_60.00 and increase the resolution form there until you reach the desired target
What this configuration will do is create a dummy output that simulate a physical screen to fool Linux into always booting a desktop environment that can then be used in remote desktop connection sessions
Save the file and reboot your PC. you should now be able to connect to it even when your monitor is not present.
Your third option (No Monitor using hardware solution)
Works with Linux Mint as well.
If you do not wish to mess with or install dummy software packages and mess with the hassle of configuration files the this solution might just be for you.
You will need to either Buy or DIY a dummy screen dongle. its a simple device that simply plugs into the screen card and will simulate a monitor that is connected even though you dont have one. you get VGA, DVI and even HDMI dummy dongles these days which cost is very low.
CAUTION: This next part is at your own risk. It can, if done incorrectly damage your motherboard or graphics card. So do this at your own risk. You have been warned
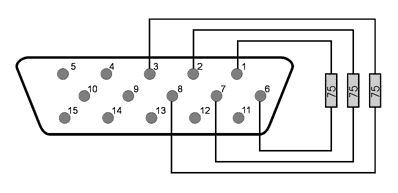
To DIY a VGA Dummy Dongle for Remote Desktop Access
You will need a VGA Female To Female F/F Gender Changer Adapter plug and 3 x 50 ~ 150omh resistors. For this example I will be using 75ohm resistors. But any resistor between 50 and 150 ohms should work fine.
What you want to do in bridge the pins on the VGA adapter like this

You need to bridge Pin 1 and 6, pin 2 and 7 and lastly pin 3 and 8 so that the setup looks like this once you are done.
To DIY a DVI Dummy Dongle for Remote Desktop access
Same procedure as above just take note of the pins. In a DVI you need to bridge Pin C1 with C5, C2 with C5 and C3 with C5 like this

Mischief managed
Now all you do is replace your screens cable with this dummy dongle and you should get Linux to boot up into a desktop environment instead of a command line.
Connecting to your Linux Mint PC via VNC Remotely
For Microsoft Windows you will need to install a VNC Viewer app and for Linux you can use something like Remmina.
We used x11VNC which uses a the VNC protocol. You will not be able to use Microsoft remote desktop utility to connect to your Linux PC.
For Ubuntu 220.4 users you can use RDP but you will need to setup Vino on the Ubuntu system settings under share. The headless issue will still be applicable to solve the annoyance of not having a desktop to boot into.
Conclusion
We had a look at 3 ways to setup a remote desktop server for Linux and have it boot into a desktop environment. One of the most annoying things is that Linux even in 2023 doesn’t offer a simple option or method to achieve this and is different from distribution to distro. What works on Ubuntu might not work on Mint.
In order for Remote Desktop connections to work you will need a functioning network first. you can have a look at out article How to Setup a home network
Congratulations! You’ve successfully set up x11vnc on your Linux Mint/Ubuntu system, unlocking the potential for effortless remote desktop access.
In conclusion, mastering the art of remote desktop setup is a valuable skill for any Linux user. With x11vnc, you can take control of your system from anywhere with ease. Implement these steps, and you’ll be on your way to a seamless and secure remote desktop experience. Happy computing!


Pingback: Top 10 things to know before switching to Linux - Micro Fusion Insight
Pingback: 10 annoying things Linux Mint should address to improve user experience - Micro Fusion Insight
Very nice writeup, but one suggestion: it would helpful if you dated the writeup. While this is always useful, it is especially useful for Linux-related articles since things are always changing in the Linux world
Thank you for the feedback, we do date the write-ups, right at the top of the article. Coming next year I will be making some changes to how the blog looks and feels, to highlight such critical information.
Thanks! I tried another guide, it didn’t work. This one worked right away!
Pingback: Setting Up Your Plex Server to Stream Your Media Collection - Micro Fusion Insight
Pingback: How To Stream Live Video Using Plex’s RTMP Feature - Micro Fusion Insight
Pingback: Setting up a simple NAS server on Windows 10 - Micro Fusion Insight