Plex Server offers a seamless way to organize and stream your personal media collection across various devices. This ultimate guide provides step-by-step instructions on setting up and optimizing your Plex server, ensuring a secure and efficient streaming experience. Whether you’re installing it on Ubuntu, managing your libraries, or expanding its capabilities, this guide covers everything you need to know.
Key Takeaways
- The initial setup of Plex on Ubuntu involves adding the Plex APT repository, installing the server, and configuring basic settings.
- Organizing media effectively is crucial, including understanding supported formats, adding libraries, and managing metadata and artwork.
- Securing your Plex server is essential, with steps like implementing network security, setting up SSL with Let’s Encrypt, and managing user access.
- Optimizing performance includes ensuring proper hardware, network configurations, and regular server maintenance to prevent common issues.
- Plex’s functionality can be expanded with plugins, integration with other services, and tools like Plex Dash for server monitoring.
Initial Setup and Configuration of Plex Server
Adding Plex Server APT Repository
To begin the journey of setting up your Plex Media Server, the first step is to add the Plex APT repository to your system. This repository contains the necessary packages to install Plex on Ubuntu. Execute the following command to add the Plex repository to your sources list:
echo deb https://downloads.plex.tv/repo/deb public main | sudo tee /etc/apt/sources.list.d/plexmediaserver.list
Subsequently, you’ll need to import the Plex GPG key to ensure the authenticity of the packages. Run these commands to import the key:
wget https://downloads.plex.tv/plex-keys/PlexSign.key
cat PlexSign.key | sudo gpg --dearmor -o /etc/apt/trusted.gpg.d/PlexSigkey.gpg
Once the repository and key have been added, it’s crucial to update the package index with sudo apt update to refresh your system’s package list. This step is essential for the system to recognize the newly added repository.
Remember, maintaining a secure and updated system is paramount when running a media server that may be accessible over the internet.
Installing Plex Server on Ubuntu
After adding the Plex APT repository to your system, the next step is to install the Plex Media Server. Ensure your system is up to date with the latest packages by running sudo apt update. This will refresh your package index and prepare your Ubuntu system for the new installation.
To begin the installation process, use the following commands:
- Download the Plex Media Server package:
wget https://downloads.plex.tv/plex-media-server-new/1.21.3.4014-58bd20c02/debian/plexmediaserver_1.21.3.4014-58bd20c02_amd64.deb - Install the downloaded package:
sudo dpkg -i plexmediaserver_*.deb
Once the installation is complete, Plex will start automatically. You can verify that Plex is running by using sudo systemctl status plexmediaserver.
It is essential to ensure that your server has a static IP address for reliable remote access and streaming.
With Plex now installed, you can proceed to configure your server settings and manage user accounts to tailor your media streaming experience.
Configuring Basic Server Settings
Once the Plex server is installed, configuring the basic server settings is a critical step to ensure smooth operation and ease of use. The initial configuration involves setting up network parameters, defining user preferences, and specifying the types of media to be served.
To begin, navigate to the server settings and select the ‘Network’ tab. Here, you can adjust the HTTP authentication type, with ‘none’ being the default option. It is also essential to set the appropriate bandwidth limits to prevent network congestion and ensure optimal streaming quality:
| Parameter | Description | Default Value |
|---|---|---|
maxbw | Maximum sending bandwidth (bytes/second) | 0 (relative) |
mss | Maximum Segment Size (bytes) | System default |
After configuring the network settings, proceed to the ‘Library’ section to define the allowed media types, such as ‘video’, ‘audio’, ‘data’, and ‘subtitle’. By default, all media types are accepted.
Finally, establish the minimum and maximum local UDP ports to facilitate communication with client devices. The default values range from 5000 to 65000, but these can be adjusted based on your network environment. Remember to save your settings and perform a server restart if necessary to apply the changes.
Creating and Managing User Accounts
Once your Plex Media Server is operational, the next crucial step is to create and manage user accounts. User accounts are essential for personalizing the viewing experience and maintaining control over who has access to your media library. To start, you’ll need to set up a primary account, which will serve as the admin account with full privileges to manage the server settings and user permissions.
Italics are used to denote the primary account holder, who can invite friends or family members to their Plex Home, allowing for a shared but personalized media experience. The following list outlines the steps to manage user accounts effectively:
- Invite users to your Plex Home
- Assign appropriate permissions to each user
- Set up managed users for children or guests
- Customize library access for different users
Managing user accounts also involves monitoring their activity and adjusting settings as needed to ensure a smooth streaming experience for all.
Remember to regularly review and update user permissions, especially when changes are made to your media library or server configuration. This practice helps in maintaining a secure and enjoyable environment for all users.
Organizing and Adding Media to Plex
Supported Media Formats and File Organization
Understanding the supported media formats is crucial for a seamless Plex experience. Plex supports a wide range of file formats for video, audio, and images, ensuring compatibility with most of the media you may wish to stream. Organizing your media files into a clear and consistent directory structure is equally important, as it facilitates the automatic matching of metadata and artwork.
For video, common formats include MP4, AVI, MOV, and MKV, while audio support extends to MP3, AAC, and FLAC among others. Image formats such as JPEG, PNG, and RAW are also supported. It’s essential to note that while Plex can play a multitude of formats, some may require transcoding for playback on certain devices, which can impact server performance.
When adding media to Plex, it’s recommended to follow the naming conventions and folder structures that Plex recognizes. This practice ensures that your media is correctly identified and organized within the server.
Below is a list of commonly supported codecs and file formats:
- Video Codecs: H.264, H.265 (HEVC), MPEG-2, MPEG-4
- Audio Codecs: AAC, MP3, ALAC, FLAC
- Image Formats: JPG, PNG, RAW
- Subtitle Formats: SRT, SSA, ASS
By adhering to these formats and organizing your files accordingly, you can enhance the user experience and ensure that your media collection is displayed with the correct information and artwork.
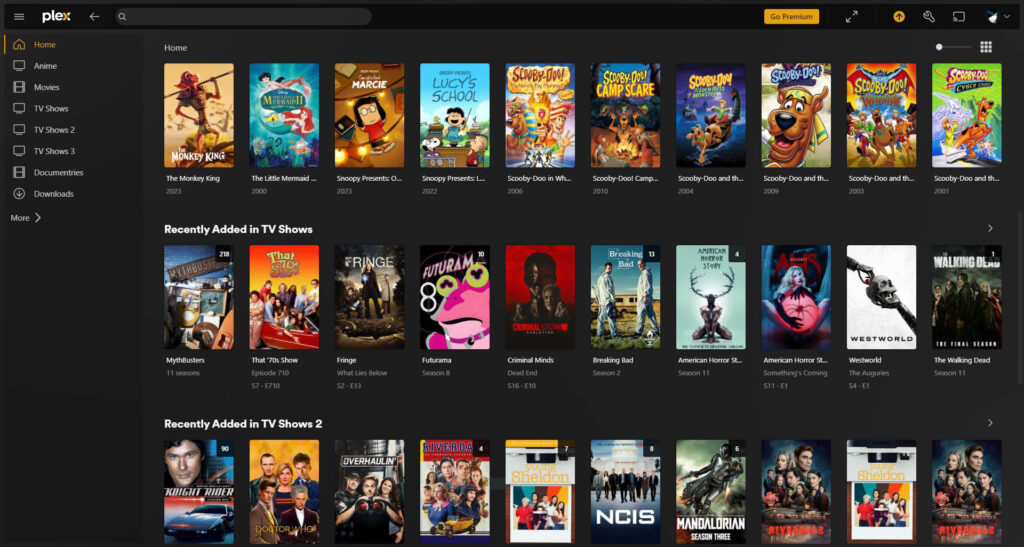
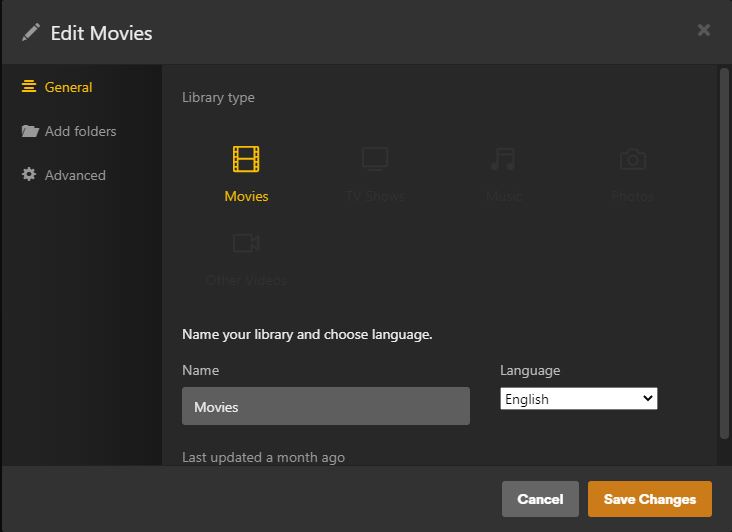
Adding Libraries and Media Content
Once your Plex Media Server is operational, the next step is to populate it with your media collection. Adding libraries is a straightforward process that involves specifying the type of media and pointing Plex to the folders where your media files are stored. For instance, you might have separate libraries for ‘Movies’, ‘TV Shows’, ‘Music’, and ‘Photos’.
Each library type supports different file formats. Plex is quite versatile, but it’s important to ensure your files are in formats that Plex can natively support to avoid unnecessary transcoding. Here’s a list of commonly supported formats:
- Video: MP4, MKV, AVI, MOV
- Audio: MP3, M4A, FLAC, ALAC
- Photos: JPG, PNG, RAW
Remember, organizing your media into appropriately named folders before adding them to Plex can greatly simplify library management and improve the metadata matching process.
After setting up your libraries, Plex will scan the specified directories and add the media to your server, pulling in relevant metadata and artwork. This process can be manual or automatic, depending on your preference. Regular maintenance and updates to your libraries will ensure that new content is added and accessible to users. Recent comments on setting up Apache and NAS servers on Linux Ubuntu by Micro Fusion Insight suggest that a well-organized server can significantly enhance user experience.
Metadata and Artwork Management
Proper management of metadata and artwork is crucial for an organized and visually appealing Plex library. Metadata agents within Plex are responsible for gathering this information from various sources once you choose the library type and select a particular primary metadata agent. For instance, a ffmetadata file contains key details like titles and artist names, which Plex can extract and utilize to enrich your media collection.
When organizing metadata, it’s important to adhere to specific formats and escape special characters to ensure accuracy. For example, metadata keys or values containing characters such as ‘=’, ‘;’, ‘#’, and ‘\’ must be escaped with a backslash. This attention to detail facilitates a seamless integration of metadata into your Plex library, enhancing the overall user experience.
To optimize the metadata retrieval process, prioritize the sources based on reliability and completeness. This can significantly reduce the need for manual metadata entry and ensure a consistent presentation of your media.
Below is a list of common metadata formats supported by Plex:
- FFmpeg metadata
- MOV/MP4/3GP
- Matroska
- MAXIS XA
- Monkey’s Audio
Each format has its own set of options and considerations, which should be reviewed to maximize compatibility with Plex’s metadata system.
Advanced Library Settings and Customization
Customizing your Plex library settings allows for a more personalized and efficient streaming experience. Advanced settings enable fine-tuning of the media indexing process, ensuring that your content is organized exactly how you prefer. For instance, you can specify the sorting order of titles, adjust how content is grouped, or even create custom collections.
Metadata management is crucial for maintaining an informative and visually appealing library. Plex provides options to automatically fetch metadata from various sources, but you can also manually edit or add information to ensure accuracy. This includes details like movie summaries, actor bios, and cover art.
- To manually edit metadata, select the media item and choose ‘Edit’.
- For custom sorting, access the library settings and select ‘Advanced’.
- To create collections, use the ‘Collections’ feature in the library’s edit menu.
By taking the time to customize your library settings, you not only enhance your own browsing experience but also provide a more engaging environment for shared users.
Remember that while Plex automates much of the media management process, investing a few moments into customization can greatly enrich your media library’s functionality and appearance.
Securing Your Plex Server
Implementing Network Security Measures
Ensuring the security of your Plex Media Server is crucial to protect your media collection and personal information from unauthorized access. Implementing robust network security measures is a foundational step in safeguarding your server. One effective method is the use of a Virtual Private Network (VPN), which encrypts your internet connection and hides your IP address, providing an additional layer of security.
It’s essential to understand that even a home network can have vulnerabilities. A VPN not only secures your home network but also protects your interconnected devices from potential cyber threats. This is particularly important if your home includes Internet of Things (IoT) devices, such as smart cameras and appliances, which may be susceptible to cyber attacks.
By using a VPN, you create a more secure and private connection, ensuring that your media server and all associated devices are less exposed to risks.
When configuring your Plex Media Server, always use HTTPS/TLS with basic authentication to prevent unauthorized access to sensitive information. Additionally, regularly monitor your server’s security settings to stay informed of any potential risks. For detailed guidance on setting up secure server connections, refer to the Plex Support documentation.
Setting Up Let’s Encrypt SSL for Plex
Securing your Plex Media Server with Let’s Encrypt SSL is a critical step in safeguarding your media streaming experience. The process involves using a Proxy Server such as Apache to enable SSL encryption. This ensures that your connection to Plex is private and secure, protecting against unauthorized access and data breaches.
To set up Let’s Encrypt SSL for Plex, follow these general steps:
- Ensure that your Plex server is accessible from the internet on port 32400.
- Install a Proxy Server, like Apache, if it’s not already in place.
- Obtain a free SSL certificate from Let’s Encrypt.
- Configure the Proxy Server to use the SSL certificate for Plex traffic.
- Update your Plex server configuration to work with the Proxy Server.
Remember, while Plex provides robust media management, it’s essential to secure your server to prevent potential vulnerabilities. For detailed instructions on setting up Apache and other configurations, refer to the latest guides and comments from experts in the field.
Managing User Access and Permissions
Ensuring that your Plex Media Server is accessible to the right people with the appropriate level of permissions is crucial for maintaining both privacy and a tailored user experience. Plex provides granular control over user access, allowing you to create managed users with specific content restrictions, such as for a child’s profile, and to add family members to your Plex Home for easy switching between accounts.
Managed Accounts and Plex Home are powerful features for controlling access:
- Managed Accounts allow you to restrict content based on preset profiles or customized settings for Plex Pass subscribers.
- Plex Home enables fast user switching and shared access among family members without compromising individual preferences.
It is important to regularly review and update access permissions to ensure that they reflect current usage patterns and privacy requirements.
In the event of a security breach, as has occurred in the past, prompt action is required. Users should be instructed to reset their passwords immediately to prevent unauthorized access. Regularly updating passwords and monitoring for unusual activity are part of a robust security protocol.
Using VPNs with Plex for Enhanced Privacy
Incorporating a Virtual Private Network (VPN) with your Plex Media Server can significantly enhance your privacy and security. A VPN masks your real IP address, making your streaming activities appear as if they are originating from the VPN’s server location. This not only helps in maintaining anonymity but also allows you to bypass geographical restrictions that may be placed on content.
Why Use a VPN with Plex?
- Secures your data from potential eavesdroppers
- Ensures anonymity by hiding your real IP address
- Unblocks content restricted by location
- Protects your home network
By using a VPN, you can enjoy a smooth and private connection, free from concerns about identity theft or online surveillance.
It is important to choose a reliable VPN service that is compatible with Plex. Services like NordVPN and ExpressVPN have been recognized for their ability to work seamlessly with Plex, providing users with the freedom to access their media libraries from anywhere. Remember, not all VPNs are created equal, and selecting one that meets your specific needs is crucial for the best streaming experience.
Optimizing Plex Server Performance
Hardware Requirements and Recommendations
When setting up a Plex Media Server, the hardware you choose can significantly impact performance. It’s essential to consider the type of media you’ll be streaming, the number of simultaneous streams, and whether you’ll be using Plex’s transcoding features. For a small setup with minimal transcoding, a basic desktop or a dedicated NAS device may suffice. However, for larger libraries and multiple users, a more robust system with a powerful CPU and ample RAM is recommended.
Italics are used to emphasize the importance of a powerful CPU, as transcoding is a CPU-intensive process. Here’s a quick reference for the minimum hardware recommendations:
- CPU: Intel Core i3 or equivalent
- RAM: 2GB for a basic server; 8GB or more for heavy usage
- Storage: Sufficient for your media collection, SSD for the operating system
Ensuring your server has a wired network connection can greatly improve streaming quality and reduce buffering.
Remember, these are just starting points. As your media library grows and your streaming needs evolve, you may need to upgrade your hardware accordingly. Keep an eye on server performance and plan for future expansion to maintain a seamless streaming experience for all users.
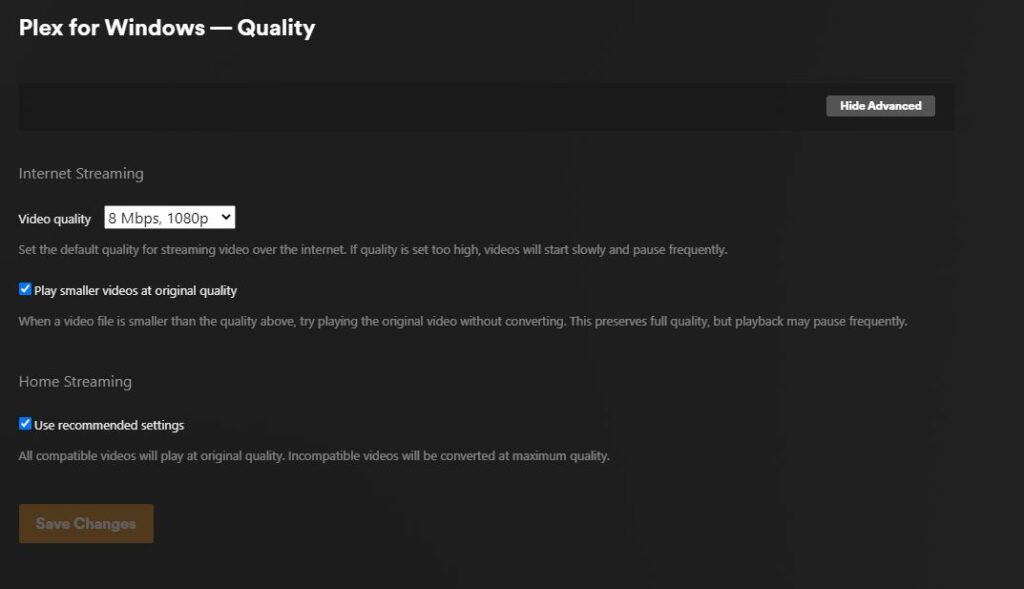
Network Configuration for Optimal Streaming
To ensure optimal streaming performance on your Plex server, it is crucial to configure your network settings appropriately. Proper network setup can significantly reduce buffering and improve the quality of your streams. One aspect to consider is the use of Plex RTMP (Real-Time Messaging Protocol), which can provide a more stable and efficient streaming experience.
When configuring your network for Plex streaming, consider the following:
- Ensure that your network hardware (routers, switches, etc.) is capable of handling high bandwidth requirements.
- Configure Quality of Service (QoS) settings to prioritize Plex traffic, especially if your network is shared with other high-bandwidth applications.
- Avoid network features that may interfere with streaming, such as broadcast storm protection, which can disrupt broadcasting.
Remember, a well-configured network is the backbone of a seamless Plex streaming experience. Take the time to optimize your settings for the best possible performance.
Lastly, keep in mind that network conditions can vary, and what works well for one setup may need adjustments for another. Regularly test your streaming quality and adjust your network configuration as needed to maintain optimal performance.
Plex Server Maintenance and Updates
Regular maintenance and timely updates are crucial for the smooth operation of your Plex Media Server. Keeping your server up-to-date ensures optimal performance, security, and access to the latest features. Plex periodically releases updates that may include new functionalities, bug fixes, and security patches.
To update Plex Media Server on Ubuntu, you should follow these steps:
- Open a terminal window.
- Run
sudo apt updateto refresh the package index. - Execute
sudo apt upgrade plexmediaserverto upgrade to the latest version.
It’s important to monitor the server’s performance and apply updates as they become available. The Plex Dash app, exclusive to Plex Pass subscribers, is an excellent tool for remote server monitoring, providing insights into server activity and resource usage.
Remember, neglecting updates can lead to vulnerabilities and degrade your server’s performance over time. Regularly check for updates and schedule maintenance windows to apply them without disrupting your streaming experience.
Troubleshooting Common Plex Server Issues
After addressing common issues with your Plex Media Server, you may wish to enhance its capabilities. Plugins and third-party tools can significantly expand the functionality of your Plex setup. For instance, Plexamp offers a refined audio experience for audiophiles, while Plex Dash provides exclusive server monitoring for Plex Pass holders.
To begin exploring the available plugins:
- Navigate to the Plex Media Server downloads section.
- Review the list of available plugins and tools.
- Select and install plugins that suit your needs, such as media organization or server monitoring utilities.
Remember, while plugins can add valuable features, they should be used judiciously to maintain server performance and stability.
Lastly, ensure that any plugins or tools you install are compatible with your server’s version and that they do not interfere with the core functionalities of Plex. Regularly updating your plugins alongside your Plex Media Server will help prevent compatibility issues.
Expanding Plex Functionality with Plugins and Tools
Exploring Official and Community Plugins
Plex plugins, also known as channels, significantly enhance the functionality of your Plex Media Server by providing access to additional content and features. Official plugins are developed by Plex Inc., ensuring a seamless integration and a stable experience. Community plugins, on the other hand, are developed by third-party developers and can offer a wide range of niche content and specialized features.
To explore and install plugins, navigate to the Plugins section within your Plex server’s web interface. Here, you can browse and select from a variety of available plugins. It’s important to note that while official plugins are generally safe to use, community plugins should be used with caution as they are not officially endorsed by Plex Inc.
When considering community plugins, always ensure they are from reputable sources and have positive user feedback to maintain the integrity and security of your Plex Media Server.
Below is a list of popular Plex plugins that can help you get started:
- WebTools: A collection of tools for Plex, including a logs viewer and subtitle management.
- Tautulli: Monitors your Plex server activity and provides detailed analytics.
- Sub-Zero: Enhances subtitles support and management for your media.
- Trakt.tv: Syncs your Plex viewing history with your Trakt.tv account.
Remember, the availability of plugins can change over time, and some may no longer be supported or updated. Always check the current status of a plugin before installation.
Integrating with Other Media Services and Tools
Integrating your Plex server with other media services and tools can significantly enhance your media experience. Plex’s versatility allows for seamless integration with a variety of media applications, ranging from alternative media servers like Jellyfin and Acestream to PVR capabilities provided by get_iplayer. These integrations can be particularly beneficial for users who are accustomed to the Linux distros like Ubuntu, as they often include software that improves the desktop user experience for those transitioning from Windows or MacOS.
To effectively integrate these services, consider the following steps:
- Identify compatible media services and tools that complement your Plex setup.
- Install and configure the necessary software on your server, ensuring compatibility with your operating system.
- Test the integration thoroughly to confirm that the media streams correctly and without interruption.
It is essential to maintain a balance between expanding functionality and preserving the stability and performance of your Plex server. Overloading the server with too many integrations can lead to issues that detract from the overall user experience.
By thoughtfully selecting and integrating additional media services and tools, you can create a more robust and personalized media center that caters to your specific needs and preferences.
Customizing User Experience with Plex Apps
Plex offers a variety of apps that enhance the user experience, allowing for a more personalized and tailored media consumption. Plexamp stands out as an app designed specifically for audiophiles, delivering high-quality audio and a refined listening experience. Users with a Plex Pass have exclusive access to additional apps such as Plex Dash, which provides remote server monitoring capabilities.
To further customize your Plex experience, consider the following apps available for different platforms:
- For TVs: Roku, Fire TV, Samsung, and more
- For Mobile: iOS & Android
- For Consoles: PlayStation & Xbox
- For Desktop: Mac, Windows & Web
By leveraging these apps, you can ensure that your Plex server caters to the unique preferences of each user, creating a more engaging and enjoyable media environment.
Remember, while some apps are available to all users, certain premium features are reserved for Plex Pass subscribers. This subscription model offers enhancements like the Ultimate DVR for recording broadcast TV, and access to new features before they are widely released.
Monitoring Server Activity with Plex Dash
Plex Dash is a Plex Pass Exclusive app that provides detailed insights into your Plex Media Server’s activity and performance. Monitoring your server is crucial for maintaining a seamless streaming experience for all users. With Plex Dash, you can keep an eye on real-time server metrics such as current streams, server resource usage, and recently added content.
To effectively use Plex Dash, follow these steps:
- Ensure you have a Plex Pass subscription.
- Download and install Plex Dash from the Plex Pro Downloads section.
- Log in with your Plex account credentials.
- Navigate through the app to view server statistics and activity logs.
By regularly checking Plex Dash, you can preemptively identify and resolve issues, ensuring your media server runs optimally at all times.
Remember, Plex Dash is not just about monitoring; it’s also a tool for managing your libraries, refreshing metadata, and even restarting your server remotely. This level of control and oversight is invaluable for any serious Plex administrator.
Conclusion
In this comprehensive guide, we have explored the intricate process of setting up a Plex Media Server, ensuring that your media collection is accessible and securely streamed across various devices. From the initial installation on Ubuntu systems to the addition of media libraries and securing the server with Let’s Encrypt SSL, each step has been meticulously detailed to provide clarity and ease of execution.
The integration of WireGuard VPN for enhanced privacy and the exploration of Plex’s additional features, such as Plexamp and Plex Dash, further enrich the user experience. As we conclude, it is evident that Plex offers a robust and user-friendly platform for media organization and streaming, catering to both novice users and seasoned pros alike. With the knowledge acquired, you are now equipped to enjoy a seamless and personalized media streaming experience from the comfort of your own server.
Furthermore have a look at How To Stream Live Video Using Plex’s RTMP Feature, thus giving you more spearming power over your media or how about Setting up a simple NAS server on Linux Ubuntu to use with your Plex server…
Frequently Asked Questions
How do I install Plex Server on Ubuntu?
To install Plex Media Server on Ubuntu, you need to add the Plex APT repository to your system, import the GPG key, update your package index, and then install Plex using the appropriate commands for your version of Ubuntu.
What are the supported media formats for Plex?
Plex supports a wide range of media formats, including but not limited to MP4, MKV, AVI, MOV, and more for video files, as well as MP3, M4A, FLAC, and more for audio files.
How do I secure my Plex Server with Let’s Encrypt SSL?
To secure your Plex Media Server with Let’s Encrypt SSL, you can use a Proxy Server such as Apache web server and follow the necessary steps to obtain and configure an SSL certificate for your Plex server.
Can I use a VPN with Plex for enhanced privacy?
Yes, you can use a VPN with Plex to enhance your privacy. A quality VPN can help you securely stream your media content from anywhere and protect your network traffic.
What are some common Plex Server issues and how can I troubleshoot them?
Common Plex Server issues include problems with server connectivity, media playback, and library updates. Troubleshooting steps include checking network settings, ensuring the server is updated, and verifying file permissions.
What are Plex Plugins and how can they expand my server’s functionality?
Plex Plugins are additional features that can be installed to extend the capabilities of your Plex Media Server. They include official and community plugins that can provide integration with other media services, customization options, and enhanced user experiences.


Pingback: Repurpose Your Old PC: 10 New Uses - Micro Fusion Insight