In essence, a NAS Server or (Network Attached Storage server) is a centralized device on your network that acts like a digital filing cabinet. It securely stores and manages a variety of data, including multimedia files like photos, videos, and music, along with documents and any other kind of file. This data can be easily accessed and shared by multiple users on the network.
If you have a spare computer you can repurpose it into a NAS Server with little effort. You do not need Server hardware.
- Why are NAS servers convenient?
- Choose your NAS Servers Operating System
- Easily Setup A Windows 10 NAS server
- Firstly you will need a few things to setup a Windows 10 NAS server
- Step #1 – Getting the software needed for setting up Ubuntu NAS
- Step #2 – Preparing Windows 10 installation medium via flash drive
- Step #3 – Installing Windows 10 from the flash drive on our NAS server
- Step #4 – Getting Windows 10 ready to be a NAS Server
- Step #5 – Setting up a static IP address on the Windows NAS server
- Step #6 – Setting up a hard drives for NAS storage
- Step #7 – Setting up Windows File Sharing for the NAS server
- Step #8 – Connecting to the NAS server share
- The Conclusion
- What did you think of setting up a Windows 10 NAS server ?
Why are NAS servers convenient?
NAS servers either windows based or Linux based offer you massive storage on your local network, providing a flexible way to share, backup and access files as well as giving you redundancy in safeguarding your information using systems RAID.
Thus you don’t need to spend money on extra storage for multiple computers keeping costs down.
Choose your NAS Servers Operating System
Setting up a NAS is most cost-effective using a Linux operating system like Ubuntu or Mint. While Windows machines can also be used as a NAS, they typically require additional licensing fees, making them a less economical option compared to Linux.
Have a look at Setting up a simple NAS server on Linux Ubuntu if you are interested in using Linux instead of Windows to setup a NAS server
Easily Setup A Windows 10 NAS server
Previously we covered how to setup NAS servers on Linux so now lets look as using Microsoft Windows 10.
Setting up a NAS server for your home or business is actually fairly simple, you can have your own Windows NAS server up and running quickly. follow along as we will show you how to set up a simple NAS server for your home or business.
Simply follow these easy steps and you should have a NAS server setup on Linux in now time. It will take around 30 minutes, so lets get started!
Firstly you will need a few things to setup a Windows 10 NAS server
- An Spare PC, new or old capable of running at least Windows 10. It is not advised to use an old laptop here BUT if that’s all you have then go for it.
- Any small sized Hard drive,
- Usually an old PC will have at least one hard drive installed already. An SSD drive is perfect for this.
- It will only be used to install the Windows Operating system so anything around 100 gig or more is fine. 120Gig SSD’s are cheap and perfect for a NAS
- Some larger hard drives for the actual content you want to host on the server.
- Such as the Western Digital Red or Seagate IronWolf series will be perfect.
- Network capable LAN port and either CAT5e or CAT6 LAN cable for connecting your NAS to the local network.
- A copy of Microsoft Windows 10 Pro. It’s recommended to use Pro and not home as we would like to have Remote Desktop capabilities.
- Download the Windows 10 ISO file here using the official Microsoft Media Creation tool.
- A USB Flash Drive which we will use to install Windows 10 onto the PC with. 16 Gigabyte or more is fine.
- Rufus, a small Windows program that will help us to create a bootable flash drive that we will use to then install Ubuntu onto the NAS Server PC
- Note: If you are Downloading the Windows 10 ISO with the Microsoft Media Creation tool then you can also use that to flash the image to a USB flash drive.
Step #1 – Getting the software needed for setting up Ubuntu NAS
Download Microsoft Windows 10 Pro iso from Microsoft here, Please note you will need to purchase a valid License Key to use Windows.
Download Rufus – used to create the installation flash drive if you are not using
Step #2 – Preparing Windows 10 installation medium via flash drive
In the event that your NAS server doesn’t already contain a working version of Windows 10 you will First we need to prepare Windows for installation using flash drive.
Plug in the flash drive on a windows PC not on the NAS server PC then using Rufus select the USB flash drive and the Windows 10 ISO image you downloaded as shown below. Then press start to copy the ISO files to the flash drive and make it bootable.
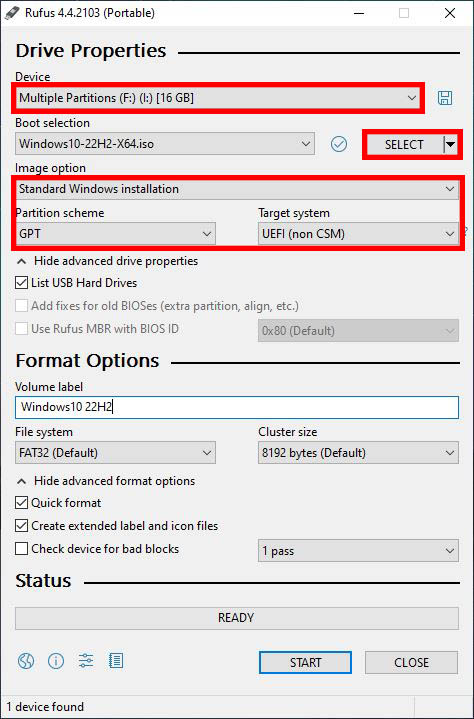
Rufus Configuration for Windows 10
Step #3 – Installing Windows 10 from the flash drive on our NAS server
Once Rufus is done we can move over to the NAS server and install Windows 10. Plug the flash drive into the USB port and power on the NAS server PC.
Now you will need to boot from the flash drive and to do so I’d highly advise consulting your motherboard manufacturer documentation. Most PC’s will have a shortcut key such as F2, F9, F10 or F12 to bring up a boot menu. Else you will need to configure the BIOS or UEFI to boot from flash drive. If you are using a UEFI bios then disable secure boot first to be able to boot from a flash drive…
You will know you have successfully booted when you reach the Windows 10 Installer screen…
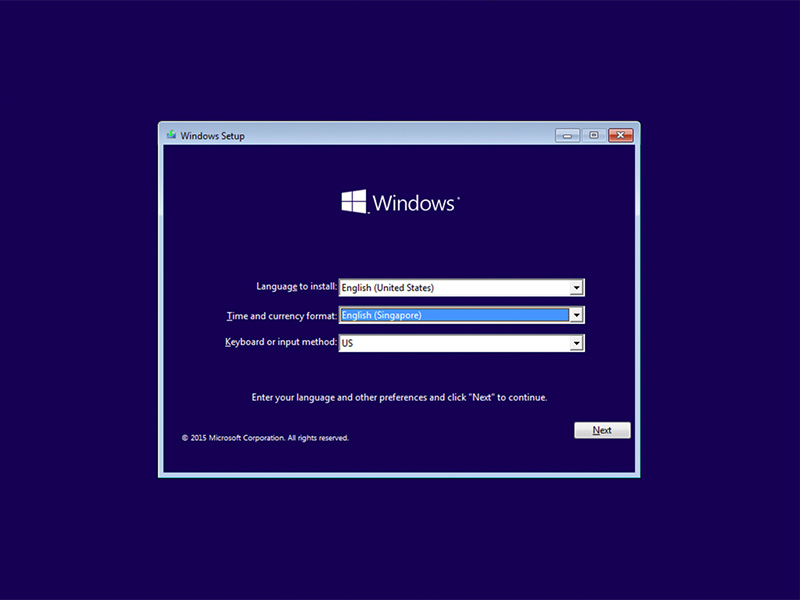
Microsoft Windows 10 Installer
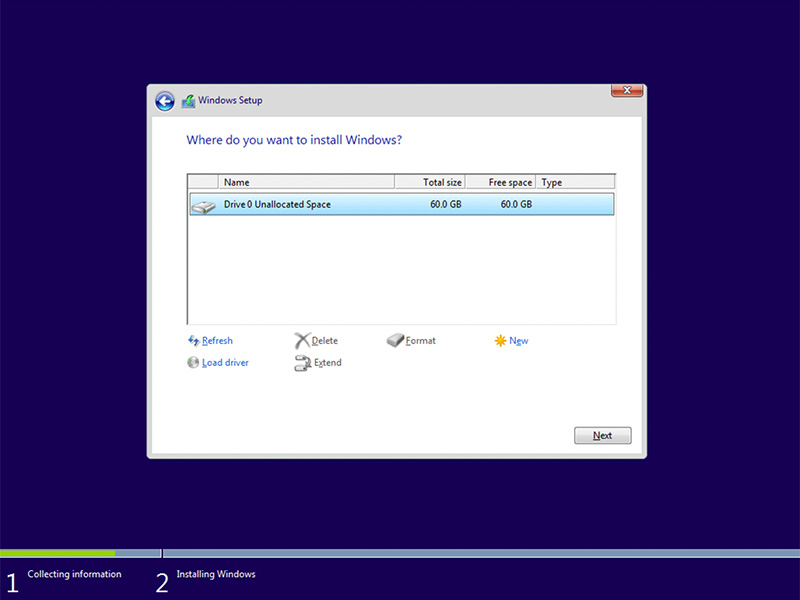
From there follow the Windows 10 installer prompts to install Windows 10 on the NAS server PC. It’s pretty straight forward and will only take about 20~30 minutes depending on your NAS server hardware. When you reach the end of the installation you will be greeted with this screen as shown below. Restart the system and remove the USB flash drive.
Furthermore make sure that you select the correct Hard drive where Windows 10 will be installed on, this should not be one of your main storage drives and a smaller SSD if possible.
Step #4 – Getting Windows 10 ready to be a NAS Server
The very first thing we want to do after installing Windows is update the system. This will ensure that the NAS server is the latest versions and will help with security and stability of the overall NAS server. To update Windows 10 open Start > Settings (⚙) and navigate to Update and Security.
While we wait for updates to download, its a good idea to make some changes to the system.
Change Windows 10 Power Management
By default your NAS Server will turn off when idle for a extended period of time, as a server we want it to stay on forever. so we need to change the default windows power plan. In the settings app navigate to System > Power and Sleep and set Sleep to never. you can leave the screen truning off as default as most probably we wont use a screen connected to the PC in any case.
Setting Up Windows Remote Desktop (RDP)
We would like to access the NAS server over the LAN as in most cases there will be no physical monitor attached. Windows unlike Linux comes with a very nice out of the box solution for remote desktop access provided you are using the Pro version.
Note: On Linux you need to look at How to setup Remote Desktop (x11vnc server) on Linux Mint/Ubuntu
In Windows System Settings under System look for Remote Desktop, Make sure to enable this feature.
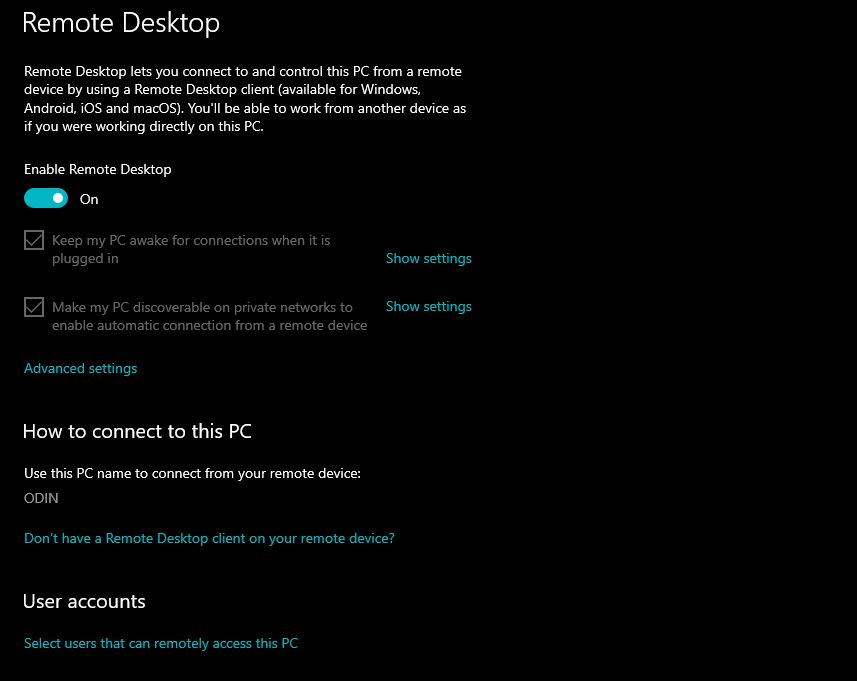
Pro TIp: If you want more than one users to have access to your NAS you can add them below using the Select Users that can remotely access this PC option.
Adding User Accounts to the NAS for Data Control (Optional)
By Default your user account are the only one that will have access to your shares and files. Its bad practice to give everyone admin level access a NAS server so what we will need to do next is add more standard user accounts. The way I like to do it is have a username for each person that will be using the NAS.
Therefore access to the NAS server can be controlled and User A cant access User B‘s data or files. You can also enforce better share restrictions if needed.
In the Settings App go to: Accounts > Family & other users > Add someone else to this PC
We will be adding local standard accounts for each person, this way you keep everything offline and there is no need for a Microsoft account for each user.
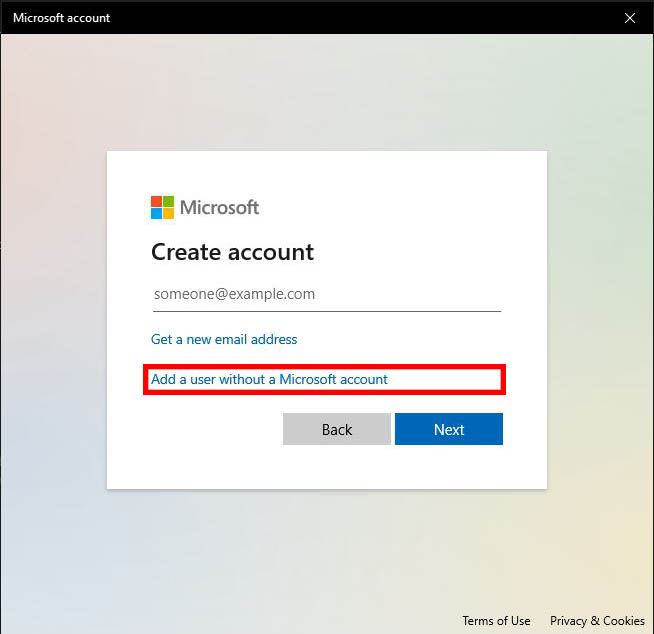
Make sure to select the “I don’t have this persons sign-in information” option

Next make sure to select Add User without Microsoft Account Option… DO NOT Create a new Microsoft Online account even though Microsoft would love to force you into creating one. This is a bad idea.
Fill in the Username, Unique for each user that you will give access to the server. These accounts and credentials will be used when we setup sharing later.

If you need to give any of these accounts remote Desktop access you can do that after creating local accounts.
Step #5 – Setting up a static IP address on the Windows NAS server
Setting up static IP addresses is required as we do not want the NAS servers IP to change on the network thus leading to us not being able to find it and shares to stop working… Its much easier to setup a Static IP on Windows than on a Linux NAS server for example: How to Setup a home network
In the Windows 10 Setting app head over to Network and Internet > Ethernet. While Wifi can technically be used its not advisable furthermore connecting with a physical LAN cable will give you higher speeds and more reliability.
Select your LAN Network Interface from the list.
Next, under Network Profile set the connection to Private. This will allow incoming LAN connection to be accepted by the NAS server and will also make the NAS server discoverable on the network by other computers.
Set metered connection to off. Unless you use some form of Internet on this connection that has a data plan and dont want to use it for updates…
Edit the IP settings next and fill out the information as follows. More on setting up Home networks here
For Example:
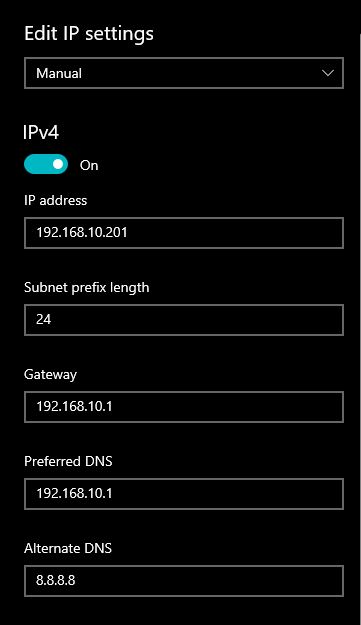
Note: Please change the IP addresses and ranges as per your environment For this Example I am using the following values that you need to change
- Set to Manual means we will be supplying the networking configuration and not use the DHCP servers issued data.
- IP Address is used to specify the NAS Server IP address on the network. Should be unique on the network.
- Subnet Prefix is usually 24 or 255.255.255.0.
- The gateway is your Routers address. Mine is 192.168.10.1
- Preferred DNS is usually also the routers address. But it can be set to use public DNS servers too such as 8.8.8.8
- IPv6 Disabled. We don’t need that for a simple LAN NAS Server
When done save and exit, The settings should be applied the moment you saved them and closed the box.
Preforming a Ping Test
To verify that you have internet and that everything is working. you can ping google using the following command in cmd. Open Start and type in cmd. start the app and then type in:
ping www.google.comLikewise the response we are looking for should look something like this: Note Received=100% with no loss. This means your internet is working
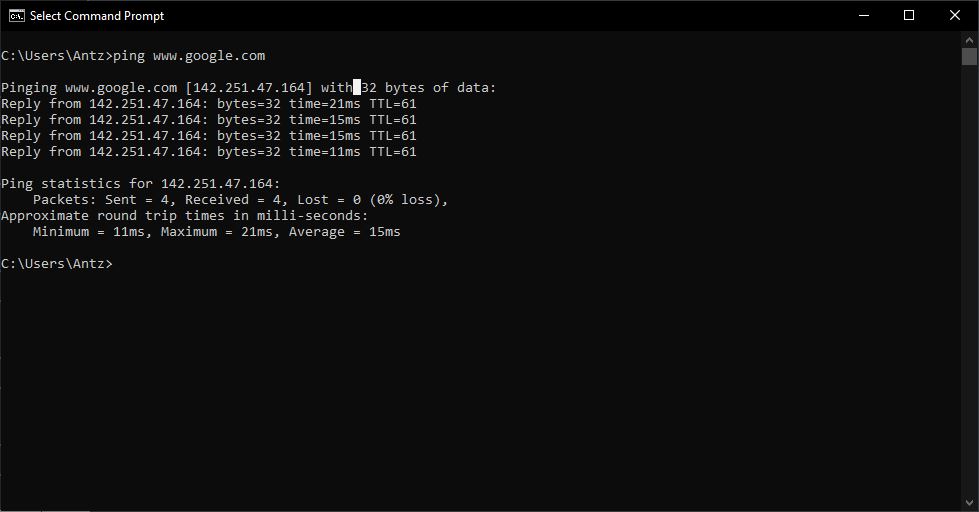
If you are getting a different output go double check your network settings and make sure you filled in your environments credentials that matched your networks setup. then try again. Else wise if you get a similar output as shown above you can continue.
Step #6 – Setting up a hard drives for NAS storage
Its time it setup the additional hard drives for the NAS server, make sure that your hard drives are installed in the NAS server before we continue.
You can follow our guide here on how to install hard drives into a PC for detailed step by step instructions on how to install and format drives in Windows.
NOTE: If you have more then one Hard Drive you will need to repeat the following steps for each hard drive you want to use on this server.
Step #7 – Setting up Windows File Sharing for the NAS server
After all your NAS server hard drive are connected and setup its time to create the actual file shares for the NAS server.
Start by opening up Windows Explorer and then open the first hard drive you wish to add shares to. Right Click on the empty space and create a new folder.
Next Rename the folder to something like Movies then, Select the newly created folder and right click on it to open up that folders options
From the popup list right at the bottom select the “Properties” Option.
- Select the Shares Tab at the top of the Properties Window.
- Select the Share button Option
- Now you can add each user account that will have access to the NAS server, Select a user account from the dropdown then click add
- Set user permissions for each user. Read only means users cannot add, remove or change files
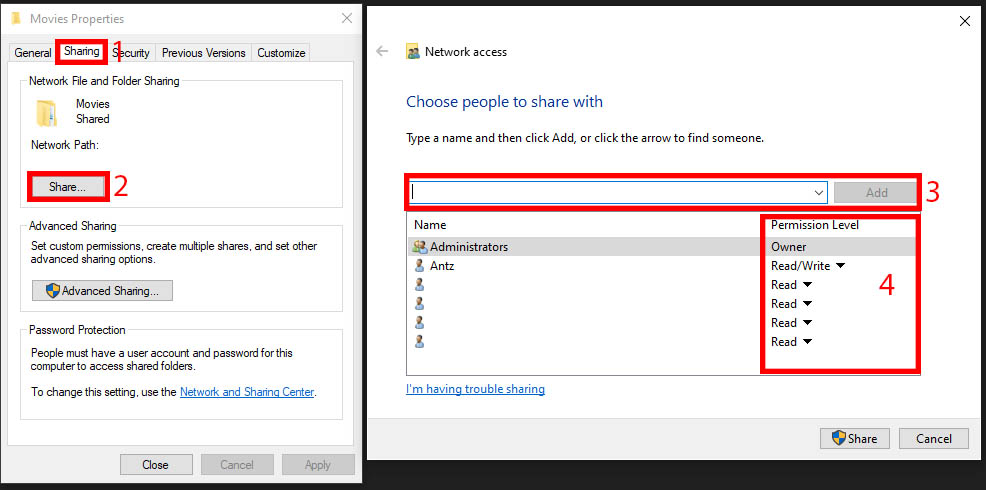
When Done hit Share and this Folder will now be shared on the NAS server.
Repeat the steps above or additional shares you would like as well as on other Drives…
For instance, I use one Hard Drive for Movies and then another one for TV series, additionally I also have a hard drive for music but you can put everything on one drive or choose to split the shares up. The choice is yours. furthermore you can also come back to this prompt windows to change and reconfigure any share you wish.
Step #8 – Connecting to the NAS server share
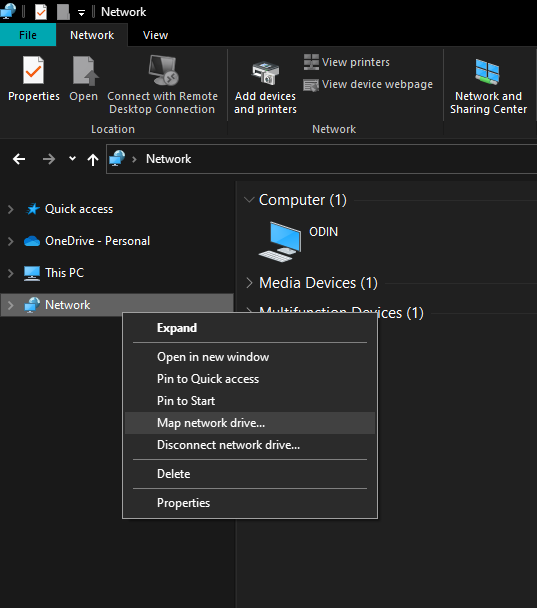
Lets connect to the NAS server. On a different Windows PC open up the file explorer app.
From the left panel locate the network category and right click on it, then select Map Network Drive as shown below:
Next select a drive letter and set the network path to your NAS share folder. What I like to do is assign a drive letter that is near the end at the alphabet because by default Windows will add new devices in alphabetical order as they are they.
I assign NAS drives starting in a reverse alphabetical order but that is completely optional. See below.
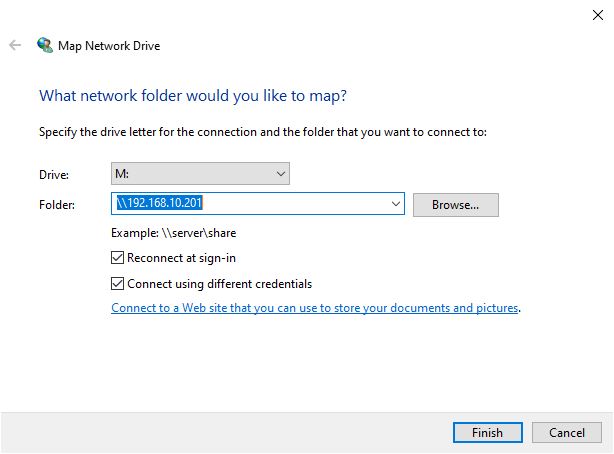
Once you have the IP entered for the NAS server click on Browse… to select which folders you want to map.
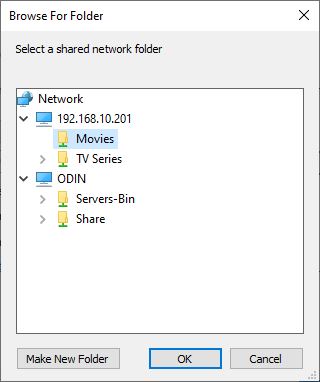
Click OK then Finish, Windows will ask you for the username and password next.
Enter your NAS server username and then the samba password you have set.
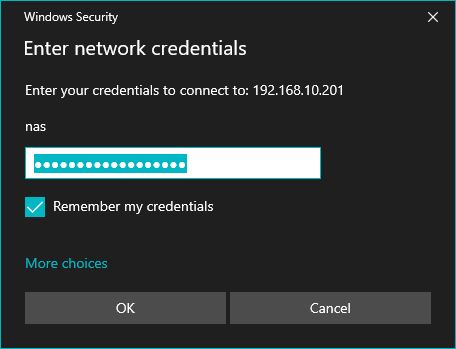
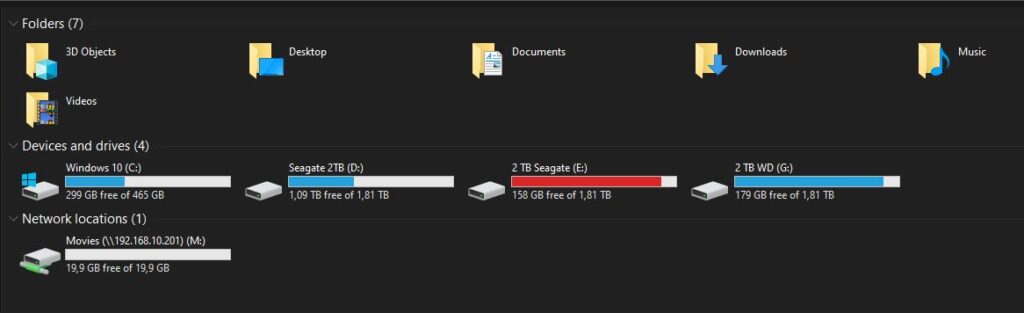
If the NAS server was setup correctly you should have access to the NAS servers mapped drive in Windows. It will now show up as a hard drive in Windows Explorer where you can now store, add, use and access files as long as the NAS server is online. As you can see below I have mapped out Movies as drive letter M: and its its now listed.
Remember that different users will need to use their credentials to Log onto the NAS server if you opted in to use multiple accounts.
The Conclusion
NAS servers are very useful, RAID would also come into play as redundancy for the server. This tutorial serves as a very basic setup mostly for home use.
If we gain traction on this article i will revisit a setup guide to setup RAID for the server for maximum data protection. Encryption can also be assigned to further safeguard the NAS. A guide can be found here : How to setup Windows Bitlocker Encryption
Have a look at Kodi next to set that up to work with you multimedia NAS server as a home entertainment system. Alternatively you there are other Linux distributions out there that;s sole purpose is to be a NAS. Some paid for and others free. Consider them maybe as well. Such as OpenMediaVault and TrueNAS
We also have a detailed guide on Setting up a simple NAS server on Linux Ubuntu should you wish to keeps costs down.


Pingback: Setting up a simple NAS server on Linux Ubuntu - Micro Fusion Insight