Plex Media Server has revolutionized the way we stream media, offering a seamless experience across various devices and platforms. With the introduction of RTMP (Real-Time Messaging Protocol) streaming, Plex users can now enjoy live video broadcasting with ease. This article will guide you through the process of leveraging Plex’s RTMP feature to stream live video content, from understanding the basics of Plex and RTMP to optimizing your streaming setup for the best experience.
Key Takeaways
- Plex Media Server, combined with RTMP streaming, allows for high-quality live video broadcasting across different devices and operating systems.
- To prepare for RTMP streaming, enable remote access on your Plex server and consider upgrading to Plex Pass for advanced features like HDR and beta builds.
- Setting up RTMP streaming involves accessing the Plex Web UI, adding media libraries, and configuring live TV and RTMP sources for seamless streaming.
- Optimizing the streaming experience may require adjusting quality settings and bandwidth, as well as troubleshooting common issues to ensure smooth playback.
- Expand your Plex streaming capabilities by integrating with smart TVs and other devices, exploring additional features and plugins, and building a comprehensive home streaming setup.
Understanding Plex Media Server and RTMP Streaming
Defining RTMP and Its Role in Streaming
Real-Time Messaging Protocol (RTMP) is a foundational technology for live streaming, enabling the delivery of audio, video, and other data between a server and a client. RTMP is crucial for maintaining low latency, ensuring that content is delivered in real time, which is essential for live broadcasts and interactive experiences.
RTMP was originally developed by Macromedia, which was later acquired by Adobe. Although the protocol was designed for high-performance transmission, the decline of Adobe Flash has led to a shift in how RTMP is used. Today, it serves primarily as an ingest protocol for streaming servers, which then redistribute the content using modern delivery methods like HLS or DASH.
- RTMP’s low latency makes it ideal for live events and gaming.
- It supports dynamic streaming, adjusting video quality in real time.
- RTMP is compatible with most encoding software and hardware.
RTMP continues to be a vital part of the streaming ecosystem, despite the evolution of technology and the end of Flash Player. Its role has transformed from a delivery mechanism to a reliable ingestion method that feeds content into various streaming platforms, including Plex.
Overview of Plex Media Server Capabilities
The Plex Media Server is a robust platform designed for streaming aficionados who wish to manage and stream their media content with ease across a variety of devices. Its transcoding feature is particularly noteworthy, as it allows for real-time conversion of media files, ensuring they are compatible with different platforms and enhancing the user experience.
Plex server capabilities extend beyond simple streaming. Here are some of the key features that make Plex a comprehensive media solution:
- Easy selection and sharing of media libraries
- Cloud sync support
- Parental control options
- Encrypted connections and support for multiple user accounts
- Video flinging between devices
- Media optimizer for Plex Media Player
- Audio fingerprinting and automatic photo-tagging
- Mobile sync for offline media access
Plex’s simple interface and organized libraries provide a seamless way to access media, making it an indispensable tool for a unified streaming experience.
Whether you’re looking to stream music, movies, or photos, Plex provides a centralized solution that caters to all your media needs. With its compatibility across Linux, macOS, and Windows, Plex ensures that your media is just a few clicks away, regardless of the operating system you use.
Compatibility of Plex with Various Operating Systems
Plex Media Server’s versatility extends to its compatibility with a wide range of operating systems, ensuring that users can enjoy a seamless streaming experience regardless of their preferred platform. Plex can be installed on Linux, macOS, Windows, and more, offering a simple interface that organizes media into beautiful libraries for easy access.
Linux distros like Ubuntu offer a variety of software, including Google Chrome. Linux has improved desktop user experience, welcoming Windows and MacOS users. This inclusivity is pivotal for users who operate across different systems but wish to maintain a consistent media library and streaming service.
Plex’s transcoding capabilities are particularly noteworthy, as they allow for on-the-fly conversion of media files, ensuring smooth playback across all devices.
The table below outlines the compatibility of Plex with various operating systems:
| Operating System | Compatibility |
|---|---|
| Linux | Full Support |
| macOS | Full Support |
| Windows | Full Support |
By supporting a range of operating systems, Plex ensures that users can access their media libraries seamlessly from any device, making it an indispensable tool for a unified streaming experience.
Preparing Your Plex Media Server for RTMP Streaming
Enabling Remote Access and DRM
To fully utilize Plex Media Server’s capabilities, enabling Remote Access is crucial. This feature allows you to access your media library from any location, not just within your home network. To enable Remote Access, navigate to Settings > Remote Access in the Plex Web UI and follow the on-screen instructions.
Enabling DRM is essential for Plex’s WebUI to function correctly, especially when using browsers like Firefox. Without DRM, you may encounter issues such as the interface malfunctioning or displaying error messages. It’s important to note that enabling DRM is a straightforward process that typically involves a prompt in your browser, which you must accept.
While Plex Pass is optional, it enhances your streaming experience by offering additional features such as HDR options and access to Beta builds.
Lastly, if you’re operating Plex on an Ubuntu system, ensure that your firewall settings allow traffic through Plex’s default port, which is 32400. This can be done by executing sudo ufw allow 32400/tcp in the terminal. Remember, a well-configured server ensures a seamless streaming experience for you and your viewers.
Configuring Bandwidth and Transcoding Settings
To ensure a smooth streaming experience, it is crucial to configure your Plex Media Server’s bandwidth and transcoding settings appropriately. Adjust the server’s transcoding settings to match the capabilities of your hardware, which can be found under Settings > Transcoder. For instance, users of the Raspberry Pi 5 may find it beneficial to tailor these settings for optimal transcoding of DVB-T2 Full HD/50 fps HEVC streams.
When considering bandwidth, remember that Plex may transcode videos to a smaller format to facilitate streaming. To direct stream content, the bandwidth settings should be adjusted to at least twice the bitrate of the video. This accounts for the variability in bitrate during different segments of the video. The settings for this can be located under Settings > Server.
- Optimize Streaming Performance
- Enable Subtitles
- Monitor Server Performance
- Backup Your Configuration
It’s important to monitor server performance regularly, utilizing the built-in dashboard or third-party tools to view real-time bandwidth usage and diagnose potential issues. Additionally, backing up your Plex configuration and database is recommended, especially before implementing significant changes.
Upgrading to Plex Pass for Enhanced Features
Upgrading to Plex Pass is a pivotal step for users seeking to unlock the full potential of Plex Media Server. Plex Pass provides access to a suite of premium features, enhancing the overall streaming experience. For a nominal fee of $5/month, subscribers can enjoy benefits such as HDR options and early access to Beta builds.
Plex Pass is particularly beneficial for users operating on Ubuntu, as it offers premium options tailored to this operating system. To upgrade, users may encounter a prompt within the Plex Web UI; however, this step is optional and can be bypassed if desired.
The advantages of Plex Pass extend beyond enhanced visual quality and software updates. Subscribers gain access to the Ultimate DVR feature, exclusive to Plex Pass, which allows for watching and recording broadcast TV. Additionally, Plexamp, an app designed for audiophiles, becomes available, further enriching the user’s media library.
Upgrading to Plex Pass not only elevates the user’s streaming capabilities but also ensures a more robust and feature-rich media management system.
For those setting up a home network with Ethernet cables, Plex Pass can significantly improve streaming speed and reliability, especially when paired with a Linux server and efficient package management.
Setting Up RTMP Streaming on Plex
Accessing the Plex Web UI
To begin streaming live video using Plex’s RTMP feature, the first step is to access the Plex Web User Interface (UI). Navigate to the Plex UI by entering the server’s IP address followed by :32400 in your web browser, such as http://{server-ip-address}:32400. Upon reaching the Plex sign-in page, you can log in with your existing account or register a new one if you are a first-time user.
Once logged in, you will be greeted by the initial configuration setup, which provides a brief overview of how Plex operates. It is essential to ensure that Digital Rights Management (DRM) is enabled, especially when using browsers like Firefox, to avoid any malfunctions with the Plex Web UI.
After completing the initial setup, you may encounter an optional prompt to upgrade to Plex Pass. While this step is not mandatory, Plex Pass subscribers gain access to additional features such as HDR options and Beta builds.
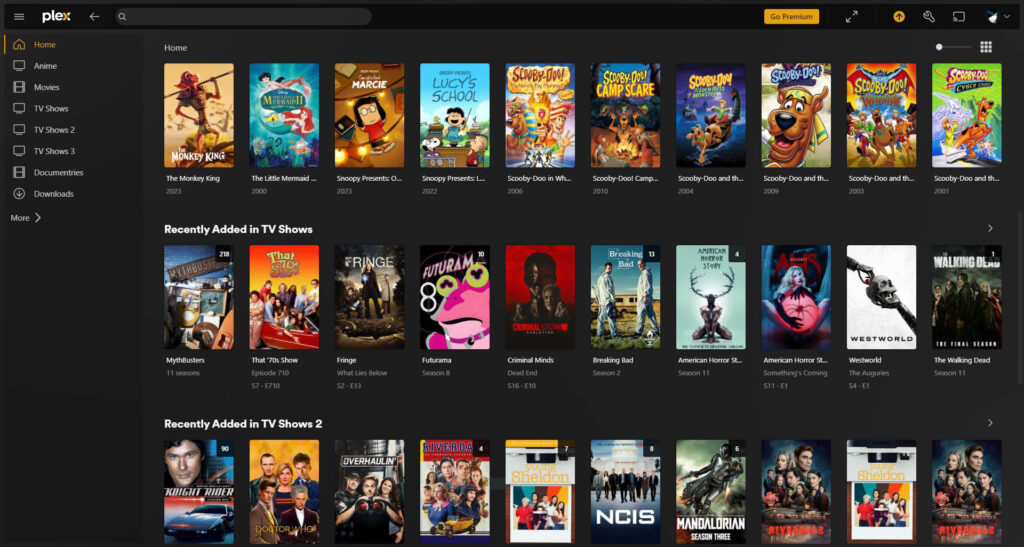
Finally, you can either add a Media Library immediately or skip this step to finish the setup. Clicking the DONE button will take you to the Plex Dashboard, where you can manage live TV, movies, shows, podcasts, and music.
Adding Media Libraries to Plex
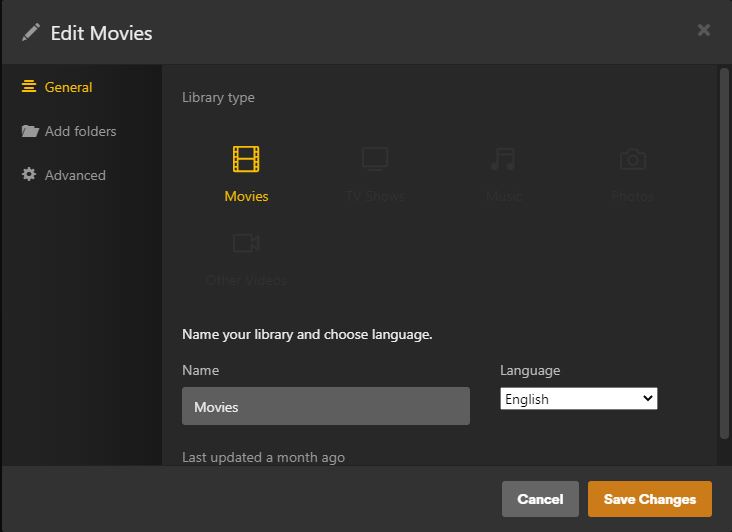
Once you have accessed the Plex Web UI, the next crucial step is to add your media libraries. This process is straightforward and essential for organizing your content within Plex. Click the ‘ADD LIBRARY’ button to initiate the process, and select the appropriate media type—such as TV shows, movies, or music—to ensure your media is organized correctly.
- Organize Media Libraries: It’s important to name your libraries thoughtfully and organize your media files in a logical structure. This will facilitate easier navigation and a more enjoyable streaming experience.
- Metadata Management: Customize your metadata settings under
Settings > Libraryto ensure that the correct information and artwork are displayed for each item in your library.
Once your folders are added, you may access advanced options to further tailor Plex to your preferences. Remember, these settings can significantly impact how your media is presented and accessed.
While Plex has discontinued its official plugin directory, you can still enhance your Plex experience by installing plugins manually. These can add functionality and features to your server, though it’s important to ensure they are compatible and safe to use.
Configuring Live TV and RTMP Sources
Once you have your Plex Media Server up and running, the next step is to configure Live TV and Plex RTMP sources. This process involves adding your media sources to Plex, which can include live television feeds and RTMP streams.
To add an RTMP source to Plex, you’ll need to obtain the RTMP URL and stream key from your streaming provider. These details are essential for Plex to connect to the live stream. Here’s a simple step-by-step guide:
- Access the Plex Web UI and navigate to the ‘Live TV & DVR’ section.
- Click on ‘Set Up Plex DVR’.
- Choose ‘Add Device Manually’ and input the RTMP URL and stream key.
- Follow the prompts to complete the setup and scan for channels.
It’s important to ensure that your network settings allow for RTMP traffic and that your server has sufficient bandwidth to handle streaming without buffering issues.
Remember to review the compatibility of your server setup with RTMP streaming. Recent comments on setting up Apache and NAS servers on Linux Ubuntu suggest that there may be specific configurations required for optimal performance.
Optimizing the Streaming Experience
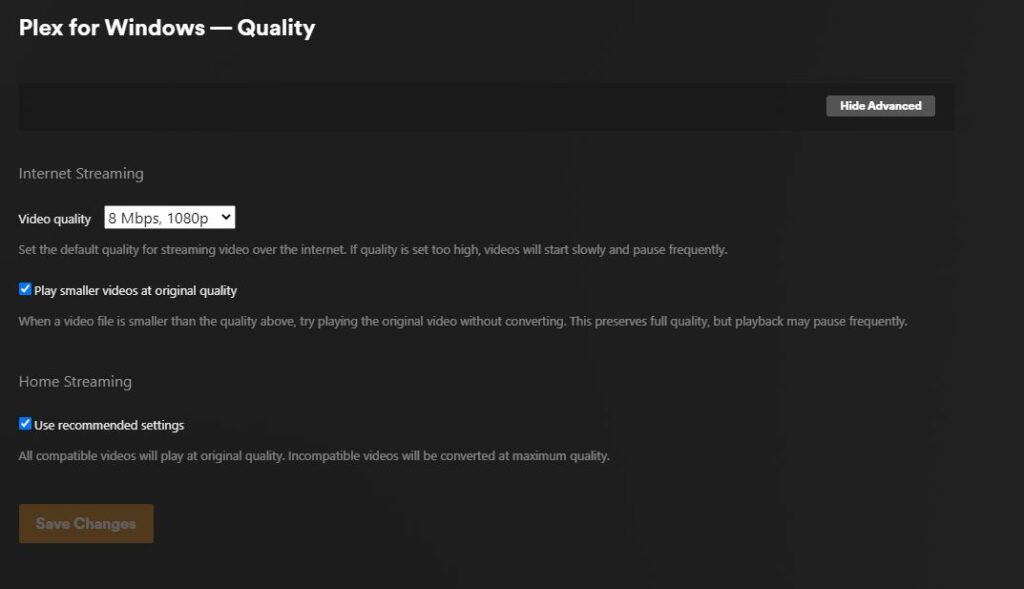
Adjusting Quality and Bandwidth for Optimal Streaming
To ensure a seamless streaming experience on Plex, it is crucial to adjust the quality and bandwidth settings according to your network’s capabilities. This involves configuring the server’s transcoding settings, which can be found under Settings > Transcoder. Transcoding is essential for converting media to a compatible format and resolution for the client device, but it requires significant processing power and can affect server performance.
For users who prefer subtitles, Plex provides options to enable and configure them under Settings > Server > Languages. Subtitles can increase the enjoyment and accessibility of content for many viewers.
Monitoring server performance is key to optimizing streaming quality. The Plex dashboard offers insights into real-time bandwidth usage, which is critical for diagnosing and resolving streaming issues.
When using third-party players like Infuse, remember that they may attempt to direct stream content, bypassing the need for transcoding. However, to ensure direct streaming, the bandwidth settings in Plex might need to be adjusted to twice the bitrate of the video. This accounts for the variability in bitrate during different segments of the video playback.
Troubleshooting Common Streaming Issues
When encountering issues with RTMP streaming on Plex, it’s essential to methodically troubleshoot to identify and resolve the problem. Restarting your Plex server can often rectify local streaming issues, especially if traffic is being incorrectly routed through Plex’s relay service. This is a common fix that can restore your streaming experience to optimal performance.
To further optimize streaming performance, adjusting the server’s transcoding settings is crucial. Navigate to Settings > Transcoder to tailor these settings to your hardware’s capabilities. Additionally, if subtitles are desired, they can be enabled and configured under Settings > Server > Languages. Monitoring server performance is also beneficial; use Plex’s dashboard or third-party tools to view real-time bandwidth usage and diagnose issues.
It’s important to be aware of Plex Relay, a service designed for remote streaming. If active, it can lead to playback issues due to its low bandwidth cap. Disabling Plex Relay on your device can prevent these issues and enhance your streaming quality.
Lastly, consider the advice from community forums, such as increasing the bitrate to lessen glitches after updates to streaming devices like the TC Mini 4K. Maintaining a 3 second keyframe rate and experimenting with Variable Bit Rate (VBR) instead of Constant Bit Rate (CBR) can also be beneficial, as some CDNs prefer CBR for server efficiency.
Leveraging Plex Pass for Advanced Streaming Options
Plex Pass is the premium tier of the Plex streaming service, offering a suite of advanced features that enhance the streaming experience. With Plex Pass, users gain access to high dynamic range (HDR) options, ensuring a richer visual quality for compatible content. Additionally, Plex Pass subscribers have the privilege of accessing Beta builds, which include the latest features and improvements before they are released to the general public.
Plex Pass also unlocks exclusive apps such as Plexamp and Plex Dash, designed for audiophiles and for monitoring server statistics, respectively. These apps cater to users who demand more from their media server, providing tools that go beyond basic streaming functionalities.
Upgrading to Plex Pass not only elevates the visual and audio experience but also introduces tools for a more informed and controlled streaming setup.
For those considering the upgrade, here is a quick overview of Plex Pass exclusive features:
- Plexamp (Music app for audiophiles)
- Plex Dash (Server monitoring and management)
- Ultimate DVR (Watch and record broadcast TV)
- Early access to new features (Beta builds)
While Plex offers a robust streaming platform even without Plex Pass, the additional features can significantly expand your capabilities, making it an attractive option for serious streaming enthusiasts.
Expanding Your Plex Streaming Capabilities
Integrating with Smart TVs and Other Devices
Plex Media Server offers extensive compatibility with a variety of devices, ensuring that your streaming experience is seamless across different platforms. Integrating Plex with smart TVs and other devices is a straightforward process that enhances your home entertainment system.
To begin, ensure that your device is running a compatible version of the Plex application. Here’s a list of supported devices and their minimum version requirements:
- Amazon Fire TV (v10.5.0 and newer)
- Android mobile (v10.5.0 and newer)
- Android TV (v10.5.0 and newer)
- Apple TV (v8.29 and newer)
- iOS (v8.29 and newer)
- PlayStation (v5.74.0 and newer)
- Plex Web App (v4.120.1 and newer)
- Roku
- Smart TV supported models:
- LG (v5.74.0 and newer)
- Samsung (except Tizen 2.4)
- VIDAA (Hisense)
- VIZIO
- Xbox (v5.74.0 and newer)
Once you have verified compatibility, the next step is to activate Plex on your device. This typically involves downloading the Plex app from your device’s app store, signing in with your Plex account, and linking the device to your Plex Media Server. Activation is a simple process that can usually be completed in a few minutes.
By integrating Plex with your smart devices, you not only centralize your media but also gain the flexibility to enjoy your content on any screen within your network.
Remember, the platform also supports high-quality video streaming and live streaming on multiple devices, ensuring that your viewing experience is of the highest quality, whether you’re watching on a mobile device, desktop computer, or smart TV.
Exploring Additional Plex Features and Plug-ins
Plex extends its functionality beyond the core media server capabilities through various features and plug-ins. Plexamp stands out as an app designed for audiophiles, offering an enhanced audio experience. While Plex has phased out its official plugin directory, users can still manually install plugins by adding them to the Plug-ins directory of their Plex installation.
The array of features Plex offers is impressive, including parental controls, cloud sync, and encrypted connections. Notably, Plex supports ‘flinging’ of video from one device to another and boasts a media optimizer for the Plex Media Player. For those interested in organization and metadata, Plex provides audio fingerprinting and automatic photo-tagging.
Plex Pro Downloads offer exclusive access to apps like Plex Dash, which is a custom app for remote server monitoring, available only with Plex Pass.
To further enhance your Plex experience, consider the following plug-ins and features:
- Parental control functionality
- Cloud sync support
- Encrypted connections with multiple user accounts
- Media optimizer for Plex Media Player
- Audio fingerprinting and automatic photo-tagging
- Mobile sync for offline media file access
Building a Comprehensive Home Streaming Setup
Creating a comprehensive home streaming setup with Plex involves more than just installing the software; it requires a thoughtful integration of hardware, network infrastructure, and user preferences. Ensure your network is robust and reliable, as streaming high-quality video demands significant bandwidth. Consider upgrading your router to a model that supports the latest Wi-Fi standards and offers Quality of Service (QoS) settings to prioritize streaming traffic.
For a seamless experience, centralize your media content by organizing it into well-defined libraries within Plex. This not only makes navigation easier but also enhances the efficiency of the streaming process. Additionally, take advantage of Plex’s compatibility with a wide range of devices by setting up your server to communicate with smart TVs, game consoles, and mobile devices.
- Optimize server settings for transcoding
- Regularly update Plex to the latest version
- Utilize Plex Pass for premium features
By following these steps, you will be on your way to building a Plex ecosystem that caters to all your entertainment needs, offering a personalized and uninterrupted streaming experience.
Conclusion
In summary, Plex’s RTMP feature offers a versatile and user-friendly platform for live video streaming, catering to both novice and experienced streamers. Throughout this article, we have explored the intricacies of setting up and utilizing Plex’s RTMP capabilities to broadcast live content seamlessly. By following the outlined steps and considering the tips provided, users can enhance their streaming experience and share their media with a broader audience. Plex’s integration with various devices and operating systems, coupled with its robust transcoding abilities, ensures a high-quality streaming service that is both accessible and reliable. As we conclude, it is evident that Plex Media Server remains an invaluable tool for anyone looking to delve into the world of live video streaming.
Frequently Asked Questions
What is RTMP and why is it important for streaming?
RTMP stands for Real-Time Messaging Protocol. It’s a protocol designed for high-performance transmission of audio, video, and data between a server and a client, like a web player. It’s important for streaming because it ensures low-latency communication, which is crucial for live broadcasts.
How do I enable remote access on my Plex Media Server?
To enable remote access on Plex, you need to go to the server settings, navigate to the ‘Remote Access’ section, and click on ‘Enable Remote Access’. This allows you to access your Plex server from other devices over the internet.
What are the benefits of upgrading to Plex Pass?
Upgrading to Plex Pass provides enhanced features such as HDR support, access to Beta builds, advanced user controls, offline media access, and more. It also supports the development of Plex.
How can I access the Plex Web UI?
You can access the Plex Web UI by navigating to http://IP_address:32400 on your web browser. Once there, you can sign in and manage your media, watch live TV, and configure your server settings.
What should I do if my Plex media doesn’t play smoothly when streaming remotely?
If you’re experiencing playback issues when streaming remotely, try adjusting your bandwidth settings in Plex to be twice the bitrate of the video being streamed. Also, ensure that your server is powerful enough to transcode the media if necessary.
Can I use Plex on different operating systems?
Yes, Plex Media Server can be installed on various operating systems including Linux, macOS, and Windows. Plex offers a simple interface and organizes your media into libraries, making it easy to access on any compatible device.


Pingback: RTMP server guide: How to set up a free RTMP server - simulcast.stream